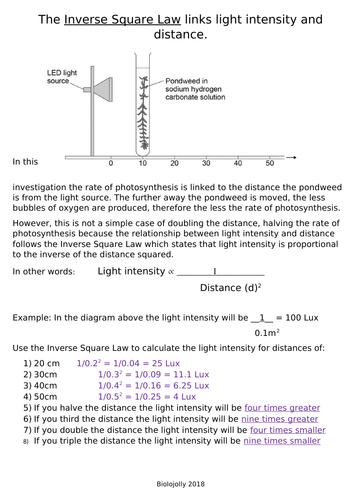
Written for GCSE AQA Trilogy Biology paper 1 Higher.
Useful in a mixed ability class for the students who will be doing higher paper. All information is on the work sheet so higher students should be able to work through this on their own or with little teacher input.
Need to have completed work on photosynthesis and limiting factors.
Mark scheme included.
(Worked example updated to include units.)
Powerpoint slide to add into any lesson presentation on scale / microscopy / orders of magnitude / standard form. Also 4 on a page to print off on labels to be stuck inside exercise books for easy reference. Formatting looks a bit off on the preview but it prints off fine.
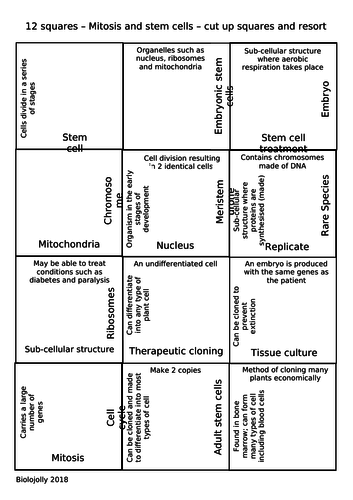
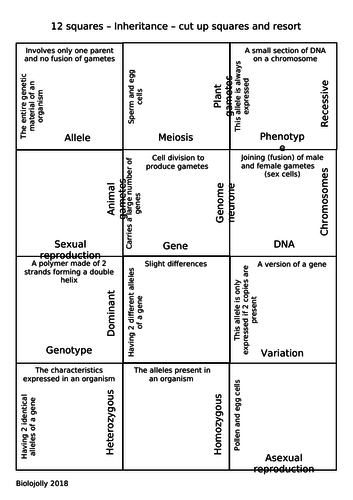
Differentiated card sorts. Sheet 1 has less text than sheet 2. Could be KS3 and KS4 or less and more able. I use them as starter activities. Print on card and cut up, put in small zip bags. Could be used as a starter to assess prior knowledge or as a plenary to assess learning in the lesson.
Lesson presentation on the need for handwashing.
Slide 2 is a learning framework.
Slides 3-4 are for you to print off for yourself. I’ve just copied and pasted the text that accompanies the video clips that are hyperlinked on those slides.
Slide 5 shows how to set up agar plates to grow microbes. Use permanent markers to label the bottom of the agar plate. Add name to the rim of the lid then keep lid on with 2 small pieces of tape. DO NOT SEAL. When microbes grown you will be able to see through the lid (or base) without opening it.
DO NOT OPEN CONTAMINATED PLATES. When plates have been observed in a second lesson, use slide 6 to draw microbial growth and conclusions. Label diagrams identifying differences between bacterial colonies and fungal growth. COLLECT PLATES AND GIVE TO TECHNICIAN TO AUTOCLAVE.
This could be done as a revision task to assess understanding of concepts. I have found it most useful as an alternative homework task. Students either love it or hate it. Those that love doing these want to do more. Some just don’t get it. I have always found that more students do the homework if they have a choice of activities. Consider this as one alternative. I usually print off 4 slides to a page. Slides 1-3 and one other. Print off landscape so that each slide is easier to read.
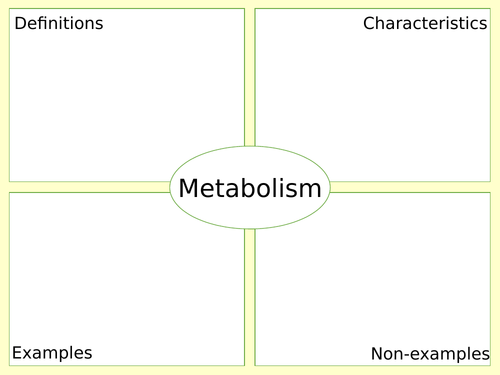
This is not an original idea. Plenty to read about it on-line. But I put this slide together to use as a template. Just change the word in the middle and print off.
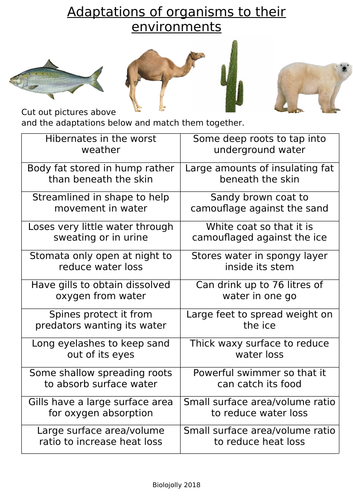
Four different organisms and some of their various adaptations. Cut out, match up and stick in exercise book. Could also be done as a card sort (starter or plenary)
Easy to differentiate LAPS - cut off bottom 4 boxes. Aimed at KS3 and GCSE.
Powerpoint presentation with lesson on microscopes and a video link to clip explaining light, scanning and transmission electron microscopes. Then activity to sort sizes and link to type of microscopes needed to see things. Answers are on the presentation.
There is a worksheet for students to fill in as they go around the room to look at the lists of mis-ordered words. This always takes longer than I expect. It is worth putting a time limit on time spent at each list. Leave plenty of time to go through answer slides so that you can discuss any disagreements.
It is worth having some electron microscope images for students to guess at as a plenary. The one I use was not done by me so I haven’t included it but I am fairly sure I downloaded it from TES resources. It is called ‘Amazing images through the eyes of the electron microscope’ and the author is Craig Prestidge.
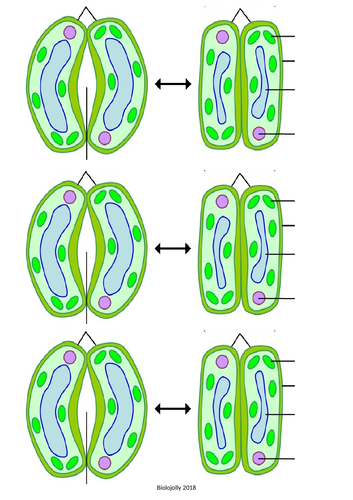
This is just four slides so not a whole lesson but hopefully you will be able to copy them into your own lessons and I have done the fiddly work for you. This could be used as a plenary to apply learning to a new situation i.e. labelling a real micrograph of a plant cell. The first two slides show the cell labelled and unlabelled. You need to show this in slideshow in order to label the cell one sub-cellular structure at a time. The second two slides are a cloze activity. Again answers will fill in one at a time in slideshow.
I print off the cells onto label sheets, 4 to a page. I’ve supplied these. Stick into centre of the page so that you can add labels around it.
Some of my students need missing words on the table in front of them, so I have supplied these. Some also need to fill in gaps on a sheet due to time constraints or poor/slow handwriting, so I’ve supplied these as well.
This is preparation for the Reaction time required practical in AQA GCSE Trilogy.
Slide 1 is a learning framework for the lesson.
Slide 2 provides the key words for the lesson. Can simply be a visual aid to introduce the vocabulary. I tend to print this slide off for individuals in the class who would benefit from their own copy and for TAs. More able students use this as a basis for a mind map to make links between key words.
Slide 3-5 are pictures of root hairs
Slide 6-7 describe transpiration
Slide 8-10 show how stomata work
Slide 11 has a link to a YouTube video on 'sticky water’
Slide 12 explains transpiration in more detail
Slide 13 Questions
Slide 14 diagram of a potometer -need to explain how it works
Slide 15 gives a method for setting up a practical on surface area of leaves and rate of transpiration.
Two sheets supplied one has diagrams of transpiration to go with slide 12 and the other has diagrams of open and closed stomata to go with slides 9-10. I include these simply because I find them useful for particular students with my mixed ability classes. If I know a particular student makes a meal of using glue, I will print directly onto labels for them. I keep a supply of 4 labels to a page for this purpose.
I wrote this song in the shower one morning. It just came to me. (Sing to the tune of Frere Jacques.) At that time I had a particularly joyful class who I thought would like it, as a bit of fun. However I have since used it with classes of all ages and all abilities. We have also done very simple actions. ( Not as popular with the older ones.) I have even witnessed students mouthing the words during an exam! I hope you have as much fun with it as I have done over the years.
This is preparation for the Reaction time required practical in AQA GCSE Trilogy.
Slide 2 is a learning framework for the lesson.
Slide 3 provides the key words for the lesson. Can simply be a visual aid to introduce the vocabulary. I tend to print this slide off for individuals in the class who would benefit from their own copy and for TAs. More able students use this as a basis for a mind map to make links between key words.
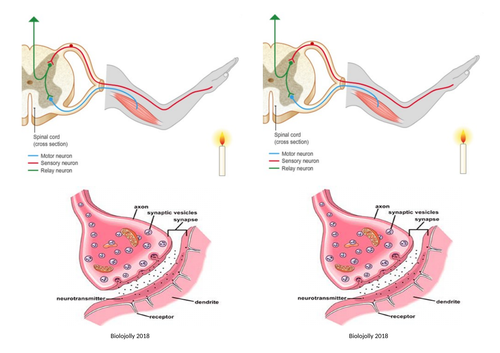
Slide 4 is a picture diagram of a reflex arc.
Slide 5 shows a simplified version of previous slide with questions to answer. Differentiate by number of examples given in Q4.
Slide 6 is a fill in the gaps cloze.
Slide 7 inserts the answers to slide 6.
Slide 8 shows a synapse.
Slide 9 gives details of each neurone.
Slide 10 is a literacy activity.
Slide 11 - instructions for a simple ruler drop test.
This is a short practical so that students understand what to do for the Required practical next lesson.
Slide 12 - Plenary
Two sheets supplied one has the diagrams and the other has the questions and cloze. I include these simply because I find them useful for particular students with my mixed ability classes. If I know a particular student makes a meal of using glue, I will print directly onto labels for them. I keep a supply of 4 labels to a page for this purpose.
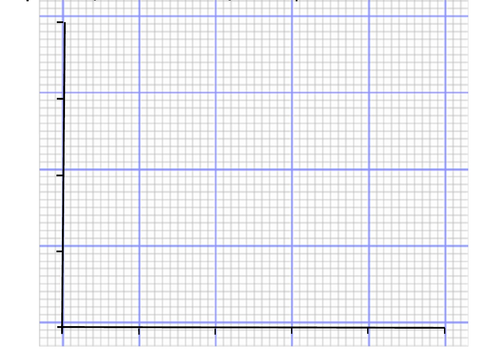
Useful for less able students who struggle to draw axes and identify where to put the numbers. Don’t be put off by the formatting on the preview, it downloads and prints off fine.
This worksheet allows students the opportunity to decide if an adaptation is structural, functional or behavioural. Written with AQA Trilogy in mind. Also included Powerpoint slide with answers to be used for self or peer assessment of worksheet.
This is written for AQA Trilogy Ecology unit.
Ahead of lesson - print up card sorts. I suggest you do this on different coloured card, so that if two sets on same desk they will not get muddled and any odd cards from floor are easily be matched up with the correct set.
Slides 5-12 - could be printed off (preferably in colour) on separate sheets and laminated so they can be used in the future.These could be spread around the room for students to visit or passed around tables in rotation. An alternative would be to print 4 slides to a page so that they can be cut up and stuck in books. The way you do this will depend very much on the class you are working with.
Slide 1- learning framework for the lesson
Slide 2 - starter activity - watch video clip and identify different
habitats
Slide 3 - Ecology four words to learn, then card sort with 8 words.
Slide 4 - differentiated questions to complete with activity
LAPS red; MAPS green; HAPS purple
Leave this on screen as students complete different habitats.
Plenary - Could use different coloured highlighter pens to identify habitats, species (biotic) and abiotic factors.