Teaching Art is a feast into a of colour, line, texture, space and shape. By encouraging a visual exploration in my learning I love developing a creative approach to learning in the classroom. By encouraging different techniques and an understanding of art I hope to help students appreciate visual learning more. I hope you enjoy my uploads and can use them. Please contact me if you require any further information.
Teaching Art is a feast into a of colour, line, texture, space and shape. By encouraging a visual exploration in my learning I love developing a creative approach to learning in the classroom. By encouraging different techniques and an understanding of art I hope to help students appreciate visual learning more. I hope you enjoy my uploads and can use them. Please contact me if you require any further information.
To understand what the elements of art are: line, shape, colour, texture, space,value and tone and where PATTERNS appear in nature. To learn about different terms in pattern making and how to make a repeat design To make a page of patterns, combining cultural patterns and everyday patterns
Create a title on your page called ‘Pattern’
Describe the word pattern using keywords- looking at examples of patterns and how one makes a pattern
Students are asked to list 3 areas where pattern can be recognised in everyday life. There is an understanding also in slidesto explain what the elements of art are, line, colour , shape and how to make patterns
Students are asked to research the internet pictures that show different words relating to patterns
students are given tasks to make a display slide on a Powerpoint showing the following patterns.
Students research the names below and find an example of this type of pattern online - then save a copy of the picture.
Students make their own powerpoint on PATTERN and write out the words below of different patterns and paste an example of this pattern ,on a piece of paper to draw your own pattern for each.
Flowery pattern
Geometrical pattern
Variegated pattern
Organic pattern
5.Linear Pattern
Symmetrical pattern
Radial balance pattern
Informal balance pattern
Check pattern
Animal pattern
Paisley pattern
Chevron pattern.
Basketweave pattern
Repeat pattern
A sculptural project or life drawing project inspired by the famous British artist, the drawings of Henri Moore.
Looking at the ink wash drawings of Henry Moore in detail his presentation shows loads of examples of the way he sketched his body shapes and looks at the way he simplified the bodies into organic shapes.
This is a good presentation to show KS3 how to simplify and to distort drawings of different poses into organic shapes. This can be used for KS3 making abstract body sculptures and shows how to reduce, simplify, re-arrange and to distort drawings into a pleasing harmonious shape.
It can also be used for A-level students doing life drawing and giving ways to explore different wax resist techniques with ink washes.
There are loads of pictures of Henri Moore’s Drawings and hopefully will inspire outcomes and enable students to develop some confidence when drawing figures.
This presentation can be bought with the Life drawing presentation.
This is a GCSE coursework project on a theme called ‘Surfaces’ giving you loads of ideas to develop with your students. It deals with developing ideas to gain confidence with different media and to develop sketchbook skills. It is about the process of developing the Examboard Assessment Objectives AO1- Develop ideas from artists and AO2 Exploring different media for coursework.
It gives a set of observational photographs to work from for Assessment Objective 3 - AO3.
It gives you different artists to look at to gather resources on and students will be able to use these as artist studies and begin to explore these artists techniques and do studies in their book. This if for Assessment Objective 1 and students can gain ideas on ways to develop their skills in techniques through these artists and in so doing ‘Develop ideas’.
There are further sets of techniques for Assessment Objective 2 and one can explore, experiment with ideas for developing ‘creativity’ in your classroom. That is, exploring a number of different media and showing how one can take risks with the media in order to create an interesting effect. There are slides giving you a set of techniques to use - explaining how to use media in creative ways. These techiques link with the list of artists given on slides to start with.
The experimental techniques are:
=white paint printing,
=wax and scratch,
=distressing surfaces,
=dripping paint, scraping paint,
=using sgrafitto,
=cardboard collaging
=layering digital manipulations with collage
=using fabric and sewing into surfaces.
Emphasis here is that students should play and take risks and experiment with different materials and begin to layer and be able to draw on different surfaces.
It is a fun set of techniques at GCSE and/or A-level with students using their own resource material and developing their confidence and fluency with making creative experiments. Students can develop their own responses using the techniques.
There are questions so that students can write a final evaluation.
After this set of work students should be confident and independent enough to find their own photographs and to develop their own idea for a final piece for Assessment Objective 4.
A detailed Celtic medieval project looking at examples of how to draw in a simplified stylised way and to represent one’s own family, friends, animals in an illuminated letter.
Students make up two large letters in pencil crayons learning to draw stylising their own pictures and study a number of medieval examples of letters and learn to elongate and to distort their own pictures capturing a simple picture with expression.
Students draw this on white paper their two initials and add in all the medieval patterns. There are loads of examples on this powerpoint of various medieval letters and illuminated manuscripts to copy from to give the students enough resources to work from .
There are also tasks and steps to follow for teachers. An enjoyable project that also should include how to shade carefully using light and dark tones with pencil crayons as part of unit of work and how to draw using warm and cold colours.
The work is finally presented cut out and pasted onto black paper and students can then use oil pastels and further decorate their presentation to create the intricate pattern work of an illuminated manuscript letter.
The powerpoint first of all gives you some techniques to use with paper and students to make a sample board of the techniques.
Homework task: Zentangle …see powerpoint example
Students then go on to draw out an insect and there are symmetry templates for you to use to develop insects.
There are also lots of different resources and pictures of insects to use.
Further task is then to build the paper craft techniques on the pen drawing and to make your relief paper insect. There are examples of different paper techniques and samples to develop.
**Learning Objectives **
Using the topic given insects/birds the aim is to develop their paper art skills and to begin to make an insect. Also, to use skill of symmetry and practise drawing skills and to build a 2D relief insect using paper creatively.
• To learn how to do various paper art techniques and develop ability to manipulate paper.
• To explore a number of different paper craft activities, there are slide examples of techniques.
coiling paper
folding paper
spiraling paper
layering paper
scoring paper
embossing paper
twisting paper
rolling paper
curling paper.
• To EXPLAIN HOW TO carefully draw out insects using the symmetry insects as a guideline.
• To cut out the shapes of insect drawing carefully
• To explore paper techniques.
**Resources **
Large square of re-cycled paper to paste the paper sample techniques on
Glue – pritt stick and pots of glue
Pencils, Scissors
Magazine paper to use to make insects, Pens to draw with
Tracing paper to help with symmetry drawing
**ACTIVITY OBJECTIVES **
To make a sample board of different effects one can achieve when using paper as an art form.
To develop a range of skills to use when working with paper artists and craftsman
To learn to coil, scratch, spiral, fold, bend, cut and lift, twist, emboss, layer, cut, roll and manipulate paper
To learn about different paper artists and craftsmen who work with paper as an art form.
To learn to use paper and to craft various shapes and folds
To learn to build a paper insect using the paper craft techniques, that is, to fold, score, layer, cut, emboss and coil a paper insect
To do homework task: Zentangle insect.
Examples of artists on the Powerpoint to help you to build a 3D paper sculpture with techniques
Also various templates to help you to draw an insect - especially to develop your ability to use symmetry.
These are a set of 6 sheets which can be laminated for classroom tables to help students with writing about Art.
These are lists of descriptive words linked to the Elements of art and the Principles of design. These will help students to be able to write about artworks and help to broaden vocabulary.
There are also words to help with writing at GCSE and support with writing under the GCSE Assessment Objectives as well.
There are also sheets to help with writing frames to support weaker students when they analyse and write about their artworks.
This can be used with Key Stage 3, GCSE and A-level
Leaving these on the desks in the classroom support literacy learning and help students with vocabulary.
A powerpoint outlining some tasks for a Key Stage 3 project on Tim Burton. In this project there are a number of skills, pencil drawingwith pen work, chalk and charcoal drawing on black paper, making a black and white silhouette cut out, collaging harcoal drawing onto bottle and painting bottle, further developing a character on a bottle and making a wool paper character. This also has a few quizzes and student examples of work to support the tasks.
Starting with presenting a title page for Tim Burton and copying some of his scenes by practising pencil tone and mark making. Layering pencil and black pen in drawing when copying Burton’s work Photocopy examples for students to work from to print off.
Then developing a cut out in black paper looking at the strange, Gothic type black and white silhouettes of some of his scenes and making a page on his settings using black paper and cut-outs.
The slides give a number of the silhouette type scenes for students to use for inspiration. Further developing a character drawing and students are to look at the number of different slides and these could be printed off for students and letting them develop their own character. Some of the You tube film clips are linked on the slides as well. Students draw out the character and then colour this in.
Tim Burton’s scenes are often dark and atmospheric and this is an ideal opportunity to practise drawing with white chalk, charcoal or black soft pastel on black sugar paper and to do a drawing of one of his black and white characters. There are some examples to use to copy from to support the students learning. This black and white scene can further be photocopied and collaged onto a bottle. There is also an extension task to make a head on a wine bottle in paper-mache and lots of inspirational examples of student work
Another fun task is to play with wool and paper and to make a rolled animal using newspaper in rolls and then wrapping wool around this and to bend into shape. This can further be embellished by adding bits and bobs like buttons, braid and other decorative details to develop a character type animal which has been inspired by Burton.
There are a few quizzes and homework tasks as well.
This is for all ages - showing how one can use found objects and recycle them to make creative designs. It is to inspire students to design a dress/ costume and to then find re-cycled materials to use. There is also a page of techniques- showing how to use plastics and fuse these with string, threads and to add in wax, pastels drawings. There are outcomes as well with the result of making the plastic fusion.
Some good examples of innovative designers and how they have used materials to make dresses.
This is good for GCSE for those students who want to make dresses or for a project on recycling and fashion.
This is a powerpoint which gives tasks to interpret the style of Hundertwasser.
There are worksheets and information on the artist.
This is part of a project where students design a tile shape in colour using a building phito as an inspiration and stylise this into their own design.
Students then turn this into a clay tile outcome.
Students are to develop creative drawing by analyzing and interpreting a variety of selected artists.
Students will produce a drawing showing contextual evidence that supports the assessment criteria for the A Level course.
This powerpoint gives the LESSON PLAN AT TH END OF THE PRESENTATION.
Students to reflect on examples of copies of drawings of different MASTERS and illustrators and begin to analyse the types of shapes, lines and marks.
Develop an understanding of signature styles of particular artists and the way the artist’s signature captures the intrinsic meaning of the artist.
Students to develop an A2 sheet of drawings which shows the different mark making skills of a number of different artists; develop a still-life drawing which support a number of different artists marks.
You must show evidence of research and of investigating and developing ideas. This should include visual work and, if appropriate, annotations or written work. Practical responses to the work of other artists, designers, craftspeople and photographers must show development in a personal way.
ASSESSMENT OBJECTIVE:
develop ideas through sustained and focused investigations informed by contextual and other sources, demonstrating analytical and critical understanding
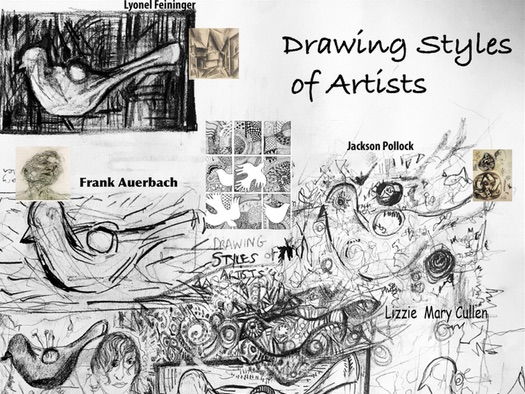
Analysis Activity- follow Mark-making analysis of artists
Put students into PAIRS give out an example of each of these artists drawing – photocopy to pair
CULLEN AND AUERBACH,
VAN GOGH AND POLLOCK
FEININGER AND GILMAN
NICOLSON AND MICHELANGELO
Students to describe the marks, the quality of the lines and shapes that define the artist.
Analysis Activity Feedback– Choose one of the works and will one of you in the group discuss this with the class. Other students may also add comments.
TASK ACTIVITY Creative Practical Skills independently
Students to choose 2 of the artists discussed or analysed in the groups and try to do a drawing now in the style of those two artists.
With a ‘window frame’ students to draw in the style of the artist in a small frame on their sheet.
Prompts Questions to Evaluate Drawing outcome
What does it remind you of?
What does the work represent?
Have any parts been exaggerated or distorted?
What message does the work communicate?
What kind of marks does the artist use?
What kind of shapes can you find?
What materials and tools have been used?
How does the work make you feel? Does the line, shape, colour affect your mood?
What do you like about it Why? What don’t you like? Why?
How might you take ideas to use in your own work?
What do you know about the artist?
Does the work relate to the social or political history of the time?
A Key stage 3 project which starts with Figure drawing of class mates - lots of student examples to support and instructions for drawing.
Students then look at modern sculptures and uses them to simplify their figures into abstract shapes. There are once more student examples and clear instructions showing how to simplify. It is important to get students to show the simplification of their figure drawing into an abstract shape.
Students study 4 different sculptural artists - Further task involves doing an artist study on one of the Sculptors: Henri Moore, Anthony Gormley, Barbara Hepworth and Jean Arp and then students make a moodboard of their work. There are sheets for each sculptor showing some info and pictures of each sculptor.
Then there is the making of the sclpture with video clip to explain how to build armature and how to make 3D form using paper mache - there are a lot of good examples of student figures
Students then need to build the figure out of cardboard, papier-mâché, wire, straws and recycled objects and to decorate this with coloured paper, tissue paper and any other embellishments like buttons, beads and string.
Furthermore there is the embellishment of the sculptures…development of design and pattern by looking at Aboriginal Art, Gustav Klimt, African Art, Beatris Milhaze and students have to choose one of these designs to inspire their figure and begin to decorate their figure.
The students then draw out the simplified figure shape with the abstract colourful patterns and present this on a page in their sketchbook.
Finally there is the development of this figure into a hanging mobile looking at the work of Alexander Calder and an evaluation.
A comprehensive drawing powerpoint with different tasks on developing drawing skills, discussions, mark-making exercises, different techniques, methods and examples to support observation skills in the classroom.
To use with GCSE and A-level students to develop their skills in looking at drawings and discussing their techniques but also doing a variety of different tasks to develop their own recording skills.
Learning to work with continuous lines, blind drawing, structural drawings, shading techniques, gestural drawing and free mark-making.
The powerpoint has examples of drawings of a number of artists like, Paul Seurat, Frank Auerbach, Rembrandt and Van Gogh and gives a number of opportunities to learn from these artists and gives different methods to use to strengthen one’s drawing skills.
This is a good place to start to understand what is colour and colour theory in the form of organising colours in a colour wheel. This i normally do in year seven but also go through again at GCSE - students should learn a large number of colour terms through this powerpoint.
The powerpoint gives clear steps to making a colour wheel and then explains all the colour terms in depth, primary, secondary colour snd tertiary colours, with complementary and analogous colours.
There are also more colour study tasks and more colour terms to understand, so it goes into more depth on different colours- including degraded colour, triads, hue, chroma, tint, tone, luminosity, lustre, neutral colours, monochrome and split contrasts.
We will be learning to make a colour wheel
We will be learning about colour terms
We will be learning to make a colour wheel with paint, or with pencil crayons or with found objects
We will be learning to combine a range of objects and arrange them in a colour wheel
We will be making a drawing developing a mood by using colour
There are also video clips on colour studies linked to tasks.
Based on an understanding of colour there is a task to represent their own memories and feelings using colour, shape and pattern. “Try to close their eyes and remember an experience in terms of colour and form. Try to make visual notes in your sketchbooks. Make a painting which symbolises the experience let your feelings and memories come out by using different colours, shapes and patterns.’”
This is a good exercise to teach students about symmetrical pattern design and to learn about an interesting culture in South Africa - the Ndebele. The powerpoint gives you loads of examples of their work and links to You tube clips and South African songs.
Develop an understanding of the Ndebele culture through the links on the powerpoint. There are lots of examples of their work to inspire and enable students to develop their own symmetry pattern in the style of the Ndebele artists. There are questions and info sheets.
Students will be able to make a symmetry pattern - a piece of jewellery as students Paint a piece of thin wood- cut into a shape. This is a good project for an ‘international project’ to develop a cultural awareness.
Students design and make a symmetry pattern in the style of the Ndebele artists and then transfer this to a piece of wood shape.
This is a very successful drawing lesson to build confidence with drawing. It can be used at any level as skills are on invaluable. It can be stretched over two lessons.
I have a shoe box of little ornaments wrapped in fabric and tied up with tape that I use for this lesson and over the years this is one of my favourite lessons.
I finally tried to make a powerpoint and hope you enjoy !
There is a drawing starter exercise
Then the fun begins
Objectives
To explore observational drawing techniques: blind drawing and contour drawing
To investigate how to capture techniques (markmaking) when drawing
To build confidence in capturing a form with line by using different styles when drawing: gestural drawing and pattern drawing
To develop a design from observational details
There are 17 drawings to make … and each slide gives you the instruction and an example of drawing
Resources
A3 cartridge
sharp 2B pencil
small objects to draw wrapped to start
oil pastel each
Fine-liner each
ruler
pencil rayons
small bit of tracing paper cut in squares ( size of unit for repeat)
starting with the following
. TOUCH DRAWING
Draw through TOUCH ONLY
Feel the object under a cloth draw the object – and try to imagine the shape, texture, and form
Try to draw and outline only.
2 minutes
BLIND DRAWING
Draw with CONTINUOUS LINE and BLINDLY 3 min
Draw the object and draw blindly. DO NOT LOOK AT YOUR PAPER as you draw.
Instead imagine your pencil as a contour ( an ant crawling on the object) exploring all the edges, outlines, shapes, textures and details of the object.
2 minutes…
Follow the slides
There are pictures of student examples.
Success criteria
The line and markmaking quality is MORE important than accuracy
This gives students a realisation that drawing is about lines and marks.
Students will create their own open window painting after been inspired by Henri Matisse
Students to write about Henri Matisse 'The open window ’ and understand what is Fauvism
Easy student examples - outcomes of watercolour designs
Clear step by step drawing of the windowdesigns and students left to add in own detail to make it more interesting
Students gain confidence in drawing using the simplified shapes of Fauvism and practise watercolour techniques
Success Criteria-
Develop a range of textural paint techniques
Experiment with blending colours
Experiment by layering and combining different techniques
Create a water colour exploration page to show variety of techniques.
Make a page of experiments following the list below.
Try to explore each technique.
When complete cut these into square shapes and display this neatly in your sketchbook.
Heading: Watercolour experiments
A Graded wash warm colour to cold colour
B. SGRAFITTO-scratch paper wash over with watercolour
C. DRIPPING TECHNIQUE
D. WET IN WET- drop another colour of waterscolour into a wet wash
E. GRADED WASH light to dark
F. CLING FILM-put over wet wash and let dry
G TRANSPARENT washes of colour overlapping each other
H. OPAQUE to transparent
I. USING BLOCK OUT TO CREATE WHITE shapes
J. FLAT WASH
K LAYERING OF PAINT details
L. SPLATTER TECHNIQUE
M. Wet paint and drop salt
N. Use a dry brus over colour
O. Use masking tape to block out areas
P Stippling with watercolour
The powerpoint gives an example for each technique
There is also an exercise to match the correct picture with technique and an answer page.
This is a summary for files - a 5 min Scheme of Work to help with having all the essential information required. This is my project Modern Movements - cupcakes where students make a cupcake in various different modern art styles: Expressionism - black and white polyprint, Neo-Impressionism stippling and dots with paint or crayon, Fauvism - splash arbitrary colours and learn how to use water-colour, Realism - pencil shading accurately, Surrealism - make a magical fantasy creature like Miro to go on the cupcake. There is a Scheme of work for this unit.