I am a secondary school & A-level Science teacher, specialising in Biology. I am also an experienced AQA GCSE Biology Examiner. My resources contain a mix of Biology, Chemistry and Physics lessons aimed at meeting specification points for the new AQA Trilogy GCSE course and KS3 Activate course.
All of my lessons include at least one opportunity for self-assessment, a range of activities to suit students of all abilities, a set of differentiated starter questions and a plenary.
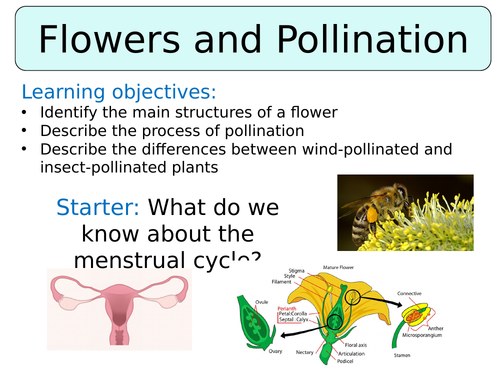
This lesson is designed for the Activate KS3 Science Course, specifically Year 7 B1.3 Module on ‘Reproduction’.
For more lessons designed for KS3 and KS4 please visit my shop at: https://www.tes.com/teaching-resources/shop/SWiftScience.
The lesson begins with a ‘Think > Pair > Share’ task, asking students to consider why flowers are so important, they can discuss their ideas in pairs before feeding back to the class.
The next activity involves students learning about the anatomy of a flower. Information sheets are firstly placed around the room, using these studenst will need to complete a worksheet which included labelling a cross-sectional diagram of a flower and completing a table to outline the functions of each of the structural features. The mark scheme for this task is included in the PowerPoint so students can assess their own work once they have completed the task.
The latter part of the lesson focuses on pollination, students will firsty watch a video and during this they should come up with a definition of ‘pollination’. Their answers can be checked against the definition provided on the PowerPoint, any corrections can be made.
Students are introduced to the idea of cross-pollination and self-pollination, as well as the idea that plants can either be cross-pollinated by wind or by insects. Students are then shown two plants - Himalayan Balsam and a Dandelion - and are asked to consider which may be pollinated by wind and which by insects, try to encourage them to use a description of the flowers structure in their answers.
Lastly, students will need to use a set of statements to complete a table outlining the structural features of insect-pollinated plants vs. wind-pollinated plants. The answers to this task are included in the PowerPoint so students can self-assess their work once it is complete.
The plenary requires students to finish off one of the sentence starters provided, summarising what they have learned this lesson.
All resources are included at the end of the presentation. Thanks for looking, if you have any questions please let me know in the comments section and any feedback would be appreciated :)
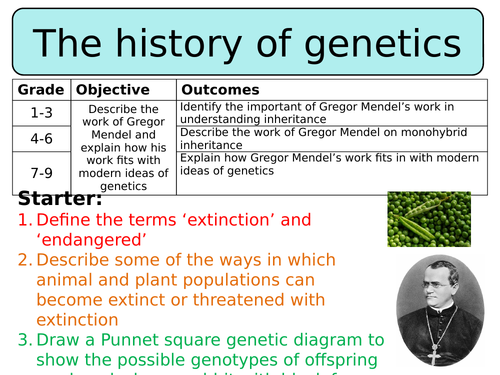
This lesson is designed for the NEW AQA Trilogy Biology GCSE, particularly the ‘Inheritance, variation and evolution’ SoW, specifically for the higher-tier, biology only specification.
For more lessons designed to meet specification points for the NEW AQA Trilogy specifications for Biology, Chemistry and Physics please see my shop: https://www.tes.com/teaching-resources/shop/SWiftScience
This lesson begins with an introduction to the work of Gregor Mendel, students will firstly watch a video and answer questions using the information provided. Once finished with this introductory task pupils can self-assess their work against the marking criteria.
The next task focuses on genetic diagrams drawn to represent the crosses Gregor Mendel carried out during his investigations. Pupils will be prompted to draw the genetic diagrams themselves to show the genotypes of offspring of the F1 and F2 generation of pea plants in the example given. There is a prompt which you can reveal for those students of a lower ability. Once this task is complete pupils can check their work against the answers which are provided.
Now there is a quick check mid-plenary for pupils to consolidate knowledge of what they have learnt so far, a set of questions is provided and the mark scheme for pupils to check their work against.
The next part of the lesson focuses on why Mendel’s important work was not wholly recognised within his lifetime, pupils can read an extract of information and use this to answer questions. Once complete pupils can self-assess their work using the answers provided.
The final part of the lesson is looking at how Mendel’s work was imperative to the development of the double-helix model of DNA and subsequent genetic research and discoveries. Pupils will need to read a page of information, in pairs, and answer questions provided on the PowerPoint slide. For those pupils of a lower ability it may be easier to tag read the information and answer questions in groups. Once completed pupils can check their work against the success criteria provided.
The final task is for pupils to answer an exam question on this topic, pupils can complete in their books (at the back of their books for an extra challenge) and assess their work using the mark scheme once complete.
The plenary task is for pupils to come up with a questions that they would like to ask Mendel about his work.
All resources are included at the end of the presentation. Thanks for looking, if you have any questions please let me know in the comments section and any feedback would be appreciated :)
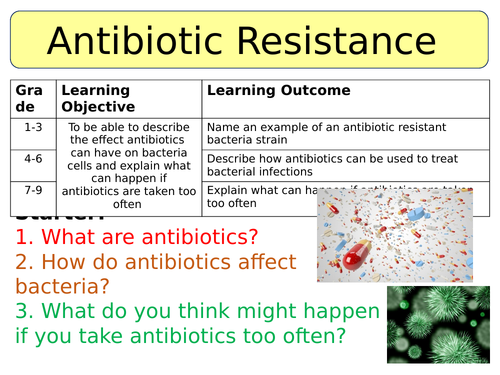
This is a resource aimed at the NEW AQA GCSE Biology specification, developed to meet learning outcomes within the 'Infection & Response' unit.
This lesson is part of a 12 lesson bundle for the NEW 'Infection & Response' Unit, found in my TES shop: https://www.tes.com/teaching-resources/shop/SWiftScience
The lesson begins by describing the process by which a bacteria may become resistant to an antibiotic.
Pupils will then watch a storyboard animation which demonstrates this process visually. Pupils can then use this animation to create their own storyboard, including diagrams and captions, to represent the process of natural selection in bacteria which leads to antibiotic resistance.
The focus of the lesson is then on MRSA, a few real-life headlines are given as an example of an antibiotic resistant bacteria. Pupils will brainstorm what sorts of methods hospitals employ to reduce the spread of such 'super bugs'.
The final activity is for pupils to completed questions on antibiotic resistance and how to prevent the spread of antibiotic resistant bacteria such as MRSA. The mark scheme for the questions are included on the Power Point presentation for students to mark their own work or peer-assess.
The plenary is a recap on the learning outcomes, pupils will need to assess whether they are R/A/G.
This a resource aimed at the new AQA GCSE Biology specification as part of the 'infection & response' unit.
This lesson is part of a 12 lesson bundle for the NEW 'Infection & Response' Unit, found in my TES shop - https://www.tes.com/teaching-resources/shop/SWiftScience
The lesson begins with a recap of what makes a good medicine. Pupils are then given a scenario where they have to read some information cards on different medicines and using the information they need to decide which medicine would be the best to treat a bacterial infection.
The next PowerPoint slide will go through the difference between antibiotics and painkillers and hopefully students should have chosen the antibiotic as the drug to treat bacterial infections in the previous activity.
Next is an introduction to Alexander Fleming, the scientist who first discovered penicillin. Pupils can watch a video on his work and answer questions on a worksheet. Pupils can then peer-assess their work.
The next few slides focus on how the growth of bacteria are affected by antibiotics, pupils can then use some data on the growth of bacteria to answer some questions.
For the plenary pupils need to choose the correct word to complete the sentences.
Other lessons for the NEW AQA 'Infection & Response' unit can be found in my TES shop.
Thanks :)
This resource is for the NEW AQA GCSE specification on preventing infections, it meets specification points within the 'Infection & Response' module.
This resource includes a PowerPoint presentation and all the resources needed for the lesson.
This lesson is part of a 12 lesson bundle for the NEW 'Infection & Response' Unit, found in my TES shop - https://www.tes.com/teaching-resources/shop/SWiftScience
The lesson begins by pupils considering what a communicable disease is, the differences between bacteria and viruses and the mechanisms by which these pathogens spread disease.
The next part will be a brief introduction to the work of Ignaz Semmelweis, Joseph Lister and Louis Pasteur and how they have improved our knowledge of pathogens and contributed to the development of methods to stop the spread of infection.
Pupils will then focus on the work of Ignaz Semmelweis by writing out some sentence starters, watching a video on his work in hospitals in order to finish the sentences off. Pupils can then assess their work using red pens.
The next activity pupils will need to read some information on different disease prevention methods and will need to copy and complete the table shown on the PowerPoint slide. This could be achieved using a circus activity, whereby poster so the information are made and placed around the room for pupils to access.
Finally, pupils will then consider some data on the board and use this to explain the difference between a pandemic and an epidemic.
All of the resources you need for this lesson are included on the PowerPoint slide, there is also an additional resource of a newspaper article activity on Semmelweis which could be used as a homework activity.
This lesson is designed to meet specification points for the NEW AQA Trilogy GCSE Biology ‘Organisation’ SoW.
For more lessons designed to meet specification points for the NEW AQA Trilogy Biology, Chemistry and Physics specifications please visit my shop: https://www.tes.com/teaching-resources/shop/SWiftScience
The lesson begins by completing an activity which recaps the role of each of the components of blood.
Pupils are then introduced to the three types of blood vessels - artery, vein and capillary. Looking at a diagram provided pupils will need to consider the differences between the three in terms of structure an function.
Pupils will then watch a video and answer questions about arteries and capillaries, the answers to the video are provided so that pupils can then self-assess their work.
The next slide will show how veins are structured and how they work to move blood back to heart from the rest of the body. Pupils could draw a diagram to represent this if there was time.
The next part of the lesson is the longest activity, pupils will need to either copy the blank table into their books or be given a printout of the table. Using cards of information pupils will need to complete the table, which shows the structural features of each of the blood vessels. The answers to this activity are provided so that pupils can either peer or self-assess their work.
The next activity is a quick fill-in-the-blank task to demonstrate the role of the capillaries within the body.
Students are now introduced to the idea of a double-circulatory system, using a diagram and a description of the system pupils will need to answer questions about the role of this system, which can then be self-assessed.
The plenary task is for pupils to pick one question to answer from a list of traffic-light questions, green for most difficult and red for easiest.
All resources are included in the lesson, any questions please leave a comment for me to get back to you and any feedback would be much appreciated :) thanks!
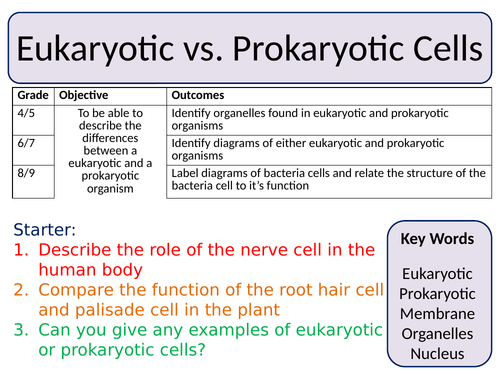
This is a lesson aimed at the new AQA GCSE Biology (2016) - ‘Cells’ SoW.
The lesson begins by identifying examples of prokaryotic and eukaryotic cells, pupils can begin to think about the structural differences between these two types of cells.
Next, pupils are given a worksheet plus an additional card of information on either the structure or function of a bacteria cell. Pupils will need to walk around the room and trade the information on their card with others to fully complete a labelled diagram of a bacteria cell and descriptions of the functions for each structure.
Once completed pupils can peer or self-assess their work using the information within the PowerPoint slide.
The next activity requires pupils to apply their knowledge of the structure of bacteria (prokaryotic) cells and compare this to the structure of eukaryotic cells, pupils need to construct a list/table in their books to identify the similarities and differences between these two cells. Pupils can then self-assess their work against the list provided in the PowerPoint slide.
The next activity is an assessment activity, pupils will need to complete the past-paper question in their books and again self/peer-assess their work using red pens.
The final activity involves a list of ‘True/False’ statements, to gauge the progress of the class this could be completed by students holding up red/amber/green cards to identify whether they think the statement is true or false.
All resources are included in the PowerPoint presentation, please review to provide me with feedback :). Thank you.
This is a lesson which meets specification points in the NEW AQA GCSE (2016) 'Cells' SoW.
Other lessons from this SoW and other AQA GCSE Trilogy Sow for the new specification can be found in my TES shop.
This lesson begins by watching a video about the structure of cells and where to find the genetic information, pupils will watch the video and answer questions (provided in the PowerPoint presentation.)
Pupils will then be presented with a labelled diagram of a cell, nucleus, chromosome and gene. Pupils will be required to analyse the diagram for a few minutes (you can include a stop clock on the board). The screen will then be changed and pupils will be given a blank copy of the diagram which they will need to complete from memory - pupils can then peer-assess their work.
In the next activity, pupils are shown diagrams of a cell with a nucleus visible, DNA, a gene and a chromosome. Pupils can either create a flow chart by cutting and sticking the diagrams in order from largest to smallest and then labelling them. Alternatively, they could draw their own diagrams and label them. Pupils can then self-assess their work using red pens.
The next activity, pupils are given a series of words and definitions, they will need to match the key words up to the correct definition. Pupils then self-assess their work.
Their are two option for the plenary activity, for lower ability classes pupils will be required to fill in the blanks in a paragraph describing the structure and function of genetic information and where it is found within the cell. The second plenary is a past-paper question, pupils can answer this in their books and then peer-assess using red pens.
All resources are included, please leave a review with feedback :). Thanks!
This is a resource for the NEW AQA GCSE Biology specification, covering specification points within the ‘Infection and Response’ module.
For more resources aimed at the NEW AQA GCSE specifications please see my shop: https://www.tes.com/teaching-resources/shop/SWiftScience
This resource contains the PowerPoint for the lesson, the resources are found at the end of the PowerPoint.
The lesson begins with considering what is important in a new medicine and what scientists need to think about when developing new medicines. This goes on to define some of the key factors such as safety, efficacy & stability.
Next, is an introduction of how a vaccination works, pupils will watch a video and answer questions on a worksheet. Pupils will self-asses their work.
Pupils will then complete a cartoon strip of how a vaccination works, trying to use as many key words as possible. Pupils should self-assess their work against correct use of key terminology.
The plenary will test the pupils knowledge of their ability to describe how a vaccine works. They will need to turn to the back of their books and describe how a vaccine works, using as many of the key terms as possible.
Resources are all found at the end of the PowerPoint.
Enjoy :)
This lesson is designed for the NEW AQA AS-level Biology course, particularly the ‘Cells’ module.
For more lessons designed to meet specification points for the NEW AQA A-level Biology course please visit my shop: https://www.tes.com/teaching-resources/shop/SWiftScience
A-Level lesson format: I teach in more of a lecture style compared to GCSE. In the majority of my A-level lessons the beginning portion of the lesson is mainly teacher-led, where students are expected to take notes onto a handout/in their books. This is then mixed in with student-led activities, as well as questions and exam prep.
You will find some of my slides have blank spaces for you to add more detail/descriptions/explanations. If you look at the ‘Notes’ section underneath each of these slides, you will find additional content which you can add in as you teach!
This lesson begins with a starter review to remind students of the role of diffusion in glucose absorption, the process of co-transport, and the role of microvilli.
Students are then guided through a summary of defence mechanisms, subdividing them as non-specific (physical barriers and phagocytosis) and specific (cell-mediated and humoral responses). Students should keep this in mind before trying to name some of the physical barriers to infection in the human body. Sample answers are on the next slide for self-assessment, and students should consider which of the answers were physical or chemical barriers.
The next task is to consider three questions about the human body’s defence mechanisms in the stomach, skin, and trachea. After seven minutes students should self-assess to the answers on the following slide.
To defend the body, lymphocytes must be able to distinguish the body’s own cells, students are asked to decide which biological molecules would most likely be used for this and where they are found. The next slide explains the immune system’s identification ability and asks students to consider the medical implications of self-defence responses. The example of organ and tissue donation is explained on the following slide, there are plenty of notes below the slide as well.
If physical barriers fail, white blood cells are next, so students are then introduced to phagocytes and lymphocytes over the next few slides.
Students will then watch a short video and follow along with their worksheet to fill in boxes and summarise phagocytosis. Answers are on the next slide for self-assessment.
The next task is interactive! Students will use information stations around the classroom to complete their table on non-specific immune response.
The plenary task is to draft a 140-character tweet demonstrating what they have learned today including #keywords.
All resources are included. Thanks for looking, if you have any questions please let me know in the comments section and any feedback would be appreciated :)
This lesson is designed for the NEW AQA AS-level Biology course, particularly the ‘Cells’ module.
For more lessons designed to meet specification points for the NEW AQA A-level Biology course please visit my shop: https://www.tes.com/teaching-resources/shop/SWiftScience
A-Level lesson format: I teach in more of a lecture style compared to GCSE. In the majority of my A-level lessons the beginning portion of the lesson is mainly teacher-led, where students are expected to take notes onto a handout/in their books. This is then mixed in with student-led activities, as well as questions and exam prep.
You will find some of my slides have blank spaces for you to add more detail/descriptions/explanations. If you look at the ‘Notes’ section underneath each of these slides, you will find additional content which you can add in as you teach!
This lesson begins with a little challenge for students to calculate the actual size of a specimen and complete three measurement conversions.
The first outcome is for students to begin to understand graticules and their use. The following slides define eyepiece graticules and explain how to calibrate the eyepiece properly. Students will also watch a short video before working though example (b).
Students will then practice calculating magnification to understand the relationship between the eyepiece graticule scale and the stage micrometer scale. To practise their learning students will complete the Calibrating an Eyepiece Graticule worksheet.
The next task is to practise calibrating the eyepiece and measure three onion cells. Students will also be asked to complete a biological drawing of their onion cells, and examples of poor and quality drawings are provided in the slides with more detailed expectations.
Students will then consolidate their learning by completing an exam-style question, answers are provided on the following slide for self-assessment.
The plenary task is a quick exit card, students should write thee things they’ve learnt, five key words, and on question for their peers about this lesson.
All resources are included. Thanks for looking, if you have any questions please let me know in the comments section and any feedback would be appreciated :)
This lesson is designed for the NEW AQA Trilogy Biology GCSE, particularly the 'Inheritance, variation and evolution' SoW.
For more lessons designed to meet specification points for the NEW AQA Trilogy specifications for Biology, Chemistry and Physics please see my shop: https://www.tes.com/teaching-resources/shop/SWiftScience
The lesson begins with a recap on the relative sizes of structures found within the cell, starting with nucleotides & building up to nucleus and then cell.
The next task requires pupils to answer questions about the human genome whilst watching a video. This work can then be self-assessed using the mark scheme provided in the PowerPoint presentation.
The next part of the lesson shows students the structure of a DNA nucleotides and of the overall double-helix structure of DNA.
Pupils will then watch a video on the process of protein synthesis, pupils will need to answer questions whilst watching this video. Pupils can then self-assess their work using the mark scheme provided.
The final activity is for pupils to complete an exam-style question, pupils then either self-assess or peer-assess their work using the mark scheme provided.
The plenary task is for pupils to write a list of key words from the lesson today.
All resources are included at the end of the presentation. Thanks for looking, if you have any questions please let me know in the comments section and any feedback would be appreciated :)
This lesson is designed to meet specification points for the NEW AQA Trilogy GCSE Biology specification, particularly the ‘Organisation’ SoW.
For more lessons designed to meet specification points for the NEW AQA Trilogy Biology, Chemistry and Physics specifications please visit my shop: https://www.tes.com/teaching-resources/shop/SWiftScience
The lesson begins by introducing the heart as an organ and it’s function in the body, pupils will have a few minutes to read through the information on the slide as a ‘memory test’. Then move the slide forward where pupils have to copy and complete the information about the heart, using key words to help them. Pupils can then self-assess their work.
For the next activity pupils are given an information sheet providing information about the structure of the heart and the job of the blood vessels supplying/taking blood away from the hear. Pupils will also be given a worksheet which they will need to complete using this information.
Pupils will then be introduced to the idea of valves, they can watch a short video an have a look at the position of the valves within the heart. They will need to Think > Pair > Share ideas about the function of the valves in the heart. After a short class discussion the answer can be provided for them.
The next activity will require pupils to sort information into a flow diagram to demonstrate the route the blood flows through from the right atrium onwards. The words they need to fill in the boxes will be provided, they can self-assess their work once it has been completed.
The next part of the lesson focuses on problems with blood flow through the heart, firstly pupils are introduced to the idea of coronary arteries being blocked due to cholesterol/fatty deposits. They will provided with some information on the board and will need to answer questions on this information, which can then be assessed once the answers are revealed.
Then they will shown the differences between different types of treatment - surgery, stents or statins - and will be asked some questions about the uses, advantages and disadvantages of these examples of treatment for people with cardiovascular disease.
Again, all answers are provided for pupils to check their work throughout the lesson.
Plenary is to write a twitter message about what the students have learnt this lesson, make sure to #keywords!
Any questions please comment on the resource to ask me, any feedback if you have purchased this resource would be much appreciated :) thanks!
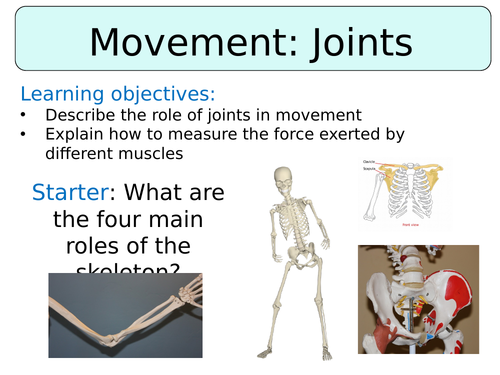
This lesson is designed for the Activate KS3 Science Course, specifically Year 7 B1.2 Module on ‘Structure & Function of Body Systems’
For more lessons designed for KS3 and KS4 please visit my shop at: https://www.tes.com/teaching-resources/shop/SWiftScience.
Students are firstly given the definition of a joint and are then asked to move around a bit, either in their seats or around the room, and whilst moving they should think about their joints - whether they are all the same, if they move in the same way or not. This leads into an introduction to three types of joint that they need to learn about - ball-and-socket joint, hinge joint and fixed joint.
The next part of the lesson will focus on the tissues which comprise a joint - namely tendons, ligaments and cartilage. Students will be given information sheets, either on their table or placed around the room. Using this information they will need to complete a summary table of the three tissues - the location of the tissue (what it is connected to), a description of the tissue and it’s role in the joint. Once students have completed this task they can self-assess their work using the mark scheme provided.
Next, students will conduct an investigation into muscle strength. Students will work in pairs, following the method provided on the PowerPoint to measure the strength of their triceps, biceps and forearm using a Newton Scale. Their results should be recorded in a suitable table.
Lastly, students are given a worksheet to summarise what they have learned on this topic so far. They will need to complete the sentences with the correct key word, this word can then be found within the word search. The mark scheme for this task is also included so students can mark and correct their work.
The plenary provides two choices for students, either unscramble the anagrams of key words from the lesson or using the key word selection provided, write a summary of what was learned this lesson.
All resources are included at the end of the presentation. Thanks for looking, if you have any questions please let me know in the comments section and any feedback would be appreciated :)
This lesson is designed for the KS3 Year 8 Science course, specifically the B2 1.2 Ecosystem Processes.
For more lessons designed for KS3 and KS4 please visit my shop at: https://www.tes.com/teaching-resources/shop/SWiftScience.
The lesson begins with a diagram of a food chain, showing how energy is transferred from organism to organism and a definition for the term ‘food-chain’. This is then followed by a question, asking students to identify which of the organisms is a producer, a consumer, a herbivore and a carnivore. Students can discuss with their partner before feeding back to the class, the answers are then revealed and students can self-assess their work.
Next, students are given a match-up activity whereby they need to correctly match the type of organism (producer, primary/secondary/tertiary consumer) with the correct description and example. This task can be self-assessed using the mark scheme included once it is complete.
Students will now be given a selection of organisms - plant, aphid, hawk, vole, ferret, moth larva - using these organisms they will need to construct their own food chain, including labels and arrows. An example answer is provided for pupils to check their work, other examples could be made using the animal selection provided.
Next, students will focus on energy losses through a food chain. Firstly, students will be told that energy can be lost from animal to animal along a food chain, students should then ‘Think > Pair > Share’ their ideas about why this happens. The answers can then be revealed using the PowerPoint presentation, students can check their answers and correct their work if necessary.
Lastly, students are introduced to the idea of a food web - giving an example of a marine food web. Students are then asked a set of questions about this food web, students can answer these questions in their books before self-assessing them using the mark scheme available.
The plenary task will then require students to spend a minute talking to the person next to them about what they have learned this lesson.
All resources are included at the end of the presentation. Thanks for looking, if you have any questions please let me know in the comments section and any feedback would be appreciated :)
This is a lesson designed to meet specification points for the new OCR GCSE (Gateway) Biology ‘Scaling up’ scheme of work.
The lesson begins by introducing the heart as an organ and it’s function in the body, pupils will have a few minutes to read through the information on the slide as a ‘memory test’. Then move the slide forward where pupils have to copy and complete the information about the heart, using key words to help them. Pupils can then self-assess their work.
For the next activity pupils are given an information sheet providing information about the structure of the heart and the job of the blood vessels supplying/taking blood away from the hear. Pupils will also be given a worksheet which they will need to complete using this information.
Pupils will then be introduced to the idea of valves, they can watch a short video an have a look at the position of the valves within the heart. They will need to Think > Pair > Share ideas about the function of the valves in the heart. After a short class discussion the answer can be provided for them.
The next activity will require pupils to sort information into a flow diagram to demonstrate the route the blood flows through from the right atrium onwards. The words they need to fill in the boxes will be provided, they can self-assess their work once it has been completed.
Next, pupils will be given a place mat worksheet which has questions about each of the four components of the blood. Each student will then be given a slip of information about these four components, the students will need to share information to complete their place mat. Once complete, the answers which will be provided on the PowerPoint slide can be used for pupils to either self-assess or peer-assess their work.
Pupils will now look at how red blood cells transport of oxygen around the body, once this has been explained using diagrams on the PowerPoint slide pupils will then need to arrange sentences into an order to show how this process occurs. Once completed pupils will self-assess their work using the answers provided.
The next activity is a True or False activity about what the students have learnt so far, this could be extended by asking students to re-writing the incorrect sentences so that they make sense.
The final activity is a past-paper question on the components of blood, which pupils can then peer or self-assess.
This bundle contains 68 whole lessons, along with all additional resources, which meet all learning outcomes within the complete Year 8 course, units include:
Biology:
B2.1 Health & lifestyle
B2.2 Adaptation & Inheritance
B2.3 Ecosystem Processes
Chemistry
C2.1 The Periodic Table
C2.2 Metals & Acids
C2.3 Separation Techniques
C2.4 The Earth
Physics
P2.1 Electricity & Magnetism
P2.2 Energy
P2.3 Motion & Pressure
The resources were designed with the Year 8 Activate course in mind, it contains over 24 weeks worth of lesson content!! You can find more lesson bundles aimed for the KS3 and KS4 science curriculum at: https://www.tes.com/teaching-resources/shop/SWiftScience
All lessons contain a mix of differentiated activities, videos & animations, progress checks and more than two opportunities, per lesson, for self/peer red-pen assessment of tasks!
This bundle contains 57 whole lessons, along with all additional resources, which meet all learning outcomes within the complete Year 7 Activate Course, units include:
Biology:
B1.1 Cells
B1.2 Structure & Function of Body Systems
B1.3 Reproduction
Chemistry
C1.1 Particles & Their Behaviour
C1.2 Elements, Atoms & Compounds
C1.3 Chemical Reactions
C1.4 Acids & Alkalis
Physics
P1.1 Forces
P1.2 Sound
P1.3 Light
P1.4 Space
The resources were designed with the Year 7 Activate course in mind, it contains over 24 weeks worth of lesson content!! You can find more lesson bundles aimed for the KS3 and KS4 science curriculum at: https://www.tes.com/teaching-resources/shop/SWiftScience
All lessons contain a mix of differentiated activities, videos & animations, progress checks and more than two opportunities, per lesson, for self/peer red-pen assessment of tasks!
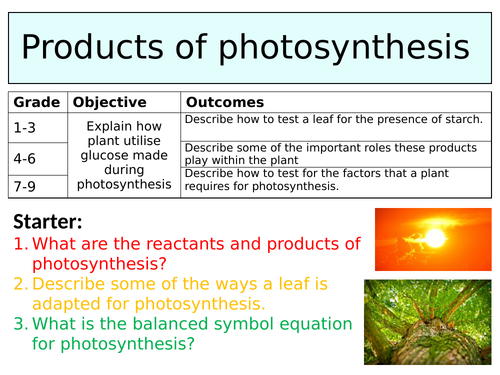
This is a lesson designed to meet specification points for the new OCR GCSE (Gateway) Biology 'Cell-level lsystems’ scheme of work.
Pupils will learn about the products made during photosynthesis and how these are used plants. In particular the uses of protein, cellulose, starch and fats & oils. At a higher level pupils will consider the advantages and disadvantages of energy storage molecules such as fats, oils & starch.
Pupils will have an opportunity to use information points around the room to complete a levelled worksheet on this topic which will be peer assessed at the end of the lesson. Extension opportunities are available if finished.
Once this first activity has been self or peer assessed pupils will then have the opportunity to conduct an experiment to investigate the presence of starch in normal and variegated leaves. Students will also learn about investigations that can be carried out to prove that chlorophyll, carbon dioxide and light are needed for photosynthesis to take place.
The last activity pupils will complete are two exam-style questions on the topic of the lesson, this can then be self-assessed.
All resources are included in the PowerPoint presentation, thank you for purchasing :)
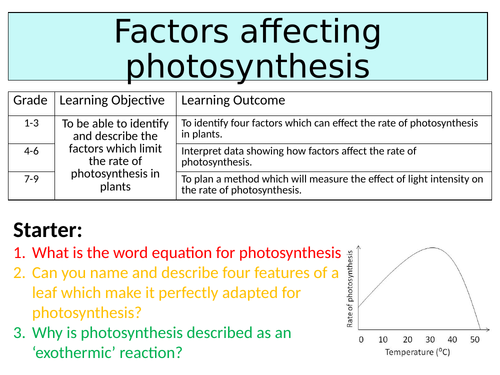
This is a lesson designed to meet specification points for the new OCR GCSE (Gateway) Biology 'Cell-level lsystems’ scheme of work.
The lesson begins by students thinking about the raw materials needed for plants to photosynthesise and which factors might limit the rate. The three factors which students will need to learn about are then revealed - carbon dioxide, light intensity and temperature. Three limiting factor graphs are then shown for each of these factors and students need to have a go at explaining what the graphs are showing, as a class discussion. Pupils will then need to complete a fill-in-the-blank task and self- their assess their work using the answers provided.
Next pupils are shown a green leaf and a variegated leaf and are asked to think>pair>share which leaf they believe will have a higher rate of photosynthesis, and why. This then leads to pupils learning that less chlorophyll means less photosynthesis will take place, which could lead to stunted growth.
The next part of the lesson focuses on pupils being able to use practical equipment to set up an investigation which measure the effect of light intensity on rate of photosynthesis. Pupils will firstly be given some images of equipment they could use and are asked to come up with a potential method for this investigation. After this pupils are then shown a video where they have to answers questions about the variables in this investigation.
The plenary is a silent 5 task where pupils need to answer questions about what they learnt this lesson on their own in their books.
All resources are included in the PowerPoint presentation, thank you for purchasing :)