Teaching Art is a feast into a of colour, line, texture, space and shape. By encouraging a visual exploration in my learning I love developing a creative approach to learning in the classroom. By encouraging different techniques and an understanding of art I hope to help students appreciate visual learning more. I hope you enjoy my uploads and can use them. Please contact me if you require any further information.
Teaching Art is a feast into a of colour, line, texture, space and shape. By encouraging a visual exploration in my learning I love developing a creative approach to learning in the classroom. By encouraging different techniques and an understanding of art I hope to help students appreciate visual learning more. I hope you enjoy my uploads and can use them. Please contact me if you require any further information.
This is for all ages - showing how one can use found objects and recycle them to make creative designs. It is to inspire students to design a dress/ costume and to then find re-cycled materials to use. There is also a page of techniques- showing how to use plastics and fuse these with string, threads and to add in wax, pastels drawings. There are outcomes as well with the result of making the plastic fusion.
Some good examples of innovative designers and how they have used materials to make dresses.
This is good for GCSE for those students who want to make dresses or for a project on recycling and fashion.
Success Criteria-
Develop a range of textural paint techniques
Experiment with blending colours
Experiment by layering and combining different techniques
Create a water colour exploration page to show variety of techniques.
Make a page of experiments following the list below.
Try to explore each technique.
When complete cut these into square shapes and display this neatly in your sketchbook.
Heading: Watercolour experiments
A Graded wash warm colour to cold colour
B. SGRAFITTO-scratch paper wash over with watercolour
C. DRIPPING TECHNIQUE
D. WET IN WET- drop another colour of waterscolour into a wet wash
E. GRADED WASH light to dark
F. CLING FILM-put over wet wash and let dry
G TRANSPARENT washes of colour overlapping each other
H. OPAQUE to transparent
I. USING BLOCK OUT TO CREATE WHITE shapes
J. FLAT WASH
K LAYERING OF PAINT details
L. SPLATTER TECHNIQUE
M. Wet paint and drop salt
N. Use a dry brus over colour
O. Use masking tape to block out areas
P Stippling with watercolour
The powerpoint gives an example for each technique
There is also an exercise to match the correct picture with technique and an answer page.
This is a powerpoint which gives tasks to interpret the style of Hundertwasser.
There are worksheets and information on the artist.
This is part of a project where students design a tile shape in colour using a building phito as an inspiration and stylise this into their own design.
Students then turn this into a clay tile outcome.
This is a good place to start to understand what is colour and colour theory in the form of organising colours in a colour wheel. This i normally do in year seven but also go through again at GCSE - students should learn a large number of colour terms through this powerpoint.
The powerpoint gives clear steps to making a colour wheel and then explains all the colour terms in depth, primary, secondary colour snd tertiary colours, with complementary and analogous colours.
There are also more colour study tasks and more colour terms to understand, so it goes into more depth on different colours- including degraded colour, triads, hue, chroma, tint, tone, luminosity, lustre, neutral colours, monochrome and split contrasts.
We will be learning to make a colour wheel
We will be learning about colour terms
We will be learning to make a colour wheel with paint, or with pencil crayons or with found objects
We will be learning to combine a range of objects and arrange them in a colour wheel
We will be making a drawing developing a mood by using colour
There are also video clips on colour studies linked to tasks.
Based on an understanding of colour there is a task to represent their own memories and feelings using colour, shape and pattern. “Try to close their eyes and remember an experience in terms of colour and form. Try to make visual notes in your sketchbooks. Make a painting which symbolises the experience let your feelings and memories come out by using different colours, shapes and patterns.’”
There are plenty of examples of Andy Goldsworthy on the slides and examples of other peoples work doing land art.
Students will also need to identify various examples of materials used in Goldsworthy’s work.
Students will also need to complete an analysis of one example of one of Goldsworthy’s work: Penpont in Cairn. There are questions to answer on this work.
Also there is a project task for students to make their own land art outcome and examples to be inspired from.
This is part of a set of HUNDERTWASSER POWERPOINTS.
In this powerpoint the students use their design they made for their tiles and make a tile in clay in the style of Hundertwasser.
In this powerpoint there are examples of how to roll and make the tile with key clay steps to follow and include in tile.
There are student outcomes to look at while using key skills in making of a tile.
Students paint these with acrylic paints and varnish with PVA glue or a Varnish gloss when dry.
These resources support a study on Hundertwasser.
This helps with making an artist analysis of his work, interpreting a photo you take of houses into your own style and making a coloured drawing
Secondly taking this into a clay tile.
A set of resources developing an understanding of Cubism. Giving information on the art movement and learning to mix colours.
Making a painting, practising making a 3D sculpture using Analytical cubism and using a portrait as a subject.
Also showing how perspective was changed with Cubism.
Projects to develop an understanding of the basic elements and the use of pattern.
Also developing a printing project using a repeat pattern.
Developing an understanding of William Morris
Also looking at Japanese concept of pattern and the use of Notans
This is part of a set 5 powerpoints on Cubism, painting skills and colour mixing and constructing a 3D sculpture.
This attached Powerpoint deals with the development of the 3D sculpture
Powerpoint 1
Using a drawing of face break this up into geometric shapes and compose an outcome to paint and analyse a cubist analytical painting and develop and understanding of Cubism
Powerpoint 2
Explore a mixing of colours, especially complementary colours and develop an understanding of contrasting colours
Powerpoint 3
Practice painting skills and applying paint smoothly
Powerpoint 4. Painting skills using a card
Poweerpoint 5.
Simplify and construct a 3D analytical sculpture from your painting and evaluate your putcome.
The powerpoint gives instructions and examples to show how to cut and join this. Firstly pasting on cardboard a copy of the painting and then cutting this up in shapes and building a construction of form as a 3D sculpture
This then becomes a construction of a 3D sculpture using cardboard to make a mobile or standing sculpture based on Cubism.
To paste painting onto Cardboard Ceareal box and to paint the back of the box
To finally construct with glue gun to form a hanging mobile.
Evaluation of project
This is a series of 5 powerpoints where students to learn to paint a Cubist painting using a celebrity picture and complementary colours.
Students to gain an understanding of Analytical Cubism and how to fragment a picture into geometric shapes and then learn to paint it in complementary colours.
Develop this into a 3D sculpture and make a construction mobile cutting a copy of the painting into shapes.
This is a project to present the work of William Morris in a sketchbook. focusing on lettering in the Arts and Crafts style, it also shows how to do an artist critical study and can be used at KS3 and GCSE.
Success Criteria
Make an elaborate heading for William Morris showing his emphasis on NATURE
Creatively present the pictures on his work
Answer the questions with full sentences describing the characteristics of William Morris.
Copy a detail of his work.
THE POWERPOINT SHOWS how to make a small frame try to draw an enlarge a part of an image of William Morris, that is, crop a section and draw what you see in a box on your page.
(The measurements for the box is 10x12 cm and it can be Portrait or Landscape).
The overall objectives are :
To understand what the elements of art are: line, shape, colour, texture, space, value and tone. This lesson you will be completing an artist study presentation on the work of William Morris and answering the questions and making a critical analysis of his work. We will be presenting examples of William Morris’s work and making a decorative presentation using the word William Morris for a title and presenting this creatively.
This is a unit of work for the first 12 weeks at school.
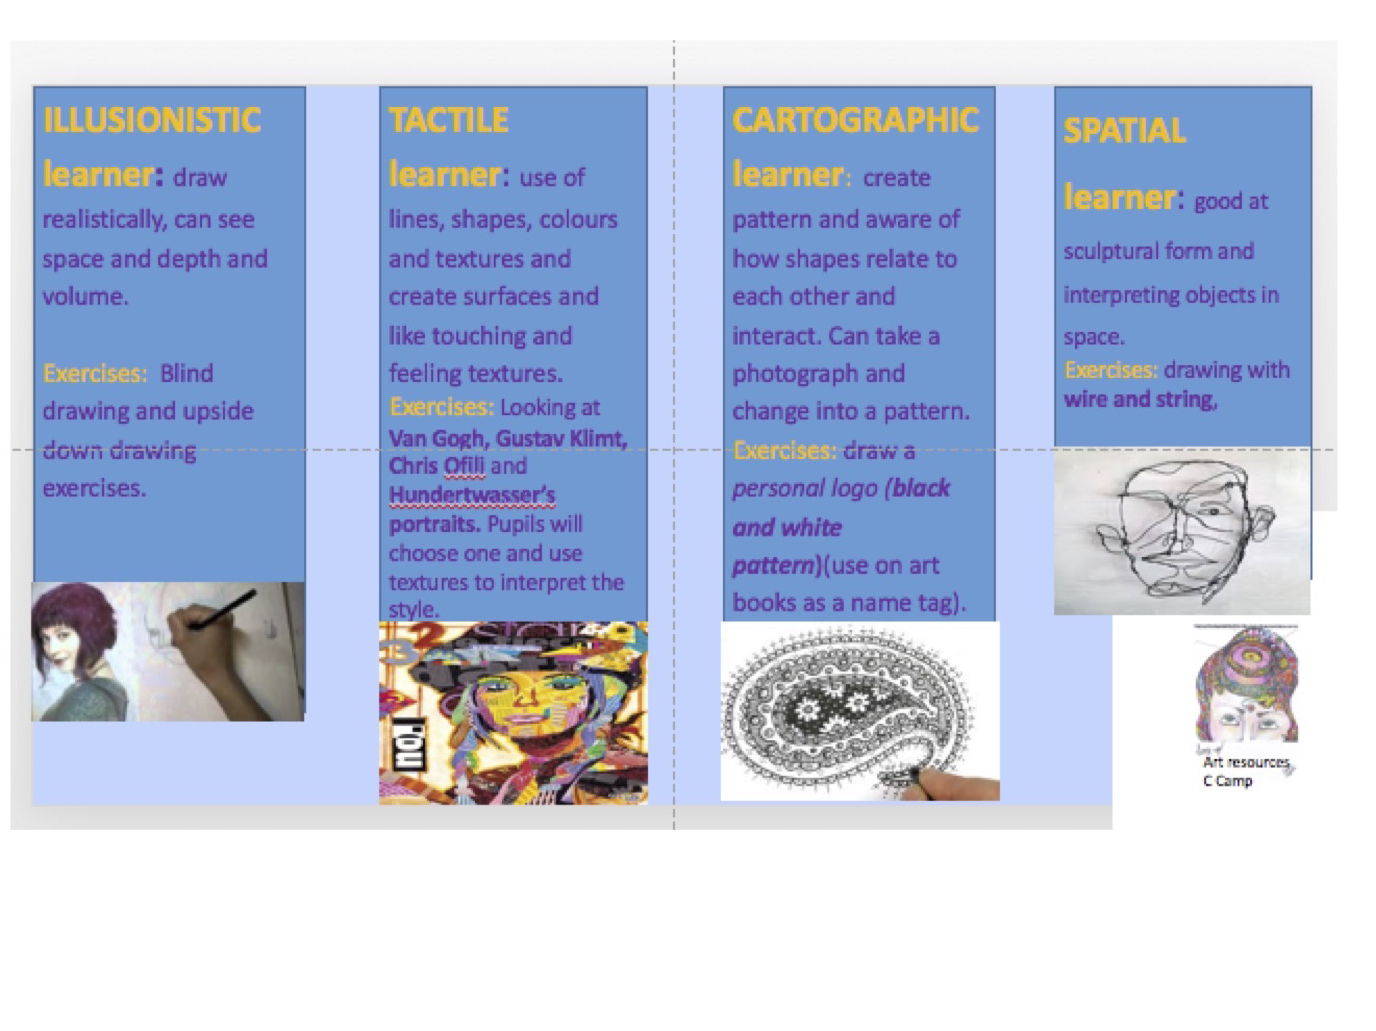
There are questions to assess the students knowledge of Art from KS2 and then a project to assess he strengths and skills of the students. This is a diagnostic project looking at the Illusionary, Spatial, Tactile, Cartographic skills of the students with tasks to do.
There is also a fun project on making a sketchbook and giving prompts to help students to be creative in the Keri Smith powerpoint.
In this powerpoint there are key objectives:
To use photographs of your school building and change them to emulate artists/photographers who show decay.
To learn how to crinkle the picture up to show paper creases
To blend in pictures of decay and textures into a school building photograph in the style of the artist.
There is a clear definition for decay and students can use this to start there project.
There are slides of a number of photographers to use for this theme and then examples of how to use Adobe Photoshop with steps to show progress in building your own outcome.
The photographers are Cedric Wilson, Serj Fedulov, Paul Stokinger,Stikki Peaches, Martino Zegwaard and Armita Raafat. Students can use these photographers and there are steps to show how to achieve these effects on Adobe photoshop used by the photographers
There is also a clear example on how to do an analysis of a photographer in your sketchbook
To start with there is a recap on composition - how to take a photo and a reminder of the 4 Key objectives used in Photography and an explanation of what key objectives this meets. This powerpoint focuses on the assessment objective 'Develop ideas" from photographers and then how to " Explore" Adobe photoshop techniques to develop your Decay theme.
Year 10 Art - a set of slides to give an overall course program for GCSE. Working through all the objectives - Develop, Explore, Record and Present
Under each objective a list of tasks with reflection sheet to write up progress as students work through the key areas of the course.
This is a scheme of work for students to use.
Students make a fold out booklet of each of the principles.
Video clip on how to make a booklet and then to make each fold on each principle. This powerpoint gives a slide for each principle and students need to make each side of the booklet as creative as they can. One side is the explanation of each principle and the other side one’s own interpretation.
The powerpoint has examples of artwork of each principle to help students to develop their own ideas.
Sheets are copied and students follow making a booklet where one side of the booklet is to give information and definitions on the principles and the other side of the booklet is the student’s own interpretation of the principle.
There are prompts given on each slide explaining what is required for students to write on each principle and examples of what is expected for the student to gather some notes on each principle.
Students learn to draw what is around them and simplify this into a basic painting
Students learn to use watercolour and explore techniques in sketchbook
Students learn about Henri Matisse and the random Fauvist use of colour
Students enjoy making a precious painting
Students learn about the basics in Art looking at the elements of Art
Developing an understanding of pattern
A good starter project on the basics in Art
Students in Cubism No. 2 have made a collage of a celebrity and in this powerpoint students begin to paint this in the style of the analytical cubist artists.
Students use a limited colour scheme like the Cubists and choose two complementary colours.
Students are shown how these colours cancel each other and how to create interesting colours through mixing thse colours and adding white and black.
There are examples of various complementary outcomes and students are given key terms to use in relation to colour. Degraded colours, tint, shade,…
There are a number if pictures resourced that relate to the song ‘12 days of Xmas’
Lyrics
On the first day of Christmas
My true love sent to me
A partridge in a pear tree
On the second day of Christmas
My true love sent to me
Two turtle-doves
And a partridge in a pear tree
On the third day of Christmas
My true love sent to me
Three French hens
Two turtle-doves
And a partridge in a pear tree
On the fourth day of Christmas
My true love sent to me
Four calling birds
Three French hens
Two turtle-doves
And a partridge in a pear tree
On the fifth day of Christmas
My true love sent to me
Five golden rings (five golden rings)
Four calling birds
Three French hens
Two turtle-doves
And a partridge in a pear tree
On the sixth day of Christmas
My true love sent to me
Six geese a laying
Five golden rings (five golden rings)
Four calling birds
Three French hens
Two turtle-doves
And a partridge in a pear tree
On the seventh day of Christmas
My true love sent to me
Seven swans a swimming
Six geese a-laying
Five golden rings (five golden rings)
Four calling birds
Three French hens
Two turtle-doves
And a partridge in a pear tree
On the eighth day of Christmas
My true love sent to me
Eight maids a milking
Seven swans a swimming
Six geese a-laying
Five golden rings (five golden rings)
Four calling birds
Three French hens
Two turtle-doves
And a partridge in a pear tree
On the ninth day of Christmas
My true love sent to me
Nine ladies dancing
Eight maids a-milking
Seven swans a-swimming
Six geese a-laying
Five golden rings (five golden rings)
Four calling birds
Three French hens
Two turtle-doves
And a partridge in a pear tree
On the tenth day of Christmas
My true love sent to me
Ten lords a-leaping
Nine ladies dancing
Eight maids a-milking
Seven swans a-swimming
Six geese a-laying
Five golden rings (five golden rings)
Four calling birds
Three French hens
Two turtle-doves
And a partridge in a pear tree
On the 11th day of Christmas
My true love sent to me
I sent 11 pipers piping
Ten lords a-leaping
Nine ladies dancing
Eight maids a-milking
Seven swans a-swimming
Six geese a-laying
Five golden rings (five golden rings)
Four calling birds
Three French hens
Two turtle-doves
And a partridge in a pear tree
On the 12th day of Christmas
My true love sent to me
12 drummers drumming
Eleven pipers piping
Ten lords a-leaping
Nine ladies dancing
Eight maids a-milking
Seven swans a-swimming
Six geese a-laying
Five golden rings (five golden rings)
Four calling birds
Three French hens
Two turtle-doves
And a partridge in a pear tree
And a partridge in a pear tree