I am a secondary school & A-level Science teacher, specialising in Biology. I am also an experienced AQA GCSE Biology Examiner. My resources contain a mix of Biology, Chemistry and Physics lessons aimed at meeting specification points for the new AQA Trilogy GCSE course and KS3 Activate course.
All of my lessons include at least one opportunity for self-assessment, a range of activities to suit students of all abilities, a set of differentiated starter questions and a plenary.
This lesson is designed for the NEW AQA Physics GCSE, particularly the ‘Radioactivity’ SoW.
For more lessons designed to meet specification points for the NEW AQA Trilogy specifications for Biology, Chemistry and Physics please see my shop: https://www.tes.com/teaching-resources/shop/SWiftScience
This lesson begins with an introduction to some key terms, including ‘activity’ and ‘count rate’, students can take notes from the board so they have the key definition in their books. Next students will be introduced to the idea of a ‘half-life’, students will be given the definition and shown a graph and a diagram to help illustrate this concept.
Students will then have an opportunity to investigate whether the radioactive is random or predictable, students will be given a coin in pairs and will be asked to flip it 20 times. Can you predict the outcome of the next flip? What was the rough ratio of coins flipped head:tails? This investigation demonstrates that the process of radioactive decay is random but with a large enough sample it is possible to predict the number that will decay in a certain amount of time.
Students will then be shown how to complete half-life calculations using a worked example, before students are given a set of problems to work through. The mark scheme for this work is included in the PowerPoint for students to assess their work.
Pupils are given another worksheet of problems to work through, students must show their working at all time. This task can also be self-assessed or peer-assessed using the mark scheme included in the PowerPoint.
The last task requires students to fill-in-the-blanks on a paragraph which summarises what they have learned this lesson. The answers to this task is also included so students can mark and correct their own work…
The plenary task is for students to write a set of summary sentences about what they have learned this lesson, including as many key words as possible from the list provided.
All resources are included at the end of the presentation. Thanks for looking, if you have any questions please let me know in the comments section and any feedback would be appreciated :)
This lesson is designed for the NEW AQA Physics GCSE, particularly the ‘Radioactivity’ SoW.
For more lessons designed to meet specification points for the NEW AQA Trilogy specifications for Biology, Chemistry and Physics please see my shop: https://www.tes.com/teaching-resources/shop/SWiftScience
This lesson begins with an image of two atoms - one with less neutrons in the nucleus and one with more. Students are asked to ‘Think > Pair > Share’ their ideas about what make the atoms different from one another.
Next, students will be given a set of questions which they will need to answer whilst watching a video. The students will complete this task and once finished they will be able to mark their work using a the mark scheme that is provided on the PowerPoint presentation.
Students are now introduced to the idea of radioactive decay, students will be shown another video about ionising radiation. They will need to answer a set of questions whilst watching the video, the work can be self-assessed using the mark scheme available.
The latter part of the lesson focuses on the properties of alpha, beta and gamma radiation. Posters of information will be posted around the room, students will need to read this information and use this to answer a set of questions. The mark scheme is included so students can mark and correct their work.
The last task requires students to determine the number of protons and neutrons found within radioactive sources which have undergone alpha/beta decay. Students can then mark their work once it is complete.
The plenary task is for students to write a twitter message to demonstrate what they have learned today, making sure they #keywords.
All resources are included at the end of the presentation. Thanks for looking, if you have any questions please let me know in the comments section and any feedback would be appreciated :)
This lesson is designed for the Activate KS3 Science Course, specifically Year 7 P2 ’Sound’.
For more lessons designed for KS3 and KS4 please visit my shop at: https://www.tes.com/teaching-resources/shop/SWiftScience.
The lesson starts with a ‘Memory’ Test, students will be shown a diagram of the ear with labels identifying the key parts that they need to know. Students can spend a few minutes looking at the diagram, the labels will then be taken away and they will need to try to annotate a copy of the diagram as best as possible. The labels will then be added to the diagram so students can mark and correct their work.
Next, students will watch a video on how the ear, and the brain, is able to detect sound. Students will be given a set of questions to answer whilst they watch the video, once this task is complete students can self-assess their work against the mark scheme provided.
The next part of the lesson focuses on the ways in which the ear can be damaged, students should firstly ‘Think > Pair > Share’ their ideas about how the ears/hearing can be damaged. The answers will then be revealed so students can assess their work and note down any they didn’t get. Students will then carry out a ‘Doctor’ role-play, where each group will have somebody with a particular problem. The students need to work out what the problem is, explain what the problem is and work out the best way to treat it. This can be acted out as a doctot-patient scene.
Lastly, students will complete a progress check to assess their understanding of what they have learned so far this lesson. This task can be completed in their books and can be self-assessed or peer-assessed using the mark scheme provided.
The plenary activity requires students to write a question about the component of the ear to test their peers understanding of what they have learned this lesson.
All resources are included at the end of the presentation. Thanks for looking, if you have any questions please let me know in the comments section and any feedback would be appreciated :)
This lesson is designed for the NEW AQA Trilogy Biology GCSE, particularly the ‘Ecology’ SoW.
For more lessons designed to meet specification points for the NEW AQA Trilogy specifications for Biology, Chemistry and Physics please see my shop: https://www.tes.com/teaching-resources/shop/SWiftScience
This lesson begins with a think > pair > share task where pupils will need to discuss the definition of ‘competition’. After revealing the definition for competition within the ecology context, pupils will then need to think about the types of resources that plants and animals compete for. They will be given a set of resources, they will need to sort these resources into two columns – those that animals compete for and those that plants compete for. Once this task is complete pupils can self-assess their work using the answers provided on the PowerPoint slide.
In the next activity pupils will need to draw a table in their books and they will watch a video on competition in a variety of organisms. Pupils will fill in their table by identifying the organism and then describing how it competes for the resource/s that it needs.
Pupils will then be asked to think about why animals and plants may want to avoid competition, pupils can discuss with their partner and write their answers in their books. The answers can be revealed using the PowerPoint slide. Pupils can mark and check their work.
The focus of the next part of the lesson is for pupils to consider how plants might avoid competition with other plants, pupils are asked to look at some pictures showing how plants avoid competition and students can discuss in pairs what they think the pictures are demonstrating. The answers to this task can then be revealed and pupils can check their answers, making any corrections where necessary.
The final task is an exam-style question on competition, pupils will answer the question in their books and can then self-assess their work using the mark scheme provided.
The plenary task is for pupils to summarise what they have learnt in three sentences, trying to use as many key words from the key word list provided.
All resources are included at the end of the presentation. Thanks for looking, if you have any questions please let me know in the comments section and any feedback would be appreciated :)
This lesson is designed for the Activate KS3 Science Course, specifically Year 7 C1.1 Module on ‘Particles & Their Behaviour’.
For more lessons designed for KS3 and KS4 please visit my shop at: https://www.tes.com/teaching-resources/shop/SWiftScience.
This lesson begins with an introduction to particles, describing the differences between materials which are made up of just one type of particle - a substance - and those that are made up of different particles - a mixture. Students are also introduced to the idea of properties of a substance as a description of the way in which a substance looks like and behaves.
Students will then carry out a ‘Copy and Complete’ task where they will fill in the blanks to outline what they have learned about particles so far this lesson. This task can be self-assessed using the mark scheme provided on the PowerPoint presentation.
Students are now introduced to the three states of matter - solid, liquid and gas. Students will firstly watch a video, using which they will need answer a set of questions about the arrangement of particles in a solid, liquid and a gas. The answers to this task are included in the PowerPoint for students to self-assess their work once it is complete.
Next, students will draw a summary table into their books and will be given a card sort, students will need to sort the statements into the correct part of their table to describe the properties of solids/liquids/gases. The mark scheme for this task is included on the PowerPoint presentation, it can be used for pupils to self-assess their work.
Lastly, students are given another set of statements describing the properties of solids/liquids/gases. Students need to draw a Venn diagram into their books and will need to sort the statements into the Venn diagram, this task can be marked and corrected once complete.
The plenary task requires students to unscramble a set of anagrams, each anagram is a key word learned from this lesson.
All resources are included at the end of the presentation. Thanks for looking, if you have any questions please let me know in the comments section and any feedback would be appreciated :)
This lesson is designed for the Activate KS3 Science Course, specifically Year 7 P4 ’Space’.
For more lessons designed for KS3 and KS4 please visit my shop at: https://www.tes.com/teaching-resources/shop/SWiftScience.
The lesson begins with an video on the Solar System, students will watch this and whilst watching should answer a set of questions. Once students have completed this task, they can self-assess their work using the mark scheme provided.
In the next activity, information stations will be placed around the classroom so that students can gather information and use to this to complete a worksheet. They can talk to each other to complete this task, once it is complete the work can be self-assessed using the mark scheme provided. This task also includes a research project, so if students have completed the work they can use tablets/computer/laptops/phones to complete research on the Cassinni Space Probe.
The last task requires students to complete a crossword on the Solar System, using what they will have learned over the last couple of lessons.
The plenary task requires students to summarise what they have learned this lesson in three sentences, a list of key words is provided for pupils to use in their sentences.
All resources are included at the end of the presentation. Thanks for looking, if you have any questions please let me know in the comments section and any feedback would be appreciated :)
This lesson is designed for the Activate KS3 Science Course, specifically Year 7 P3 ’Light’.
For more lessons designed for KS3 and KS4 please visit my shop at: https://www.tes.com/teaching-resources/shop/SWiftScience.
The lesson begins by students being shown a video of a laser show, students will need to note down their observations about how light travels. Hopefully students should identify that light travels in straight lines - a diagram can be shown to students to identify this. Students are also shown a diagram which demonstrates how shadows are formed.
Next, students will be given the definition of a luminous and non-luminous object. Students will need to come up with their own examples of luminous and non-luminous objects and write their ideas down into their books, under two headings. This task can then be self-assessed using the mark scheme provided, as well as other suitable suggestions.
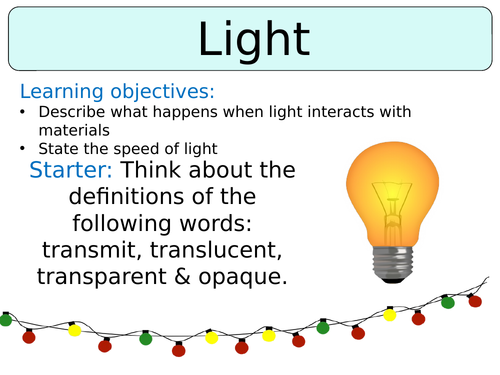
Students will now be shown some pictures of objects which are either opaque, transparent or translucent, students should now ‘Think > Pair > Share’ their ideas about how to group these images. Hopefully, students should identify the three categories, this will be revealed as part of a class discussion. Students will now be given some time to come up with their own definitions for the terms: opaque, transparent and translucent and should come up with their own examples. This task can then be self-assessed using the mark scheme provided.
The next part of the lesson focuses on the speed of light, students will be given the speed of light and will be introduced to terms such as light-second, light-minute and light-year. Students will then be asked a question ‘What travels faster - light or sound? Give examples as evidence’. Students can discuss in pairs, writing their ideas down in their books. This can then be self-assessed using the mark scheme provided.
The last task requires students to complete a ‘Progress Check’ - students will fill in the blanks to complete a paragraph of information summarising what they have learned today. This work can be marked and corrected once complete. Lastly is a true or false activity which students can either complete in their books or using mini whiteboards.
The plenary task requires students to complete an ‘Exit Card’ to summarise three things they have learned, five key words and one question to their peers.
All resources are included at the end of the presentation. Thanks for looking, if you have any questions please let me know in the comments section and any feedback would be appreciated :)
This lesson is designed for the Activate KS3 Science Course, specifically Year 7 P3 ’Light’.
For more lessons designed for KS3 and KS4 please visit my shop at: https://www.tes.com/teaching-resources/shop/SWiftScience.
This lesson begins with an explanation of how the different parts of the eye work together in order for you to see objects. The functions of different parts of the eye are briefly explained. Students will then need to complete a task to assess their knowledge of this introductory information, this can be self-assessed using the mark scheme provided.
This leads onto another task which looks at the function of different parts of the eye, students will each be given a different piece of information outlining the function of one part of the eye. Students will then need to walk around the room, sharing information with each other to complete a table on the functions of eye parts. This task can be marked using the answers provided.
Students will then be shown an image of a pinhole camera, they will need to sketch a copy of it into their book. They are then asked a few questions which looks at the similarities between a pinhole camera and the eye, students should answer these questions in their books and once complete they can mark their work using the answers provided.
Students are then provided with some information comparing the structure and function of eyes compared to a digital camera. Students will need to outline one way in which they are similar and one way in which they are different, this task can also be assessed using the answers provided.
Lastly, the plenary task requires students to write down three sentences to summarise what they have learned this lesson.
All resources are included at the end of the presentation. Thanks for looking, if you have any questions please let me know in the comments section and any feedback would be appreciated :)
This lesson is designed for the NEW AQA Trilogy Chemistry GCSE, particularly the ‘Chemical Analysis’ SoW.
The lesson starts with an introduction to chromatography, pupils are told the importance of the process along with an example of a chromatogram.
Pupils will then watch a video on the steps involved with a chromatography experiment and they will need to arrange a set of statements in the correct order to put together a suitable method. This task can be self-assessed using the mark scheme provided on the PowerPoint. Pupils will now use these steps to conduct their own chromatography experiment, once they have completed this task they can stick their chromatogram in their books and complete a conclusion and evaluation.
Next, pupils will watch another video which goes into more detail of the chromatography method, pupils will be provided with a set of questions which they will need to answer using the information provided in the video. The answers to these questions can then be self-assessed using the mark scheme provided.
The next part of the lesson focuses on how to identify unknown substances using chromatography, pupils will firstly be shown a worked example of how to calculate Rf values. They will then be given a worksheet of chromatograms, for each one they will need to calculate the Rf value of each of the substances and will need to answer a set of questions also. This work can be self-assessed using the mark scheme provided.
The plenary task requires pupils to write three facts, three key words and question on what they have learned during this lesson.
All resources are included at the end of the presentation. Thanks for looking, if you have any questions please let me know in the comments section and any feedback would be appreciated :)
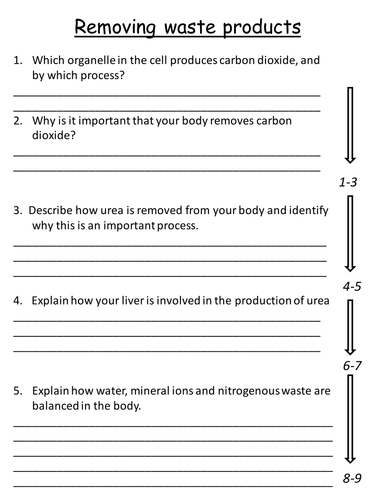
This lesson is designed for the NEW AQA Trilogy Biology GCSE, particularly the ‘Homeostasis’ SoW.
For more lessons designed to meet specification points for the NEW AQA Trilogy specifications for Biology, Chemistry and Physics please see my shop: https://www.tes.com/teaching-resources/shop/SWiftScience
This lesson begins by students discussing what they think the waste products of the body are, they can write down their ideas into their books as a mind map. As an extension pupils can consider which processes within the body actually release these waste products.
The lesson then moves on to identify carbon dioxide and urea as the two major waste products of the body, pupils will then be given a levelled worksheet which they can complete by using information posters either placed around the room or placed on their desks. After pupils have completed this worksheet, they can self or peer assess their work using the mark scheme provided.
The next task is an exam-style question on the work the pupils have just completed, higher ability pupils can challenge themselves by completing these questions in the back of their books and not looking at their notes. Once finished pupils can mark their work using the mark scheme provided in the PowerPoint slide.
The plenary task is an anagram challenge, pupils will need to unscramble 6 words to reveal 6 key words used within the lesson.
All resources are included at the end of the presentation. Thanks for looking, if you have any questions please let me know in the comments section and any feedback would be appreciated :)
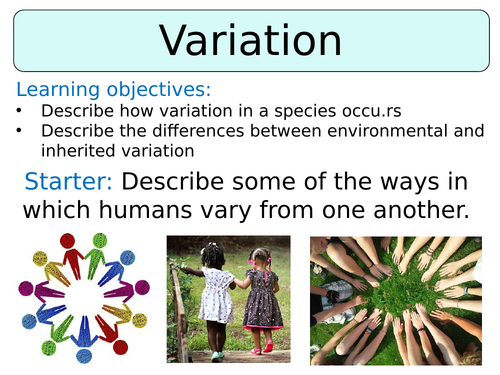
This lesson is designed for the KS3 Year 8 Science course, specifically the B2 1.3 unit on Adaptation & Inheritance.
For more lessons designed for KS3 and KS4 please visit my shop at: https://www.tes.com/teaching-resources/shop/SWiftScience.
The lesson begins with an introduction to variation and what it means to belong to a species. Students will then be shown images of four different people and will be asked to note down the ways in which the people are different from one another and why.
This will lead into the next PowerPoint slide which shows images of characteristics which are inherited - lobed/lobeless ears, eye colour, natural hair colour. Students can make a note of these in their books as examples. Next, students will be shown images of characteristics which could be due to the environment - weight, tattoos/scars, piercings, strength.
Students will now focus on inherited variation, they will be asked to think about their own characteristics and then compare this to a family member - parents/grandparent. Students should then complete a mind map of the characteristics they have inherited from different people, e.g. I have inherited my eye colour from my Dad. If complete, there is an ‘extra challenge’ question for students to consider why they are not identical to either one of their parents.
Next, students will be shown examples of environmental factors which lead to certain types of environmental variation. For example, where you grow up and the football team you support. Students will then need to complete a task which requires students to match the correct environmental factor with the correct type of environmental variation. This task can then be marked and assessed using the mark scheme provided once complete.
The last task requires students to consider a world in which there is no variation, where everyone looked the same as one another. Students will then need to describe the advantages and disadvantages of this world and explain whether it would be a world they would like to live in.
The plenary task requires students to spend a minute talking the person next to them about what they have learned this lesson.
All resources are included at the end of the presentation. Thanks for looking, if you have any questions please let me know in the comments section and any feedback would be appreciated :)
This lesson is designed for the KS3 Year 8 Science course, specifically the B2 1.2 Ecosystem Processes.
For more lessons designed for KS3 and KS4 please visit my shop at: https://www.tes.com/teaching-resources/shop/SWiftScience.
This lesson begins with an introduction of the process of aerobic respiration including the word equations that pupils will need to learn. Next is a video, pupils will need to answer questions whilst watching the video, once it is finished they can self-assess their work using the mark scheme provided.
Pupils will now have a recap of the different structures of an animal and plant cells, they will be required to label a diagram of an animal and plant cells. Once this task is complete, students can self-assess their work using the mark scheme provided. Students will look specifically at the ultra-structure of the cell and which parts are important for respiration, this activity is a match up activity that pupils can complete and then mark.
Students will then be given a piece of information on how oxygen and glucose gets into cells, using this information students will need to answer a set of questions. This work can then be self-assessed using the mark scheme provided in the PowerPoint presentation.
The plenary task requires students to spend a few minutes talking to each other about what they have learned this lesson.
All resources are included at the end of the presentation. Thanks for looking, if you have any questions please let me know in the comments section and any feedback would be appreciated :)
This lesson is designed for the KS3 Year 8 Science course, specifically the C2 1.4 unit on ‘The Earth’.
For more lessons designed for KS3 and KS4 please visit my shop at: https://www.tes.com/teaching-resources/shop/SWiftScience.
The lesson begins with an introduction to the three categories of rocks - sedimentary, igneous and metamorphic rock.
This then follows into an introduction into weathering, students will learn about the the three types of weathering - physical, chemical and biological, students need to be able to name examples for each type of weathering. This can then be assessed in the next task, students are given a group of key words and will need to use these words to write their own description of physical, chemical and biological weathering. This work can then be self-assessed using the mark scheme provided in the PowePoint.
The next part of the lesson now focuses on sedimentary rocks, students are firstly introduced to some of the common properties of sedimentary rocks. Students will then watch a video on the formation of sedimentary rocks, whilst watching this video students will answer a set of questions. This work can then be self-assessed using the mark scheme once complete.
Lastly, students are provided with a set of statements, on the board or printed out as a card sort, they will need to arrange these cards in order so that they correctly describe the stages involved in the formation of sedimentary rocks. This work can be self-assessed or peer-assessed using the mark scheme provided.
The plenary task requires students to write a set of quiz questions to test their peers on what they have learned this lesson.
All resources are included at the end of the presentation, thanks for looking, if you have any questions please let me know in the comments section and any feedback would be appreciated :)
This lesson is designed for the KS3 Year 8 Science course, specifically the B2 1.1 Health & Lifestyle.
For more lessons designed for KS3 and KS4 please visit my shop at: https://www.tes.com/teaching-resources/shop/SWiftScience.
The lesson begins with a question for students to ‘Think, Pair & Share’ with the class - ‘What do you think the most used drug in the world it?’ After a short class discussion, the answer will then be revealed as coffee!
Students are now introduced to definition for drug, as well as explaining the difference between medicinal and recreational drugs. This then follows into a task whereby students should complete a mind map of reasons why people might want to take drugs. Their answers can be checked against the mark scheme which is provided on the PowerPoint.
On the next slide students are provided with a more comprehensive explanation of the differences between medicinal and recreational drugs. The next task will then require students to sort a list of drugs into two columns - medicinal vs. recreational. This task can then be self-assessed using the mark scheme provided on the PowerPoint.
Next, students are provided with some information about the differences between addiction and dependency. Students should answer a set of questions using this information, once complete this task can then be self-assessed using the mark scheme provided.
Lastly, students will look into the use of performance-enhancing drugs in sport. Students will each be given a statement which is a viewpoint on the use of such drugs in sporting events. A class debate could the be organised for people to relay their viewpoints, whilst this is occurring students can write down arguments for and against drugs in sport within a summary table.
The plenary task requires students to complete an exit card which included three things learned this lesson, five key words and one question to test their peers on what they have learned this lesson.
All resources are included at the end of the presentation. Thanks for looking, if you have any questions please let me know in the comments section and any feedback would be appreciated :)
This lesson is designed for the KS3 Year 8 Science course, specifically the C2 1.1 unit on ‘The Periodic Table’
For more lessons designed for KS3 and KS4 please visit my shop at: https://www.tes.com/teaching-resources/shop/SWiftScience.
The lesson starts off with an introduction to the Periodic Table and Dmitri Mendeleev, this then follows into a video which students will watch and will also answer questions on a worksheet. Once this task has been completed, students can self-assess their answers using the mark scheme provided.
Next, students are introduced to the idea of groups and periods of the Periodic Table. Students can take notes on the definition of these two terms, before leading into a task whereby students will be given some data on the melting points and boiling points of Group 1 metals. Using this data students will be asked to answer a set of questions, this work can then be marked and assessed using the mark scheme provided.
The next task focuses on periods of the Periodic Table, students will need to use the data provided in the PowerPoint presentation to answer a set of questions on the pattern of melting points across Period 2 and Period 3. This task can then be self-assessed using the mark scheme provided.
The last task is a copy and correct task, students will need to copy the paragraph out into their books, correcting any mistakes. This work can the be marked and assessed using the mark scheme provided in the PowerPoint.
The plenary task requires students to write down three quiz questions to test their peers knowledge of what they have learned this lesson.
All resources are included at the end of the presentation. Thanks for looking, if you have any questions please let me know in the comments section and any feedback would be appreciated :)
This lesson is designed for the Activate KS3 Science Course, specifically Year 7 B1.1 Module on ‘Cells’
For more lessons designed for KS3 and KS4 please visit my shop at: https://www.tes.com/teaching-resources/shop/SWiftScience.
The lesson starts with an introduction to the definition of ‘specialised’, which follows on to define a ‘specialised cell’ as a cell that has special structures/features to help it carry out its job.
Students are then shown some diagrams of specialised cells and are shown a video, whilst watching the video they are asked to note down as many specalised cells as they can. This work can then be checked and corrected using the answers provided on the PowerPoint.
Students will now each be given a card of information about a the structural features and functions of certain specialised cells. Students will need to walk around the room, sharing information in order to complete a summary table.
Finally, students are asked to complete an ‘Assessment Task’, which is a set of exam-style questions based upon what they have learned the last two lessons. Students can write their answers in their books, the mark scheme for these questions is included so students can assess their work.
Lastly, students are asked to complete a ‘Job Advert’ for one of the specialised cells they have learned about this lesson, the advert should include a description of the job itself and the sort of traits required to perform the job.
The plenary task requires students to copy and complete a set of sentences to summarise what they have learned this lesson.
All resources are included at the end of the presentation. Thanks for looking, if you have any questions please let me know in the comments section and any feedback would be appreciated :)
This lesson is designed for the Activate KS3 Science Course, specifically Year 7 B1.1 Module on ‘Cells’
For more lessons designed for KS3 and KS4 please visit my shop at: https://www.tes.com/teaching-resources/shop/SWiftScience.
The lesson starts with a ‘Cells Rap’ - students will be shown a video, during which they need to write down as many cell organelles as they can. Once they have finished watching their work can be self-assessed using the answers provided.
Next, students will be shown a diagram of an animal and plant cell with the organelles labelled. Students are asked to note down the similarities and differences between these two cells, the answers to this task can then be revealed using the PowerPoint presentation. This is followed by a comprehension task whereby students will need to read an information sheet on ‘Animal & Plant Cells’, using this information they will need to answer a set of questions. The mark scheme for this task is included so students can self or peer assess their work once it’s complete.
Next, students will learn about the functions of each of the organelles. Students will be given a card of information about the function of one of the organelles. They will need to walk around the room, sharing information in order to complete the summary table. Again, this work can be self-assessed once complete.
Lastly students will complete a ‘Team Challenge’ in groups, each group will stand behind a poster and every person has one go to fill in part of the poster (either name/function of organelles), the fastest group to complete the poster correctly wins!
The plenary requires students to summarise what they have learned in the lesson by completing the sentence starters provided.
All resources are included at the end of the presentation. Thanks for looking, if you have any questions please let me know in the comments section and any feedback would be appreciated :)
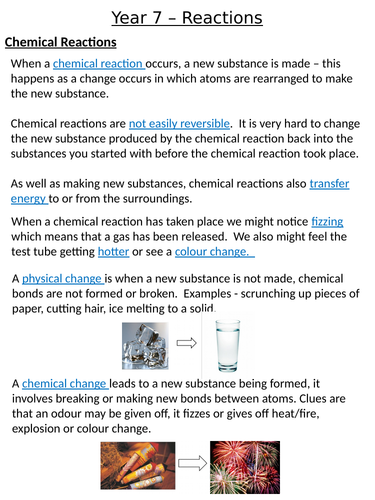
This is a homeschool pack designed for the KS3 Year 7 Science course, specifically the ‘C1.3 Chemical Reactions’ unit of work.
For more lessons & homeschool packs designed for KS3 and KS4, please visit my shop at: https://www.tes.com/teaching-resources/shop/SWiftScience.
This comprehensive pack contains six pages of information, to meet learning objectives within the Year 7 ‘Chemical Reactions’ unit of work. This is followed by three pages of questions, differentiated to suit a range of abilities, as well as a detailed mark scheme for students/parents to mark and correct answers.
The pack covers the following topics:
Chemical Reactions
Word Equations
Burning Fuels
Thermal Decomposition
Conservation of Mass
Endothermic and Exothermic Reactions
Thanks for looking :), if you have any questions please email me at swift.education.uk@gmail.com.
This is a homeschool pack designed for the GCSE Biology course, specifically the ‘B1.1 Cells’ unit of work.
For more lessons & homeschool packs designed for KS3 and KS4, please visit my shop at: https://www.tes.com/teaching-resources/shop/SWiftScience.
This comprehensive pack contains nine pages of information, to meet all learning objectives within the GCSE Biology ‘Cells’ unit of work. This is followed by five pages of questions, differentiated to suit a range of abilities, as well as a detailed mark scheme for students/parents to mark and correct answers.
The pack covers the following topics:
Animal & Plant Cells
Eukaryotic & Prokaryotic Cells
Specialised Cells
Chromosomes & Mitosis
Diffusion
Osmosis
Active Transport
Exchanging Materials
Thanks for looking :), if you have any questions please email me at swift.education.uk@gmail.com.
This lesson is designed for the NEW AQA AS-level Biology course, particularly the ‘Cells’ module.
For more lessons designed to meet specification points for the NEW AQA A-level Biology course please visit my shop: https://www.tes.com/teaching-resources/shop/SWiftScience
A-Level lesson format: I teach in more of a lecture style compared to GCSE. In the majority of my A-level lessons the beginning portion of the lesson is mainly teacher-led, where students are expected to take notes onto a handout/in their books. This is then mixed in with student-led activities, as well as questions and exam prep.
You will find some of my slides have blank spaces for you to add more detail/descriptions/explanations. If you look at the ‘Notes’ section underneath each of these slides, you will find additional content which you can add in as you teach!
This lesson on cell specialisation and organisation begins with a discussion to review specialised cell examples. Students should also describe the difference between smooth and rough endoplasmic reticulum, as well as the role of chloroplasts.
To review organelles, students are then given a matching worksheet with descriptions of nine organelles. They can check the names of each with the answers on the slide. This task leads them to a series of organelle images to label and check as well.
Students are then tasked with past-paper questions to check their understanding of cell structure. A mark scheme is on the next slide.
To begin the discussion of cell specialisation students are tased with a worksheet to try with a partner. The worksheet asks students to consider what information each organelle can tell us. Suggested answers are on the following slides.
The lesson should then spark some conversation about the organisation of certain cells, before students work through a few slides of questions about cell organisation in general. After learning the levels of cell organisation students are led through a few examples to decide for themselves which level each example fits in.
To synthesise their learning, students will work through a ‘cut & stick’ task to create a table of each cell type and its characteristics. A completed table is on the following slide so students may self-asses.
The plenary for this lesson is to write three sentences in their book summarising what they’ve learned!
All resources are included. Thanks for looking, if you have any questions please let me know in the comments section and any feedback would be appreciated :)