Teaching Art is a feast into a of colour, line, texture, space and shape. By encouraging a visual exploration in my learning I love developing a creative approach to learning in the classroom. By encouraging different techniques and an understanding of art I hope to help students appreciate visual learning more. I hope you enjoy my uploads and can use them. Please contact me if you require any further information.
Teaching Art is a feast into a of colour, line, texture, space and shape. By encouraging a visual exploration in my learning I love developing a creative approach to learning in the classroom. By encouraging different techniques and an understanding of art I hope to help students appreciate visual learning more. I hope you enjoy my uploads and can use them. Please contact me if you require any further information.
Students make a cupcake in each of the modern movement styles and make a cake stand at the end of the project. This is a set of powerpoints for each movern movement, Surrealism, Cubism, Expressionism, Neo-impressionism, Fauvism and Realism. It is a set of 8 lessons and then there is the Scheme of Work for the project.
For each of the movements students learn a different technique:
Surrealism- Splash Chance watercolour imaginary creature out of this to add to cupcake.
Cubism - geometrical shapes to shade light to dark to create angular cupcake over a collage made of newspaper. Realism - Tonal realistic shading to capture 3D form.
Expressionism-Black and white polyprint to capture the agitated marks of artists. Neo-Impressionism - using a stippling technique with paintbrush to capture fine mark-making.
Fauvism- random use of arbitrary colour to capture the bright spontaneity of paint marks.
At the end of the project students then choose a party theme and independently decorate their party plate with the cupcakes on this.
**What is A-level Art and AS Art? **
An introduction to the Course and why should I study A-level Art?
This is to introduce students to what is A-level Art and what is required in the course. It gives examples of the components of the course and describes how to go about developing the coursework project and controlled test.
**How to approach the course? **
1, Respond to work from other artists and cultures.
2, Develop preliminary plans and sketches in preparation for further work.
3. Present and organise your thoughts in a visual and intelligible way.
4. Recognise and deal with design problems
5. Think up your own ideas.
6. Explore and use materials skilfully.
**Key Tips to complete the course? **
Examples of how to process the Personal Investigation showing the key objectives, developing ideas from artists, showing exploring materials and taking ideas through a number of processes and doing artist responses. Then developing ideas, compositional plans and artist studies to realise final concept.
Examples of Externally set task, pages from sketchbooks to show how ideas were developed to interpret the theme
Examples of possible Related Study and what topics one can develop into a written study - examples of covers of different studies to give an idea of what is expected.
STEPS TO SUCCESS
To make an artwork which promotes community values and kindness
To be able to use artwork to encourage kindness
The powerpoint has a few pages of ideas that inspire ‘kindness’
Possible ideas are…
To make a poster with interesting typeface
Or
2. To make a picture illustration, combining poems and drawings or images.
Or
To make a collage or a painting or use paper craft collage
Or
To make an animation, video clip or drawing
Or
Make a fashion design
Introductory info for GCSE and A-level
A powerpoint clearly showing what is style visually but also showing how people interpret the same subject matter differently. To clearly understand what is a style?
Slides showing how style is grouped by culture, country, period, artist periods, time, and art movement.
Lots of questions and discussions about what makes a style.
Lesson Objective
To understand what is Style in Art? To develop a deeper understanding of how artists are grouped together.
To begin to analyse and question and discuss various artworks
To look at examples of elements of Art and principles of design.
To define each Art element and respond by making own interpretation
To define each Art Principle and respond by making own interpretation
Also after this a list of all the elements of art with good examples of artworks on each element. For example what is a line, shape, pattern, texture…?
A list of all the principles of Design with good examples of artworks on each principle explaining what is Balance, Rhythm, Harmony…?
Tasks are included Discussions on style and then completing an artwork for each principle and design and element of art.
Excellent introductory powerpoint for GCSE or A-level
These tasks relate to understanding the key building bricks in Art: Elements of Art and the principles of design and should give you 12 weeks of tasks for students to make two booklets.
Making a booklet on the elements of art and then one on the principles of design.
Understanding these key terms helps in enabling students to write about art and if this is completed at Key Stage 3 can be a real help at GCSE and A-level
To find out about who was Ai Weiwei and some key examples of his work and to find out what makes him one of the most famous artists in China. He is the only artist in China known to the West as he pushes boundaries, makes the authorities more aware and is an Activist.
The powerpoint gives examples of a number of his artworks to look at and is an informative powerpoint highlighting key works of Ai Wei Wei and some video clips which give a background to his life.
Learning Objective
To give students a background into art as being a statement to reform society, to see an artists who works as an activist to make statements about the corruption in the Chinese Government.
Ai Wei Wei started out as going to a Film school and he was a son of a father who was a poet. But, his father was banned from practising as a poet and Ai Wei Wei grew up in a society where he realised how important it was to use his mind and his imagination to make artworks. He realises that Chinese society prevent personal comments and censors artists.
Ai Wei Wei is so disappointed with Chinese society he leaves to go and work in the USA. He realises how artists are heavily punished and he knows he has a strong sense of criticising society. He goes to America and he cannot contribute to this society so he decides to go back to China to do his art there.
Ai Wei Wei’s work have a meaning and relate to events in society and he uses Art to change society.
This is a resource of examples of artists who use text in their artwork and there are some examples of artists who show movement in their work.
There is also an activity to collage a set of black and white newspaper/magazine and make your own version creatively using text to show movement.
A set of 8 slides which describe the key characteristics of Dadaism and gives some examples of their works and looks at Surrealism and gives examples of some Surrealist artists.
To use as worksheets in class where students can read about the movements and develop an understanding on the movements.
A description of Duchamp, Man Ray, Dali, Ernst and Magritte with key examples of their work.
The song In A Gadda Da Vida inspired an exhibition of work at the Tate Gallery. This powerpoint just highlights the work at the gallery and gives examples of the Garden of Eden by different artists. There is also a link to a You Tube clip of the original song.
This resource is helpful at GCSE and A-level to teach how to apply acrylic paint with a scraper, a ruler or a card to drag colours and to overlap layers of colours.
The resource has examples of Viera da Silva’s work to give to students. Students will need cardboard and a bank card and use this to apply the paint.
Students need to practise copying her work with only a bank card to create the marks.
Students need to cut the card in various sizes
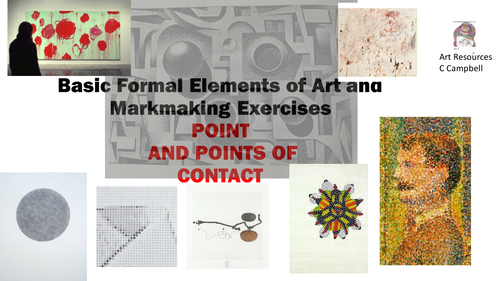
This is a good powerpoint for basic foundation course on different elements of art - starting with Point - it gives you a number of exercises to explore this element as a creative element.
Lots of exercises and different artists.
An excellent starting point for A-level art looking at the basics of a mark and how this effects the negative area.
This is a step by step drawing of a cupcake - showing how to start with basic shapes and then adding in the detail and the shading. This is part of the modern movements project where students make a cake stand with various cup cakes in different art styles linked to modern movements: Expressionism, Neo-Impressionism, Fauvism, Realism, Surrealism.
It also has some slides showing how to do some mark-making exercises to build up students ability to control pencil skills and to capture detail.
Students can also draw from a picture of a cup-cake or preferably have a real cup-cake in front of them to draw from.
Students can also use the grid method to draw a cupcake and there is a picture of this technique to help.
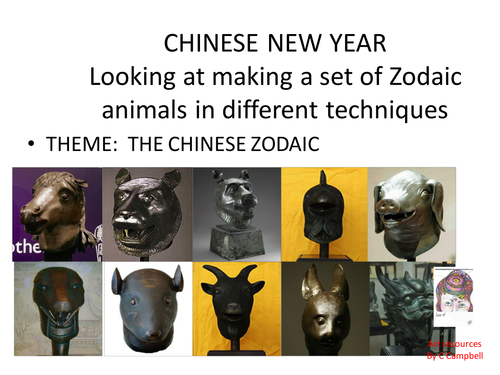
Used in a house competition where each House makes a different set of animals for Chinese New year in a different technique.
Animals in paper art, photoghrapy manipulation of animals, Painting animals, Plastic animals and paper mache artists.
Students work in groups and each group makes a different way of making a set of animals.
This is a fun activity for KS 3 Art project or an after school club.
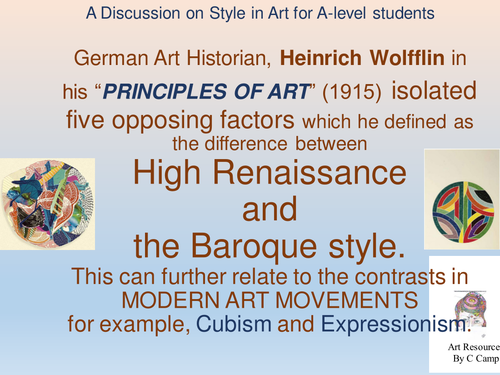
German Art Historian, Heinrich Wolfflin in his “PRINCIPLES OF ART” (1915) isolated five opposing factors which he defined as the difference between
High Renaissance and the Baroque style. This can further relate to the contrasts in MODERN ART MOVEMENTS
There are the 5 main ways of interpreting forms with examples of the work of Heinrich Wolfflin that is:
1. painterly, linear,
2. closed, open,
3. planes and recession,
4. multiplicity, unity,
5. clearness and unclearness.
Wolfflin supports a theory on ways of analysing a painting and examples of style which he formulated between the Renaissance and Baroque style and this gives a good interpretation of the differences in ways of depicting a subject.
In the slide presentation examples are chosen to show the differences in style and hopefully students begin to understand the terminology used and begin to look at the ways different works are composed.
The styles of Wolfflin also link to modern art movements like for example, painterly characterizes the work of Pierre Bonnard, Francis Bacon, Paul Gauguin, Vincent Van Gogh, Rembrandt or Renoir.
Linear characterizes the work of Vermeer or Ingres.
The Impressionists and the Abstract Expressionists tended strongly to be "painterly”, while movements such as Pop Art or photo-realism emphasize flatness and could be referred to more as linear.
This also helps A-level students find their particular strengths and to make them reflect on what particular style they enjoy doing in their own work and gives them an excellent sense of vocabulary to use when analysing artworks and gives them an understanding of using art vocabulary when critically analysing their own and artist’s work.
Students after reviewing the following slides on Wolfflin’s theory and discussing what the differences are in style begin to formulate their own essay on style using 2 artworks of your choice.
TASK: Write an essay on two different artworks and analyse the composition and structure of the artwork in relation to the theories of style of Wolfflin. Begin to not only discuss the visual appearance of the subjects but try to relate this to the influences and background of the particular artists you choose.
This is a short visual display of how perspective developed from the early Medieval paintings through the key artists in the Renaissance: Giotto, Masaccio, Brunelleschi, Leonardo and then the Dutch artists and then to Cubism.
It shows you how artists have developed a window on a flat space through first of all basic means of overlapping, placement, symmetry and story telling and how this changed with Giotto and Masaccio (use of light and dark shading) and how Brunelleschi brought the grid and camera obscura to develop a window to the world in his paintings.
It further looks at Leonardo’s example and how he developed this linear perspective but then continues with the development of chair-scuro (light to dark shading) and their oil paint blending to continue developing the illusion of reality on a flat surface in their Still life paintings.
The presentation ends with how this has now returned to a flat surface and the surface been treated as a wall again with the work of Cezanne and his brushwork painting and underpainting to develop an illusion of space.
Cubism and its multiple viewpoints show how Art has now returned to a wall and Braque and Picasso’s work show how they have now fractured space and how the importance of creating an illusion of space on a 2D surface was not a priority but instead it was the overall meaning and idea that is important.
These are lists of words and pictures to match. There is also a definition, an explanation of the pictures.
Use this in the classroom in a Medieval Fantastic creature / Bestiary project where you get students to research the images of their own - or use the images provided with the lists to play a game in the classroom.
This is a source to show students various art styles and examples of artists who do interesting portraits.
It starts with Frida Kahlo and then goes through all the important portrait artists like Rembrandt, Frans Hals, Van Gogh, Picasso and then takes through a number of other artists with interesting styles, Hundertwasser, Gary Hume, Chila Burman, Sonya Boyce, Leger, Picabia, Dali and much more.
To be used as presentation to introduce students to artists who paint portraits in different styles.
Could be printed out as laminated sheets for students to see different portraits.