I am a secondary school & A-level Science teacher, specialising in Biology. I am also an experienced AQA GCSE Biology Examiner. My resources contain a mix of Biology, Chemistry and Physics lessons aimed at meeting specification points for the new AQA Trilogy GCSE course and KS3 Activate course.
All of my lessons include at least one opportunity for self-assessment, a range of activities to suit students of all abilities, a set of differentiated starter questions and a plenary.
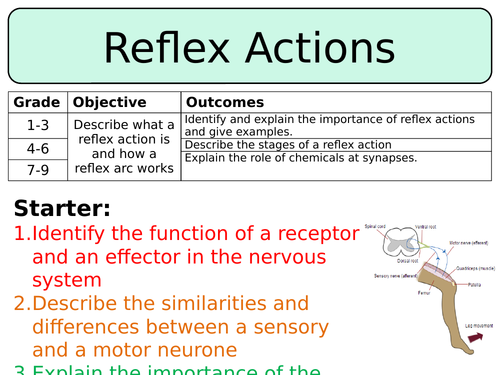
This lesson is designed for the Activate KS3 Science Course, specifically Year 7 B1.3 Module on ‘Reproduction’.
For more lessons designed for KS3 and KS4 please visit my shop at: https://www.tes.com/teaching-resources/shop/SWiftScience.
This lesson begins with an introduction to adolescence and puberty, students will be given a card of information which will read as a class before students answer a set of questions. Once this task is complete, students can self-assess their work using the answers provided.
Next, students should discuss with their partner the physical changes that could occur to a boy and girl during puberty, their ideas should be noted down as a mind map in their books. Their work can then be checked and corrected using the mark scheme provided.
Students will now be given a set of cards describing physical changes which occur in either boys or girls or both, students will need to cut the cards out and stick them into a table in their books. The mark scheme for this task is included for students to self-assess their work.
Lastly, students are introduced to the idea of sex hormones which are what cause the changes that occur in boys and girls during puberty. After this, students will be given a set of levelled questions which they should either complete at the back of their books (higher ability) or use their notes from the lesson (lower/middle ability).
The plenary task requires students to summarise what they have learned this lesson in three sentences, using as many key words as possible.
All resources are included at the end of the presentation. Thanks for looking, if you have any questions please let me know in the comments section and any feedback would be appreciated :)
This lesson is designed for the Activate KS3 Science Course, specifically Year 7 C3 ’Reactions’.
For more lessons designed for KS3 and KS4 please visit my shop at: https://www.tes.com/teaching-resources/shop/SWiftScience.
This lesson begins with a recap on the differences between elements, compounds and mixtures. Students will be given a set of diagrams and will need to decide which is which, they could write their answers down in their books or use mini white boards and complete as a class. The answers can then be revealed using the mark scheme provided and students can check their answers.
Students are then given an explanation of what happens to substances during a chemical reaction, atoms rearrange and new bonds form new substances with different properties. The example of iron sulphide is used, a demonstration could also be carried out to show that iron (in a mixture of iron and sulphur) is magnetic before it is heated. Once iron and sulphur are heated to form iron sulphide, the magnetic properties are now lost.
Students are now shown the basis of a word equation and the difference between reactants and products. They will then be given two word equations and will need to determine which are the reactants and which are the products, the answers will then be revealed. They will then be given four more reactions, students will need to identify the reactants and products of these reactions. Students can then self-assess their work using the mark scheme provided.
Students will now try writing their own word equations using a description provided, students will need to complete a worksheet of these tasks. The answers to these questions are included in the PowerPoint for students to self-assess their work.
Lastly, students will complete an investigation to observe what happens during three chemical reactions. Students will be given the practical worksheet, they can complete the investigation as a group and note down their observations from the reactions. Once the investigation is complete, students will then need to match the reactants from the reactions they carried out with the correct products. This work can then be marked and corrected using the answers provided.
The plenary task requires students to write a twitter message summarising what they have learned today, students should #keywords!
All resources are included at the end of the presentation. Thanks for looking, if you have any questions please let me know in the comments section and any feedback would be appreciated :)
This lesson is designed for the Activate KS3 Science Course, specifically Year 7 C3 ’Reactions’.
For more lessons designed for KS3 and KS4 please visit my shop at: https://www.tes.com/teaching-resources/shop/SWiftScience.
This lesson starts with a definition for a fuel and then students need to ‘Think > Pair > Share’ their ideas of examples of fuels they already know. The answers can then be revealed on the PowerPoint for students to self-assess their work.
Students are then asked to think about the conditions required for things to burn, students can discuss their ideas with each other before feeding back to the class. The answers can then be revealed using the PowerPoint presentation. Students can now summarise what they have learned by completing a ‘fill-in-the-blank’ task, this task can be self-assessed once it has been completed, using the mark scheme provided.
Next, students are asked - ‘What would happen if a glass was placed over a candle? And why?’ - students can discuss their ideas in pairs/groups before feeding back to the class. The answer can then be revealed using the answer provided on the PowerPoint presentation.
Next, students are introduced to the idea of renewable v.s non-renewable fuels, students are given examples of non-renewable fuels and are then shown a video on hydrogen as a renewable fuel. During the video, students will need to answer a set of questions, this can then be marked and assessed using the mark scheme provided.
Students will now conduct an investigation into the energy released by different types of fuel - candle vs. ethanol. Students will heat a boiling tube of water using both of these fuels for a set period of time, using a thermometer to check the temperature every minute they will determine which released the most amount of energy.
Lastly, students are introduced to the idea of an ‘oxidation’ reaction - they can take notes in their books of examples of oxidation reactions.
The plenary task requires students to spend a minute talking to the person next to them about what they have learned this lesson.
All resources are included at the end of the presentation. Thanks for looking, if you have any questions please let me know in the comments section and any feedback would be appreciated :)
This lesson is designed for the Activate KS3 Science Course, specifically Year 7 P3 ’Light’.
For more lessons designed for KS3 and KS4 please visit my shop at: https://www.tes.com/teaching-resources/shop/SWiftScience.
This lesson begins with a recap on what was learned last lesson - students will be given a set of three descriptions and will need to decide which group of materials it is describing. This task can then be checked using the answers provided.
Next, students are shown (with a diagram) what happens when light hits a reflective materials such as a mirror. The incident ray, reflected ray, normal line and angles of both incidence and reflection are labelled - students can sketch a diagram of this into their books. They then need to complete the ‘fill-in-the-gap’ task which outlines the law of reflection - the angle of incidence is equal to the angle of reflection.
Students are then shown the different reflections which can be produced by different surfaces - diffuse or specular. Students can consider why a clear image is produced by a smooth surface and why a blurry image is produced by a rough surface. After a short class discussion, students can take notes of this in their books, along with sketches of the two types of reflection.
Next, students will get to investigate the law of reflection. They will be given a practical worksheet which outlines a method by which students will direct a beam of light from a ray-box to a mirror, they should measure the angle of incidence and angle of reflection. This should be repeated with various angles of incidence, their results can be recorded in the table provided.
Next, students are asked a set of progress check questions to test their knowledge of what they have learned so far on reflection. This task can be self-assessed once it is complete, using the mark scheme provided on the PowerPoint.
The plenary task requires students to complete one of the following ‘sentence starters’ that are provided to provide a summary of what they have learned this lesson.
All resources are included at the end of the presentation. Thanks for looking, if you have any questions please let me know in the comments section and any feedback would be appreciated :)
This lesson is designed for the Activate KS3 Science Course, specifically Year 7 C1.2 ’Elements, Atoms & Compounds’.
For more lessons designed for KS3 and KS4 please visit my shop at: https://www.tes.com/teaching-resources/shop/SWiftScience.
The lesson begins with a definition of the term ‘element’, giving gold as an example. Students are then asked to name as many elements as they can in pairs, and then feed back to the class. This work can be marked using the answers, and other examples, provided on the PowerPoint.
Students will now watch a video on atoms and elements, whilst watching the video students will answer a set of questions. Once this task has been completed, students can self-assess their work using the mark scheme provided.
Next, students are introduced to the definition of an ‘atom’, students are provided with a particle diagram to help depict the definition.
Next, students are introduced to the Periodic Table, students can stick their own Periodic Table into their books Next, they will use the Periodic Table to complete a worksheet, once this task has been completed the work can be self-assessed using the mark scheme provided.
The last task is a ‘progress’ check, students will copy and complete a set of questions in their books, this work can be marked and corrected using the mark scheme provided.
The plenary activity requires students to write three sentences to summarise what they have learned this lesson.
All resources are included at the end of the presentation. Thanks for looking, if you have any questions please let me know in the comments section and any feedback would be appreciated :)
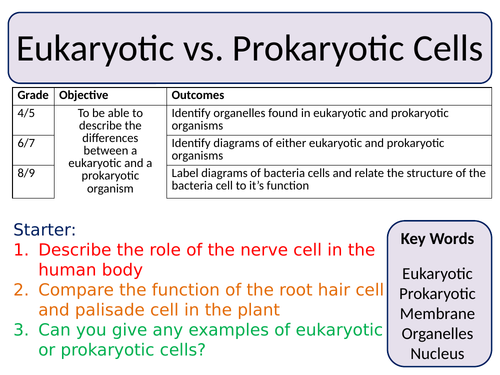
This is a lesson aimed at the new AQA GCSE Biology (2016) - ‘Cells’ SoW.
The lesson begins by identifying examples of prokaryotic and eukaryotic cells, pupils can begin to think about the structural differences between these two types of cells.
Next, pupils are given a worksheet plus an additional card of information on either the structure or function of a bacteria cell. Pupils will need to walk around the room and trade the information on their card with others to fully complete a labelled diagram of a bacteria cell and descriptions of the functions for each structure.
Once completed pupils can peer or self-assess their work using the information within the PowerPoint slide.
The next activity requires pupils to apply their knowledge of the structure of bacteria (prokaryotic) cells and compare this to the structure of eukaryotic cells, pupils need to construct a list/table in their books to identify the similarities and differences between these two cells. Pupils can then self-assess their work against the list provided in the PowerPoint slide.
The next activity is an assessment activity, pupils will need to complete the past-paper question in their books and again self/peer-assess their work using red pens.
The final activity involves a list of ‘True/False’ statements, to gauge the progress of the class this could be completed by students holding up red/amber/green cards to identify whether they think the statement is true or false.
All resources are included in the PowerPoint presentation, please review to provide me with feedback :). Thank you.
This resource meets specification points for the new AQA Trilogy GCSE Biology ‘Cells’ SoW.
For other resources designed for the NEW AQA Trilogy GCSE Biology, Chemistry and Physics specifications please visit my shop: https://www.tes.com/teaching-resources/shop/SWiftScience
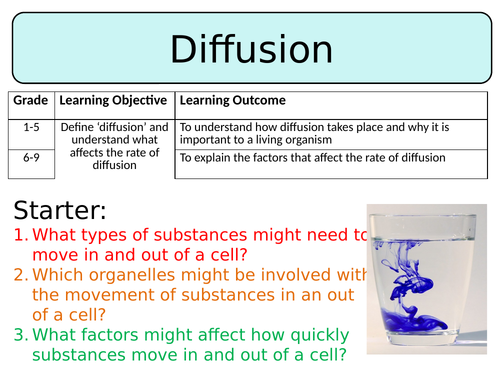
This lesson begins by getting pupils to think about what diffusion is and then giving them the scientific definition for the process. Pupils will then need to read statements about the stages of diffusion, look at diagrams demonstrating these stages and match them together in their books. This activity will be self-assessed using the answers in the PowerPoint presentation.
Pupils will then need to think > pair > share about the factors they think will affect the rate of diffusion. Once they have come up with their own ideas and shared them as a class you can show them the animation provided to demonstrate how concentration of particles and size affects the rate of diffusion. Pupils are then asked to consider how temperature might affect the rate, you can demonstrate this affect using the link to another animation which demonstrates this effect.
Pupils will then complete a fill-in-the-blank task to demonstrate their knowledge of how these different factors affect the rate of diffusion, which can be self-assessed using the answers provided.
Pupils will then look at the importance of diffusion in living organisms and specifically the types of adaptation organism might have to speed up the rate of diffusion. The final activity is a past-paper questions, when completed pupils will self-asses using the mark scheme.
The plenary activity is quick past-paper question to complete and mark.
This lesson is designed for the KS3 Year 8 Science course, specifically the B2 1.3 unit on Adaptation & Inheritance.
For more lessons designed for KS3 and KS4 please visit my shop at: https://www.tes.com/teaching-resources/shop/SWiftScience.
The lesson begins with a video on extinction, including an extra challenge task for pupils to come up with a definition of extinction. Whilst students are watching the video they will have a set of questions to answer, once this task has been completed students will self-assess their work using the mark scheme provided.
Students will now be asked to ‘Think > Pair > Share’ their ideas about what causes extinction to occur within a species. Students will be given a few minutes to talk about this amongst themselves, before feeding back to the class. The answers will then be revealed using the PowerPoint presentation, students can mark and check their work against this mark scheme.
Students will now be given cards of information on the 5 main causes of extinction: habitat destruction, introduction of new species, hunting & fishing, environmental changes & new diseases. Students should summarise this information in their books, writing a few sentences for each cause.
In groups, students will be given cards of information on different organisms and the reasons why they are being pushed to extinction. Using this information students will need to complete a table of information to include 5 different organisms which are now extinct.
Lastly, students will consider ways in which scientists are trying to prevent extinction. Each student will be given some information about the role of a gene bank, examples include: pollen banks, seed banks, cryobank & a tissue bank. They will then need to move around the classroom, sharing information with each to complete a summary table. This task can the be self-assessed using the mark scheme provided in the PowerPoint.
The plenary task requires students to pretend you are a conservationist working for a charity that is trying to stop the extinction of one of the organisms you studied earlier in the lesson. Write a twitter message to your followers to raise awareness of the issues that are critically affecting this organism.
All resources are included at the end of the presentation. Thanks for looking, if you have any questions please let me know in the comments section and any feedback would be appreciated :)
This lesson is designed for the KS3 Year 8 Science course, specifically the B2 1.1 Health & Lifestyle.
For more lessons designed for KS3 and KS4 please visit my shop at: https://www.tes.com/teaching-resources/shop/SWiftScience.
This lesson begins with images of people who are obese, underweight or have a vitamin deficiency (e.g. rickets). Students are asked to ‘Think > Pair > Share’ their ideas about whether these people are malnourished or not? Students should have a few minutes to discuss their ideas, before sharing the class. The PowerPoint then moves on to identify that each of the individuals are malnourished, as they are either taking on too much/too little nutrients.
Students are now asked to consider how people might lose weight, students can create a mind map in their books. Once students have had a chance to discuss their ideas with the class, some ideas can be revealed so students can mark and correct their own work. This then follows into a ‘copy and complete’ task, where students should complete a set of sentences to summarise what they learned so far this lesson. This work can also be self-assessed using the mark scheme available.
Students should now complete the mid-lesson progress check, which is a ‘true or false’ activity. Students are given a set of statements, they should indicate using mini whiteboards/write down their answers in their books, the answers can then be revealed for students to check their answers.
Next, students are given a task which allows them to work out how much fat they are eating each week. Students can consider a list of statements, identify how many apply to them and add them up to give a rating out of 5, the higher the rating the more unhealthy their diet is.
Lastly, students are asked to write a letter to a person who is overweight/obese to give them some information about the health problems which are associated with being overweight and explain some methods which they could employ to help them to lose weight.
The plenary task is an anagram challenge, students are given a set of anagrams which are words associated with what they have learned this lesson.
All resources are included at the end of the presentation. Thanks for looking, if you have any questions please let me know in the comments section and any feedback would be appreciated :)
This lesson is designed for the KS3 Year 8 Science course, specifically the C2 1.1 unit on ‘The Periodic Table’.
For more lessons designed for KS3 and KS4 please visit my shop at: https://www.tes.com/teaching-resources/shop/SWiftScience.
This lesson begins with an introduction to the elements found within Group 1 of the Periodic Table - The Alkali Metals. Students will also learn some of the properties of the Alkali Metals which make them similar to other metals.
Students will now focus on the reaction of alkali metals with water, students will learn what happens with lithium is placed in water - including the word equation for this reactions. After learning this, students will then need to copy and complete the word equations of other alkali metal reactions with water. This task can then self-assessed using the mark scheme provided.
Students will now draw a table in their books before watching a video on the different reactions of Group 1 metals with water. Students will need to note down observations whilst watching the video. After completing this task, students are asked to ‘Think > Pair > Share’ their ideas about how they think rubidium and caesium will react with water. After this task, students can assess their work and also watch a another video to find out if their predictions about rubidium and caesium were correct.
The next activity requires students to read a paragraph of information about the alkali metals, students will then need to answer a set of questions using this information. Once complete students can self-assess their work using the answers provided on the PowerPoint.
The last activity is a ‘True or False’ activity, students will need to decide whether the statements are correct or not. The answers are provided for this task so students can check their work.
The plenary activity requires students to write down three facts, three key words and one question to test their peers on what they have learned this lesson.
All resources are included at the end of the presentation. Thanks for looking, if you have any questions please let me know in the comments section and any feedback would be appreciated :)
This lesson is designed for the NEW AQA Trilogy Chemistry GCSE, particularly the ‘Organic Chemistry’ SoW.
The lesson begins on a description of hydrocarbons and why crude oil is so useful, this is followed by a video on crude oil. Whilst watching the video students will be required to answer a set of questions, this work can then be self-assessed using the mark scheme provided.
The next part of the lesson requires students to watch a teacher demonstration of the distillation of crude oil, students will watch the teacher distill crude oil, removing at least four fractions. The fractions can be passed around the classroom and students will need to complete a results table to assess the smell, viscosity, colour and flammability of each fraction.
Pupils will now focus on the structure of different alkanes, they will be introduced to the first four alkanes and be asked to think about why there is a pattern in the formulae of alkanes. Next, students will complete a summary table of the structural formulae, displayed formulae, 3D structure and boiling point of the first four alkanes in the homologous series. Students can self/peer assess their work using the answers provided.
Finally, pupils will complete a ‘Quick Check’ task, which involves answering a set of questions about what they have learned this lesson. Those higher ability students may want to turn to the back of their books to avoid looking at notes, lower ability will need extra support. Again, the mark scheme for these questions is included in the PowerPoint.
The plenary task requires pupils to write 3 facts, 3 key words and one questions to test their peers knowledge of what they have studied in class today.
All resources are included at the end of the presentation. Thanks for looking, if you have any questions please let me know in the comments section and any feedback would be appreciated :)
This lesson is designed for the Activate KS3 Science Course, specifically Year 7 B1.1 Module on ‘Cells’
For more lessons designed for KS3 and KS4 please visit my shop at: https://www.tes.com/teaching-resources/shop/SWiftScience.
This lesson begins with an introduction to two unicellular organisms - euglena and amoeba. Students can also watch a video to demontrate the motion of an amoeba cell.
The main task involves students completing a set of tasks using information sheets on amoeba and euglena cell structure, function and reproduction. Students should work their way through the tasks, once this is complete they can self-assess their work using the mark scheme provided.
Next, students should summarise what they have learned during the lesson by completing the fill-in-the-blank task, the answers to this task are included in the PowerPoint so students can self-assess their work once it is complete.
Lastly, students will need complete a ‘Key Word Bingo’ activity, they will need to choose 6 words from the list provided. The teacher then reads out a definition, if this definition matches one of the words written down then it can be crossed out. First student to cross all 6 words from their books/grids shouts bingo!
The plenary task is a 3-3-1 reduction - students will write down 3 facts, 3 key words and reduce this to 1 key word from the lesson today.
All resources are included at the end of the presentation. Thanks for looking, if you have any questions please let me know in the comments section and any feedback would be appreciated :)
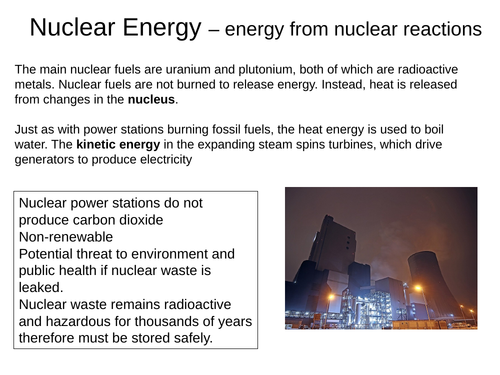
This is a resource which meets specification points from the NEW AQA GCSE Physics 'Energy' SoW.
Other lessons from this SoW can be found in my TES Shop: https://www.tes.com/teaching-resources/shop/SWiftScience
This lesson begins by pupils considering which of the energy resources are renewable or non-renewable. Pupils will then use the posters, which can be placed around the room or on pupils desks, to complete a table which identifies how the energy resource generates electricity and the advantages and disadvantages of each energy resource.
Pupils are then given a list of statements about all power stations which they need to cut and stick (or write) into two columns - advantages or disadvantages. **To challenge higher ability pupils this could be completed at the back of students books, so they cannot use information from the previous task**. Pupils can then peer-assess their work.
The plenary activity is a past-paper question which involves analysing some data on the usage of different power stations between two time periods. The mark scheme is included, pupils can use this to either peer-assess or self-assess their answer.
All resources are included. Please review, I would appreciate any feedback :). Thanks!
This lesson is designed for the NEW AQA AS-level Biology course, particularly the ‘Cells’ module.
For more lessons designed to meet specification points for the NEW AQA A-level Biology course please visit my shop: https://www.tes.com/teaching-resources/shop/SWiftScience
A-Level lesson format: I teach in more of a lecture style compared to GCSE. In the majority of my A-level lessons the beginning portion of the lesson is mainly teacher-led, where students are expected to take notes onto a handout/in their books. This is then mixed in with student-led activities, as well as questions and exam prep.
You will find some of my slides have blank spaces for you to add more detail/descriptions/explanations. If you look at the ‘Notes’ section underneath each of these slides, you will find additional content which you can add in as you teach!
This lesson begins with a starter discussion to review materials from the ‘biological molecules’ module.
Students are then asked to begin thinking about types of cell by having a ‘think > pair > share’ discussion to define eukaryotic cells and their features. They can compare their answers to the diagram on the next slide which outlines of the main features of eukaryotic cells.
The first task of this lesson is for students to fill in their worksheet using information cards about each organelle. Students should synthesise the information, not just copy it into their worksheet. The worksheet and information cards are available at the end of the slideshow.
Using their mini whiteboards students are then guided to identify some photomicrographs from scanning and transmission electron microscopes. They should identify if the photomicrograph was taken by a scanning or transmission electron microscope, and bonus points if they can name the organelle!
Students are then given another worksheet task to fill in the blanks and can self-assess using the following slide.
The plenary task is to write a tweet about what they’ve learned!
All resources are included. Thanks for looking, if you have any questions please let me know in the comments section and any feedback would be appreciated :)
This is a homeschool pack designed for the KS3 Year 8 Science course, specifically the ‘C2.3 Reactions with Metals’ unit of work.
For more lessons & homeschool packs designed for KS3 and KS4, please visit my shop at: https://www.tes.com/teaching-resources/shop/SWiftScience.
This comprehensive pack contains four pages of information, to meet learning objectives within the Year 8 'Reactions with Metals’ unit of work. This is followed by three pages of questions, differentiated to suit a range of abilities, as well as a detailed mark scheme for students/parents to mark and correct answers.
The pack covers the following topics:
Acids & Metals
Metals & Oxygen
Metals & Water
Metal Displacement Reactions
Extracting Metals
Ceramics
Polymers
Composites
Thanks for looking :), if you have any questions please email me at swift.education.uk@gmail.com.
This lesson is designed for the Activate KS3 Science Course, specifically Year 7 P2 ’Sound’.
For more lessons designed for KS3 and KS4 please visit my shop at: https://www.tes.com/teaching-resources/shop/SWiftScience.
The lesson starts with a definition of an ‘echo’ and how echoes can be produced by ship via sonar and by baby scanners via ultrasound. Students will then consider the ways in which echoes can be reduced and why this might be important in places such as theaters, concert walls & recording studios.
The first activity involves students using a range of materials (tissue paper, cardboard, cotton wool, bubble wrap, paper, plastic) to soundproof a margarine tub, which will hold a buzzer and a decibel meter. Each group can test how well they have soundproofed their margarine tub, perhaps a prize for the best one! Once this has been complete students can write an evaluation for their practical, they will need to consider which part of their practical were carried out well , how the findings could be improved and what they would do differently if it was done again.
Next, students will be given a piece of information on ‘Ultrasound’ - using this they will need to answer a set of questions in their books. This task can be self-assessed using the mark scheme provided in the books.
The last task is a crossword on ‘Sound’, students should use knowledge of that they have learned over the course of the topic on sound to answer the clues and complete the crossword. The task can be assessed using the mark scheme provided.
The plenary requires students to complete one of the selection of sentence starters to summarise what they have learned so far this lesson.
All resources are included at the end of the presentation. Thanks for looking, if you have any questions please let me know in the comments section and any feedback would be appreciated :)
This lesson is designed for the NEW AQA Trilogy Chemistry GCSE, particularly the ‘Earth’s Atmosphere’ SoW.
For more lessons designed to meet specification points for the NEW AQA Trilogy specifications for Biology, Chemistry and Physics please see my shop: https://www.tes.com/teaching-resources/shop/SWiftScience
Pupils will firstly be given some data on the rise in global temperature over the last 150 years, they will firstly need to plot this data on a graph and then will need to answer a set of questions.
Pupils will then focus on the different ways in which global climate change will affect the environment, each pupils will be given a different card of information and they will need to walk around the room and share with each other to complete the table of effects.
The next part of the lesson will look at reducing greenhouse gas emissions, firstly students will watch a video which focuses on carbon dioxide emission reduction. Pupils will need to answer some questions whilst watching the video which can then be self-assessed using the mark scheme provided. After this, pupils will told ways in which methane emissions can be reduced.
Pupils will now complete a ‘Think > Pair > Share’ task whereby they discuss what ‘Carbon footprint’ might mean and will try to come up with a definition, the actual definition is then revealed and pupils can mark their work, making corrections where needed. Pupils are now asked to come up with a mind map listing all the ways in which their actions contribute to their annual carbon footprint, once they have created a list they need to come up with an action plan of how to tackle this and reduce their overall carbon footprint. This task can be self or peer assessed using the mark scheme provided.
The final part of the lesson is an outline of problems faced when trying to reduce your carbon footprint, pupils need to understand these issues.
The plenary task gives pupils a list of answers, for each answer pupils need to come up with the question that would lead to that answer.
All resources are included within the PowerPoint presentation, if you have any questions please email me at swift.education.uk@gmail.com. Any feedback would be greatly appreciated :) Thanks!
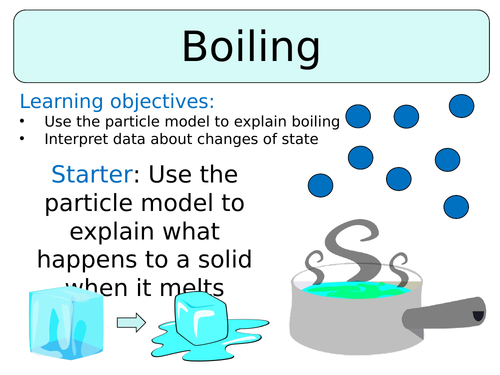
This lesson is designed for the Activate KS3 Science Course, specifically Year 7 C1.1 ’Particles & their Behaviour’
For more lessons designed for KS3 and KS4 please visit my shop at: https://www.tes.com/teaching-resources/shop/SWiftScience.
This lesson begins with a video on the process of ‘boiling’, students will need to answer a set of questions whilst watching the video. Once complete students can self-assess their work using the mark scheme provided.
Students are then shown a method they could use to measure the boiling point of a liquid, they are given tips for what to look out for - e.g. bubbles of gas forming in the liquid and also an increase in temperature which then plateaus at a certain point without increasing further.
Next activity is a ‘progress check’, students are asked to copy and complete a set of sentences to outline the process of boiling. This task can then be marked using the mark scheme provided on the PowerPoint.
The next part of the lesson focuses on an investigation, students are asked to firstly think about why salt might be added to a pan of boiling water when cooking pasta. After a short class discussion, students will need to come up with a prediction of how adding salt to water will affect the boiling point of water - will it make it higher or lower? After making the prediction, students will now conduct the experiment to investigate the effect of salt on the boiling point of water. Results should be written into a results table, followed by plotting a graph of their results and writing a conclusion.
The last section of the lesson focuses on the usefulness of boiling points and melting points of substances for predicting the state they are in. Students are provided with the melting point and boiling point of magnesium and are asked to predict the state of the metal at certain temperatures. This work can be marked and corrected using the mark scheme provided.
Lastly, students are given a set of questions based upon what they have learned so far this lesson, they should indicate the correct answers with either thumbs up, thumbs down or thumb in the middle.
The plenary task requires students to write a list of key words from the lesson.
All resources are included at the end of the presentation. Thanks for looking, if you have any questions please let me know in the comments section and any feedback would be appreciated :)
This lesson is designed for the KS3 Year 8 Science course, specifically the P2 1.1 unit on ‘Electricity & Magnetism’.
This lesson begins with an introduction to potential difference, students will watch a couple of minutes of a video and whilst watching will need to answer a set of questions. This task can then be self-assessed using the mark scheme provided on the PowerPoint presentation.
Next, students will be shown a circuit diagram, with two voltmeters connected - one parallel to a cell and one parallel to a light bulb. Students are asked to ‘Think > Pair > Share’ their ideas about whether the potential difference is higher across the battery or across the cell. Students will then carry out an investigation to find the answer the this question.
After this, students will complete a fill-in-the-blank task to summarise what they have learned so far this lesson. Once complete student can self-assess or peer-assess their work using the mark scheme provided.
Lastly, students will be given a set of questions relating to potential difference and also resistance, students will need to use what they have learned this lesson as well last lesson on resistance to complete these questions. This task can then be marked and assessed using the mark scheme provided. This is followed by a very quick anagram challenge, students will need to unscramble the anagrams to spell 6 key words related to the topic of electricity, students can write a definition for each key word if they have finished.
The plenary requires students to write a twitter message, summarising what they have learned this lesson, including #keywords.
All resources are included at the end of the presentation, thanks for looking, if you have any questions please let me know in the comments section and any feedback would be appreciated :)
This lesson is designed for the KS3 Year 8 Science course, specifically the P2 1.1 unit on ‘Electricity & Magnetism’.
For more lessons designed for KS3 and KS4 please visit my shop at: https://www.tes.com/teaching-resources/shop/SWiftScience.
The lesson begins with students being asked to ‘Think > Pair > Share’ their ideas about whether like and unlike charges attract or repel each other. After a short class discussion, students will feed their ideas back to the class and the answers can be revealed - like charges repel each other and unlike charges repel each other.
Students are now introduced to the sub-atomic particles which make up an atom - protons, neutrons and electrons. From the description provided students will need to have a go at filling in the blanks on the diagram of the atom, once completed students can self-assess their work using the mark scheme provided.
Next, students will complete a ‘Memory Test’ activity whereby a table of information is provided to students on the relative mass and charges of a proton, neutron and an electron. Students will be given a few minutes to observe and remember the information, then the table is taken away and students will need to recreate the table. The complete table is then shown to students so they can show mark and correct their work.
Students will now complete a mid-lesson progress check to assess their knowledge of what they have learned so far this lesson, the mark scheme for this progress check is included in the PowerPoint so students can self-assess the work once complete.
The next part of the lesson will focus on static charge, students will watch a video about this phenomenon and will need to answer a set of questions whilst watching. Once complete students can either self-assess or peer-assess their work using the answers provided.
The last task students will need to complete is a fill-in-the-blank task, students can mark this task using the mark scheme provided.
The plenary requires students to write a WhatsApp message to a friend, summarising what they have learned this lesson.
All resources are included at the end of the presentation, thanks for looking, if you have any questions please let me know in the comments section and any feedback would be appreciated :)