Having taught in the UK and abroad, I've experienced teaching many different syllabi including SABIS, AQA, WJEC and Cambridge. I develop resources to help teachers model key concepts, provide practice for students and include answers to help students self-assess their work. Planning for a 27 lesson week can be stressful to say the least, so I hope you find my resources useful. Thank you for choosing my lesson/s, I hope they enrich your teaching practice and make your life easier.
Having taught in the UK and abroad, I've experienced teaching many different syllabi including SABIS, AQA, WJEC and Cambridge. I develop resources to help teachers model key concepts, provide practice for students and include answers to help students self-assess their work. Planning for a 27 lesson week can be stressful to say the least, so I hope you find my resources useful. Thank you for choosing my lesson/s, I hope they enrich your teaching practice and make your life easier.
This “Speed of Sound” PowerPoint lesson is designed for GCSE Physics students, focusing on how sound waves travel through different media, how to measure the speed of sound, and how wave properties like pitch and volume are affected by frequency and amplitude. The lesson includes interactive demonstrations, real-world applications, and exam-style questions to help students grasp key concepts.
The lesson starts with a starter activity reviewing prior knowledge of wave properties, including frequency, amplitude, and wave speed equations. Students recall the relationships between wavelength, wave speed, and period, ensuring they have a strong foundation before diving into the topic.
Students then explore how sound waves require a medium to travel and why they cannot propagate in a vacuum. A key discussion point is whether an astronaut in space would hear a drum beating outside their suit. They learn that sound waves are mechanical waves, which require particles to transfer energy, making it impossible to hear sound in space.
The lesson introduces a practical demonstration using an alarm bell in a vacuum jar, which visually reinforces that as air is removed, the sound disappears because no particles remain to transfer the vibrations.
Students then see how sound speed differs in solids, liquids, and gases, understanding that:
Sound travels fastest in solids due to closely packed particles allowing quicker energy transfer.
Sound is slower in liquids since particles are further apart.
Sound travels slowest in gases, where particles are widely spaced and less frequent collisions occur.
The lesson also covers how sound waves travel and reflect, leading into an explanation of how to measure the speed of sound using the echo method.
Students work through a step-by-step guide:
Generate a sound (e.g., a hand clap).
Time how long it takes for the sound to reflect off a surface (like a wall) and return.
Multiply the measured distance by 2 (since sound travels to the wall and back).
Use the formula: speed = distance/time
Repeat and calculate an average, removing any anomalous results.
Students apply this knowledge in practice calculations, solving problems like:
If a wall is 50m away and it takes 0.3 seconds to hear the echo, how fast was the sound traveling? 100m÷0.3s=333.33m/s
A section on oscilloscopes and sound waves helps students analyze how changes in frequency affect pitch and how amplitude affects loudness. Using interactive simulations or teacher demonstrations, students match waveforms to their corresponding pitch and volume characteristics.
The lesson concludes with GCSE-style exam questions.
This editable PowerPoint (.pptx) file is fully aligned with GCSE Physics specifications, offering clear explanations, real-world applications, and interactive problem-solving activities. Updated in Februa2024, this resource ensures a strong understanding of wave behavior, sound propagation, and practical measurement techniques for GCSE students.
This “Required Practical: Acceleration” PowerPoint lesson is designed for AQA GCSE Physics Foundation Tier students. It focuses on investigating the relationship between acceleration and force using Newton’s Second Law of Motion (F=ma). This lesson provides step-by-step guidance for the required practical, ensuring students can conduct the experiment, collect and analyze data, and apply their findings to real-world physics concepts.
The practical investigation is introduced, where students measure how the acceleration of a trolley changes with varying force. They follow a structured method using a trolley, a pulley system, and weights to vary force while keeping mass constant. Data is recorded in a results table and plotted as a force vs. acceleration graph to observe the relationship.
This editable PowerPoint (.pptx) file is specifically designed for AQA GCSE Physics Foundation Tier students. Updated in February 2025, it provides structured guidance, hands-on learning opportunities, and exam-focused practice, making it an essential resource for mastering acceleration and Newton’s Second Law in GCSE Physics.
This “Properties of Waves” PowerPoint lesson is designed for AQA GCSE Physics students, covering key wave characteristics such as frequency, wavelength, amplitude, and wave speed. It introduces essential equations, including wave speed = frequency × wavelength, and develops students’ ability to calculate and analyze wave behavior through real-world applications and practice questions.
The lesson starts with a starter activity revisiting key concepts from Lesson 1: Introduction to Waves, ensuring students understand transverse vs. longitudinal waves, amplitude, and wavelength. Students then move on to defining frequency, understanding how it is measured in hertz (Hz) and calculated using the formula: frequency = number of waves / time taken.
The lesson features a demonstration using a ripple tank, where students observe wave behavior and define wavefront. They explore how the number of waves per second (frequency) relates to the time for one complete wave (period) and complete calculations using: period = 1 / frequency
Students then apply the wave speed equation: Wave speed = Frequency × Wavelength. They work through step-by-step calculations, rearrange the equation to solve for different variables, and answer GCSE-style questions. The lesson also introduces standard form calculations, preparing students for more advanced physics applications.
Updated in February 2025, this editable PowerPoint (.pptx) file is fully aligned with the AQA GCSE Physics specification and includes structured explanations, worked examples, and interactive activities, making it a valuable resource for teaching wave properties, calculations, and practical applications in GCSE Physics.
**Save 54% with the Complete Electricity Bundle! **
Get this lesson as part of our GCSE Electricity Bundle and enjoy a huge discount! Instead of buying lessons individually, grab the entire unit with 13 lessons, including required practicals, for just £12.00.
Click here to get the bundle now: https://www.tes.com/teaching-resource/resource-13199110
This “Electrical Power & Resistance Heating” PowerPoint lesson is designed for AQA GCSE Physics students, covering the concepts of power, energy transfer, resistance heating, and key equations used to calculate electrical power. The lesson includes step-by-step explanations, worked examples, and practice questions to help students apply their understanding to real-world electrical applications.
The lesson begins with a starter activity reviewing key components of a plug, including the live, neutral, and earth wires, the function of a fuse, and the importance of three-core cables for appliances with metal casings. This ensures students recall essential electrical safety concepts before learning about electrical power and resistance heating.
Students then explore electrical power, learning how power is defined as the rate at which energy is transferred. They compare appliances with different power ratings to understand how power affects performance, using relatable examples such as blenders and kettles. The power equation is introduced: P = E/t where P is power (watts), E is energy transferred (joules), and t is time (seconds). Students complete practice calculations using this equation to determine the power of household appliances.
The lesson also introduces the power equation in terms of current and voltage: P=I×V. Students apply this equation to calculate the power output of electrical devices when given current and voltage values. The lesson includes guided examples and independent practice questions to develop problem-solving skills.
In the resistance heating section, students learn that when a current flows through a resistor or a wire, some electrical energy is converted into heat due to collisions between free electrons and metal ions. This process is essential in devices such as electric kettles, filament light bulbs, and electric heaters. The equation for power dissipation due to resistance heating is introduced: P = I2R where P is power, I is current, and R is resistance. Students complete calculations to determine the heat produced in different circuit components and discuss how this affects the efficiency of electrical appliances.
This editable PowerPoint (.pptx) file is designed for AQA GCSE Physics students. Updated in February 2025, it includes structured explanations, practice questions, and real-world applications, making it an essential resource for understanding electrical power, energy transfer, and resistance heating in GCSE Physics.
**Save 54% with the Complete Electricity Bundle! **
Get this lesson as part of our GCSE Electricity Bundle and enjoy a huge discount! Instead of buying lessons individually, grab the entire unit with 13 lessons, including required practicals, for just £12.00.
Click here to get the bundle now: https://www.tes.com/teaching-resource/resource-13199110
This “Efficiency and Cost of Appliances” PowerPoint lesson is designed for AQA GCSE Physics students, covering how to calculate energy transfer in kilowatt-hours (kWh), determine electricity costs, and analyze efficiency in appliances. The lesson includes step-by-step explanations, worked examples, and real-world applications to help students develop problem-solving skills related to energy consumption and efficiency.
The lesson begins with a starter activity reviewing basic unit conversions, including grams to kilograms, meters to kilometers, and watts to kilowatts. It also prompts students to recall essential physics equations, such as the formulas for power, energy transfer, and efficiency. This ensures students have a strong foundation before learning how to calculate electricity costs and efficiency percentages.
Students first explore efficiency, understanding that it measures how well a device transfers energy usefully. They learn that no device is 100% efficient, as some energy is always wasted, often as heat. The lesson introduces the efficiency equations: efficiency = useful energy output / total energy input and efficiency = useful power output / total power input. Students practice calculating efficiency using given input and output values, converting between decimal and percentage forms, and analyzing why higher efficiency reduces energy waste and cost.
Next, the lesson covers energy transfer and electricity costs. Students learn how to calculate energy consumption in kilowatt-hours (kWh) rather than joules, making energy usage easier to compare on electricity bills. The equation used is: E=P×t where E is energy (kWh), P is power (kW), and t is time (hours). Students apply this equation to real-world scenarios, such as calculating the energy consumption of a washing machine, microwave, and heater over different time periods.
To determine the cost of using electrical appliances, students use the equation: Cost §=Power (kW)×Time (hours)×Cost per Unit §. Worked examples guide students through calculating the total cost of running household appliances, reinforcing the importance of energy efficiency in reducing electricity bills.
This editable PowerPoint (.pptx) file is designed for AQA GCSE Physics students. Updated in February 2025, it includes structured explanations, interactive problem-solving exercises, and real-world applications, making it an essential resource for teaching efficiency, energy transfer, and electricity costs in GCSE Physics.
**Save 54% with the Complete Electricity Bundle! **
Get this lesson as part of our GCSE Electricity Bundle and enjoy a huge discount! Instead of buying lessons individually, grab the entire unit with 13 lessons, including required practicals, for just £12.00.
Click here to get the bundle now: https://www.tes.com/teaching-resource/resource-13199110
This “Cables, Plugs, and Electrical Safety” PowerPoint lesson is designed for AQA GCSE Physics students, covering the structure and function of three-pin plugs, electrical wiring, and essential safety features in household appliances. The lesson includes clear explanations, diagrams, and real-world applications to help students understand electrical safety.
The lesson begins with a starter activity reviewing electrical conductors and insulators. Students answer questions about good and poor conductors, the behavior of thermistors and light-dependent resistors (LDRs), and how adding resistors in parallel affects total resistance. This ensures a strong foundation in circuit components before introducing plug wiring.
Students then examine the structure of three-pin plugs, identifying the live (brown), neutral (blue), and earth (green/yellow) wires. They learn why plug cases are made of plastic (insulator) and why brass is used for plug pins (good conductor, corrosion-resistant). The lesson includes labeled diagrams, with an activity requiring students to identify the internal components of a plug and explain their function.
The section on two-core vs. three-core cables explains why some appliances do not require an earth wire (e.g., plastic-cased appliances) and why metal-cased appliances must have an earth wire to prevent electrocution.
A key focus is on electrical safety devices, including fuses, switches, and earth wires. Students learn how fuses prevent overheating by melting when excessive current flows, cutting off the power supply. The lesson covers different fuse ratings (3A, 5A, 13A) and includes practice questions where students select the correct fuse for an appliance based on its current draw.
The lesson also explains short circuits and how they create fire hazards by allowing a large current to flow with little resistance. Students explore how fuses, circuit breakers, and earth wires prevent electrical hazards by cutting off the current when a fault occurs.
This editable PowerPoint (.pptx) file is designed specifically for AQA GCSE Physics students. Updated in February 2025, it provides structured explanations, interactive activities, and practical applications, making it an essential resource for teaching cables, plugs, and electrical safety in GCSE Physics.
**Save 54% with the Complete Electricity Bundle! **
Get this lesson as part of our GCSE Electricity Bundle and enjoy a huge discount! Instead of buying lessons individually, grab the entire unit with 13 lessons, including required practicals, for just £12.00.
Click here to get the bundle now: https://www.tes.com/teaching-resource/resource-13199110
This “Investigating Resistance in Series and Parallel Circuits” PowerPoint lesson is designed for AQA GCSE Physics Foundation students. It guides students through the required practical to examine how adding resistors in series and parallel affects total resistance. The lesson provides clear explanations, step-by-step instructions, and practical applications to help students develop a deeper understanding of resistance and circuit behavior.
Students can complete the practical using physical circuit components or an interactive simulation, with a link provided to a PhET virtual lab.
The lesson begins with a starter activity that reviews key equations, including charge (Q=I×t) and voltage (V=I×R). It also reinforces prior knowledge about how resistance changes in filament bulbs, the function of diodes, and the definition of an ohmic conductor. These foundational concepts help students connect theoretical knowledge to experimental practice.
The core focus of the lesson is the required practical investigation, where students:
Set up circuits with resistors in series and parallel.
Measure current and voltage to determine resistance using Ohm’s Law.
Compare the effects of adding resistors in both circuit types.
Analyze results and apply theoretical concepts to explain changes in total resistance.
The PowerPoint includes circuit diagrams, step-by-step practical instructions, and guided analysis questions. Students record their observations and answer GCSE-style questions, such as:
What happens to total resistance when resistors are added in series?
How does total resistance change when resistors are added in parallel?
How do current and voltage behave in both circuit types?
The lesson concludes with practice calculations and multiple-choice questions to reinforce key takeaways.
This editable PowerPoint (.pptx) file is specifically designed for AQA GCSE Physics Foundation students. Updated in February 2025, it provides structured guidance, hands-on learning opportunities, and real-world applications, making it an essential resource for mastering resistance in series and parallel circuits.
**Save 54% with the Complete Electricity Bundle! **
Get this lesson as part of our GCSE Electricity Bundle and enjoy a huge discount! Instead of buying lessons individually, grab the entire unit with 13 lessons, including required practicals, for just £12.00.
Click here to get the bundle now: https://www.tes.com/teaching-resource/resource-13199110
This “AC, DC, The National Grid & Transformers” PowerPoint lesson is designed for AQA GCSE Physics students. It covers the differences between alternating current (AC) and direct current (DC), the structure and function of the UK National Grid, and the role of transformers in electricity distribution. The lesson includes clear explanations, interactive activities, and real-world applications to help students understand how electricity is transmitted efficiently.
The lesson starts with a starter activity that prompts students to recall the movement of electrons in a circuit and the direction of current flow. This helps reinforce the concept that electrons move from the negative to the positive terminal, setting the foundation for understanding AC and DC electricity.
Students then explore the key differences between alternating and direct current, including how AC changes direction 50 times per second (50Hz) in the UK mains supply, while DC flows in one constant direction. A voltage-time graph comparison is provided to help students visualize how AC and DC behave differently.
Next, the lesson introduces the UK National Grid, explaining how electricity is generated, transmitted, and distributed across the country. Students learn why high-voltage transmission is necessary to reduce energy loss due to resistance in power lines. They analyze how transformers play a crucial role in the National Grid, stepping up voltage for transmission and stepping it down for safe use in homes.
The section on transformers explains their function using key equations and diagrams. Students explore the differences between step-up and step-down transformers, learning how the number of coil turns affects voltage and current. They then apply their knowledge by answering GCSE-style calculation questions, using the transformer equation to determine voltage changes.
Throughout the lesson, students engage in interactive activities, including identifying AC and DC sources, interpreting voltage-time graphs, and discussing the pros and cons of overhead vs. underground power cables. Review questions at the end assess understanding of key concepts such as National Grid efficiency, transformer function, and AC vs. DC behavior.
This editable PowerPoint (.pptx) file is designed specifically for AQA GCSE Physics students. Updated in February 2025, it provides structured explanations, problem-solving exercises, and real-world applications, making it an essential resource for mastering electricity transmission and transformer principles in GCSE Physics.
This “Introduction to Waves” PowerPoint lesson is designed for AQA GCSE Physics students, covering the fundamentals of waves, their properties, and classifications. It provides a structured breakdown of mechanical and electromagnetic waves, differentiates between transverse and longitudinal waves, and introduces key concepts such as wavelength, amplitude, compression, and rarefaction.
The lesson starts with a starter activity where students analyze a Mexican wave video. They describe how the movement of people in the stadium represents a transverse wave, reinforcing the concept that waves transfer energy without transferring matter.
Students then explore the nature of waves, learning that waves are vibrations or disturbances that transfer energy. They classify waves as either mechanical or electromagnetic, distinguishing between:
Mechanical waves (e.g., sound waves, water waves, seismic waves) that require a medium to travel.
Electromagnetic waves (e.g., radio waves, microwaves, visible light, X-rays) that do not require a medium and can travel through space at 300,000,000 m/s.
The lesson introduces parallel and perpendicular motion, helping students visualize how different wave types propagate. Students learn the difference between:
Transverse waves, where oscillations are perpendicular to the direction of energy transfer (e.g., water waves, electromagnetic waves).
Longitudinal waves, where oscillations are parallel to the direction of energy transfer (e.g., sound waves, seismic P-waves).
Key wave properties such as wavelength and amplitude are explained using diagrams and real-world examples. Students define:
Wavelength (λ) as the distance between two consecutive crests or compressions.
Amplitude as the maximum displacement from the equilibrium position, determining wave energy.
Compression as the high-pressure region in a longitudinal wave.
Rarefaction as the low-pressure region between compressions.
The lesson includes practice questions with step-by-step answers, ensuring students can interpret wave diagrams and apply terminology correctly.
This editable PowerPoint (.pptx) file is aligned with the AQA GCSE Physics specification and provides clear explanations, engaging activities, and practice exercises, making it an ideal resource for introducing waves and their properties. Updated in February 2025, this lesson ensures a strong foundation in wave physics for GCSE students.
**Save 54% with the Complete Electricity Bundle! **
Get this lesson as part of our GCSE Electricity Bundle and enjoy a huge discount! Instead of buying lessons individually, grab the entire unit with 13 lessons, including required practicals, for just £12.00.
Click here to get the bundle now: https://www.tes.com/teaching-resource/resource-13199110
This “Required Practical: Investigating Resistance” PowerPoint lesson is designed for AQA GCSE Physics students. It focuses on experimentally determining how the length of a wire affects resistance, reinforcing the relationship between voltage, current, and resistance using Ohm’s Law. The lesson follows the AQA required practical method, ensuring students understand data collection, analysis, and graph plotting.
Key Learning Objectives:
Investigate how the length of a wire affects resistance using a circuit with an ammeter and voltmeter.
Apply Ohm’s Law (R=V/I) to calculate resistance at different wire lengths.
Analyze and interpret results, including identifying patterns and sources of error.
Develop practical skills by setting up circuits, recording measurements, and plotting graphs.
Lesson Features:
The lesson begins with a starter activity where students solve Ohm’s Law problems to recall resistance calculations:
Core Topics Covered:
Aim of the Practical:
To investigate how changing the length of a wire affects resistance.
Explanation of how resistance occurs as electrons collide with metal ions in the wire.
Method (Step-by-Step Practical Guide):
Set up the apparatus using a power supply, wires, a ruler, crocodile clips, an ammeter, and a voltmeter.
Measure the wire length using a ruler and record it in a table.
Turn on the power supply, record the voltage and current.
Repeat the experiment for different wire lengths (e.g., 20 cm, 40 cm, 60 cm).
Turn off the power supply between readings to prevent overheating.
Use Ohm’s Law (R=V/I) to calculate resistance.
Plot a line graph of wire length vs. resistance.
Expected Results:
Resistance should increase with wire length, as a longer wire means more collisions between electrons and metal ions.
The relationship between length and resistance is directly proportional.
Interactive Activities:
✔ Complete the missing steps in the practical method.
✔ Predict what will happen to resistance as wire length increases.
✔ Analyze example data, perform resistance calculations, and plot a graph of wire length vs. resistance.
✔ Answer key GCSE-style questions, such as:
Why must the power supply be turned off between readings?
How does increasing wire length affect current?
File Details:
Format: Editable PowerPoint (.pptx)
Updated: February 2025
Aligned with: AQA GCSE Physics Required Practical Specification
This lesson provides clear guidance, structured activities, and real-world applications, making it an essential resource for mastering resistance investigations in GCSE Physics.
**Save 54% with the Complete Electricity Bundle! **
Get this lesson as part of our GCSE Electricity Bundle and enjoy a huge discount! Instead of buying lessons individually, grab the entire unit with 13 lessons, including required practicals, for just £12.00.
Click here to get the bundle now: https://www.tes.com/teaching-resource/resource-13199110
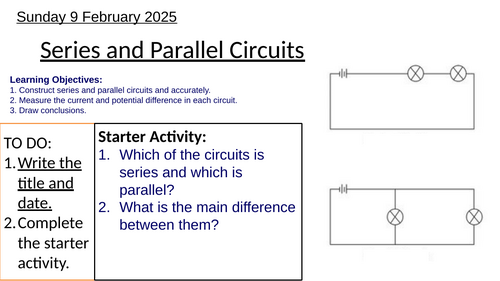
This “Voltage & Current in Series and Parallel Circuits” PowerPoint lesson is designed for AQA GCSE Physics students, covering the key differences between series and parallel circuits, how current and voltage behave in each, and how to construct and measure circuits accurately. This resource aligns with the AQA GCSE specification and includes interactive simulations, circuit diagrams, and practical tasks.
Key Learning Objectives:
Construct series and parallel circuits accurately using correct circuit symbols.
Measure and compare current and voltage in both series and parallel circuits.
Analyze brightness changes in bulbs when components are added to series and parallel circuits.
Lesson Features:
The lesson begins with a starter activity, where students identify series and parallel circuits and discuss their main differences.
Core Topics Covered:
What is a Series Circuit?
One continuous pathway for current to flow.
When more bulbs are added, brightness decreases due to increased resistance.
Current remains the same throughout the circuit.
What is a Parallel Circuit?
Two or more pathways for current to flow.
Adding more bulbs does not affect brightness.
Current splits across branches, but voltage remains the same.
Building and Measuring Circuits:
Students draw circuit diagrams for series and parallel circuits with different components.
Use PhET simulations or real equipment to observe current and voltage behaviors.
Current and Voltage Rules:
Series Circuits: Current is the same everywhere; voltage is shared between components.
Parallel Circuits: Current splits across branches; voltage remains the same across each branch.
Ammeter & Voltmeter Use: Instructions on correctly connecting meters in a circuit.
Interactive Activities:
✔ Build circuits using PhET simulations (linked in the lesson) or practical lab equipment.
✔ Draw and analyze circuit diagrams for different configurations.
✔ Complete calculations and observations for current and voltage measurements.
✔ Answer circuit-related problem-solving questions based on GCSE-style exam questions.
Lesson Summary & Plenary:
The lesson concludes with a reflection activity where students answer key questions, such as:
What happens to bulb brightness when more are added to a series circuit?
What happens if a bulb in a parallel circuit breaks?
File Details:
Format: Editable PowerPoint (.pptx)
Updated: February 2025
Aligned with: AQA GCSE Physics Specification
This resource provides clear explanations, real-world applications, and engaging activities, making it an essential lesson for series and parallel circuits in GCSE Physics.
**Save 54% with the Complete Electricity Bundle! **
Get this lesson as part of our GCSE Electricity Bundle and enjoy a huge discount! Instead of buying lessons individually, grab the entire unit with 13 lessons, including required practicals, for just £12.00.
Click here to get the bundle now: https://www.tes.com/teaching-resource/resource-13199110
This “Resistance & Ohm’s Law” PowerPoint lesson is designed for AQA GCSE Physics students, covering the concept of electrical resistance, its effect on current, and calculations using Ohm’s Law. The lesson includes theoretical explanations, real-world applications, and practice questions to build problem-solving skills.
Key Learning Objectives:
Define electrical resistance as the opposition to current flow in a circuit.
Describe the relationship between current and resistance (as resistance increases, current decreases).
Calculate resistance using Ohm’s Law: R = V/I where R is resistance (ohms, Ω), V is voltage (volts), and I is current (amperes).
Explain why resistance causes heating in circuits and how this affects electronic components.
Lesson Features:
The lesson starts with a starter activity, where students review current and voltage behavior in series and parallel circuits, reinforcing prior knowledge.
Core Topics Covered:
What is Resistance?
Resistance occurs when electrons collide with vibrating ions in a wire, slowing their movement and generating heat.
Explains why devices like smartphones heat up when in use.
Ohm’s Law and Resistance Calculation:
Step-by-step guidance on using the equation R=V/I.
Worked examples, such as calculating resistance for a bulb when given voltage and current.
Rearranging Ohm’s Law to solve for different variables (e.g., finding voltage or current).
Interactive Activities:
✔ Gap-fill exercises to reinforce definitions and key concepts.
✔ Practice calculations for resistance using Ohm’s Law.
Lesson Summary & Plenary:
Students answer key review questions, such as:
What is the unit of resistance, and how is it measured?
What happens to resistance as current increases?
File Details:
Format: Editable PowerPoint (.pptx)
Updated: February 2025
Aligned with: AQA GCSE Physics Specification
This lesson provides clear explanations, real-world applications, and engaging problem-solving exercises, making it an essential resource for understanding resistance and Ohm’s Law in GCSE Physics.
**Save 54% with the Complete Electricity Bundle! **
Get this lesson as part of our GCSE Electricity Bundle and enjoy a huge discount! Instead of buying lessons individually, grab the entire unit with 13 lessons, including required practicals, for just £12.00.
Click here to get the bundle now: https://www.tes.com/teaching-resource/resource-13199110
This “Component Characteristics Required Practical” PowerPoint lesson is designed for AQA GCSE Physics students to investigate the resistance of different components, including a fixed resistor, a filament lamp, and a diode. The lesson follows the AQA Required Practical method, ensuring students understand how to set up circuits, collect data and analyze I-V graphs.
The lesson begins with a starter activity to assess prior knowledge of circuit components. Students answer key questions about LDRs, diodes, thermistors, LEDs, and fixed resistors, reinforcing their understanding of how resistance changes under different conditions. This prepares them for the practical investigation by linking component behavior to measurable electrical properties.
Students then explore the aim of the required practical - to investigate how the resistance of a fixed resistor, filament bulb, and diode varies with potential difference. The lesson provides a step-by-step guide for setting up the circuit using a power pack, ammeter, voltmeter, and variable resistor. Instructions include how to reverse current flow by swapping circuit connections, allowing students to observe the behavior of diodes.
The data collection phase includes filling in a results table for current and voltage readings for each component. Students use their recorded data to plot I-V graphs, analyzing how resistance changes in each case. The PowerPoint features pre-drawn axes for graph plotting and sample datasets to support learners.
To reinforce learning, students answer GCSE-style questions that test their ability to interpret I-V graphs. They identify ohmic and non-ohmic resistors, explain why filament bulbs have increasing resistance at higher temperatures, and describe why diodes allow current flow in only one direction. The lesson also includes simulation and video links for students who may need additional support.
This editable PowerPoint (.pptx) file aligns with the AQA GCSE Physics Required Practical Specification and provides structured guidance, interactive tasks, and real-world applications, making it an essential resource for mastering component characteristics and resistance investigations in GCSE Physics. Updated in February 2025, it ensures students gain hands-on experience with key electrical principles and data analysis skills.
**Save 54% with the Complete Electricity Bundle! **
Get this lesson as part of our GCSE Electricity Bundle and enjoy a huge discount! Instead of buying lessons individually, grab the entire unit with 13 lessons, including required practicals, for just £12.00.
Click here to get the bundle now: https://www.tes.com/teaching-resource/resource-13199110
This “Component Characteristics” PowerPoint lesson is designed for AQA GCSE Physics students and explores the electrical characteristics of key circuit components, including resistors, diodes, thermistors, and light-dependent resistors (LDRs). The lesson covers Ohm’s Law, current-voltage (I-V) graphs, and practical applications of these components in electrical circuits.
The lesson begins with a starter activity to reinforce prior knowledge on resistance and Ohm’s Law. Students answer key questions such as how resistance is affected by wire length, the equation for Ohm’s Law, and how current and voltage are measured in circuits. These questions help build foundational knowledge before introducing new concepts.
Students then explore different circuit components, including fixed resistors, variable resistors, LDRs, diodes, LEDs, and thermistors. Each component is explained with circuit symbols, real-world applications, and an emphasis on how their resistance changes under different conditions. For example, students learn that an LDR’s resistance decreases as light intensity increases, making it useful in automatic street lighting, while thermistors are used in temperature-sensitive devices such as thermostats and fire alarms.
The lesson also introduces Ohm’s Law, defining resistance as the opposition to current and explaining how it can be calculated using the formula R=V/I. Students examine how some components obey Ohm’s Law (ohmic conductors) while others, such as filament bulbs and diodes, do not. I-V graphs for different components are analyzed, showing how resistance changes with voltage. Fixed resistors produce a straight-line graph as current and voltage are directly proportional, while filament bulbs show a curved graph due to increased resistance at higher temperatures.
To deepen understanding, students complete circuit diagram tasks, analyze I-V graphs, and discuss practical applications of electrical components. They also apply their knowledge through GCSE-style exam questions, including calculation problems and conceptual questions about resistance and component behavior.
This editable PowerPoint (.pptx) file aligns with the AQA GCSE Physics Specification and is an essential resource for teaching component characteristics, resistance, and I-V graphs. Updated in February 2025, the lesson includes structured explanations, real-world applications, and interactive problem-solving exercises to help students master the topic effectively.
**Save 54% with the Complete Electricity Bundle! **
Get this lesson as part of our GCSE Electricity Bundle and enjoy a huge discount! Instead of buying lessons individually, grab the entire unit with 13 lessons, including required practicals, for just £12.00.
Click here to get the bundle now: https://www.tes.com/teaching-resource/resource-13199110
This “Voltage and Potential Difference” PowerPoint lesson is designed for AQA GCSE Physics students, providing a structured approach to understanding potential difference, how it is measured, and its role in electrical circuits. This resource aligns with the AQA GCSE specification and includes theoretical explanations, practical applications, and problem-solving exercises.
Key Learning Objectives:
Define potential difference (voltage) as the energy transferred per unit charge.
Measure potential difference in circuits using a voltmeter connected in parallel.
Use models to explain current and potential difference, making abstract concepts more accessible.
Apply the equation: V = E/Q where V is potential difference (volts), E is energy transferred (joules), and Q is charge (coulombs).
Lesson Features:
The lesson begins with a starter activity, prompting students to answer key questions such as:
Are potential difference and voltage the same?
What is the unit of potential difference?
How is voltage measured, and how is the measuring device connected in a circuit?
Core Topics Covered:
Definition of Potential Difference:
Describes voltage as the “push” given to electrons in a circuit by a power source.
Explains how electrons transfer energy to components like bulbs and resistors.
Measuring Potential Difference:
Introduces the voltmeter and how it must be connected in parallel to measure energy differences across components.
Modelling Potential Difference Using a Rope Model:
Uses an interactive analogy where a moving rope represents electron flow, pulling represents potential difference, and squeezing represents resistance.
Potential Difference, Energy, and Charge Relationship:
Includes worked examples demonstrating how to calculate voltage using the energy transferred and charge moved.
Example: “A bulb transfers 320J of energy when 64C of charge passes through it. Calculate the potential difference across the bulb.”
Interactive Activities:
✔ Gap-fill exercises to reinforce definitions and concepts.
✔ Video-based learning using circuit models to visualize energy transfers.
✔ Practice calculations applying the equation V = E/Q.
File Details:
Format: Editable PowerPoint (.pptx)
Updated: February 2025
Aligned with: AQA GCSE Physics Specification
This resource provides clear explanations, real-world applications, and engaging tasks, making it an essential teaching tool for voltage and potential difference in GCSE Physics.
This “Investigating Electromagnets” PowerPoint lesson is designed for AQA GCSE Physics students, focusing on the factors that affect the strength of an electromagnet. The lesson covers the relationship between current, coils, and magnetic field strength, and includes a required practical investigation where students experiment with different variables to understand electromagnetism.
The lesson begins with a starter activity prompting students to recall prior knowledge about magnetic fields around current-carrying wires and how they can be made stronger. Students consider how the shape of a wire, current strength, and presence of a core influence the magnetic field of a solenoid.
Students then explore the key principles of electromagnetism, including how electromagnets differ from permanent magnets, the role of iron cores in increasing magnetic strength, and real-world applications such as scrapyard cranes and electric motors. The lesson outlines the three key factors that increase electromagnet strength:
Increasing the current in the wire.
Increasing the number of coils in the solenoid.
Using an iron core instead of air or other materials.
The practical investigation involves students building and testing electromagnets to examine how coil number affects magnetic strength. Using an iron nail, insulated wire, and paperclips, students systematically test different coil numbers and measure how many paperclips are picked up. They record data in a results table and analyze the trend by plotting a graph of coils vs. paperclips lifted.
A strong focus is placed on scientific investigation skills, including:
Identifying variables (independent, dependent, and control).
Writing a method with clear, sequential steps.
Analyzing results and forming a conclusion based on collected data.
Evaluating reliability and discussing improvements for greater accuracy.
The lesson concludes with a six-mark exam-style question. Structured guidance is provided, ensuring students can confidently describe how electromagnets function and how their strength can be adjusted.
Updated in February 2025, this editable PowerPoint (.pptx) file is designed for AQA GCSE Physics students. With structured explanations, hands-on investigation, and real-world applications, this resource is ideal for mastering electromagnetism and practical experimentation in GCSE Physics.
This PowerPoint resource is an engaging middle school science lesson that explores renewable and non-renewable energy sources, their applications, and their environmental impacts. It emphasizes critical thinking about energy choices and their advantages and disadvantages.
Key learning objectives:
Identifying renewable and non-renewable energy sources and describing how they work.
Evaluating the advantages and disadvantages of each energy source.
Understanding the environmental impact of fossil fuels and the role of greenhouse gases in global warming.
Resource features:
The lesson begins with a starter activity that reviews prior knowledge of energy stores, transfers, efficiency, and power calculations. Students also solve a simple power equation to activate their understanding of energy concepts.
Core topics include:
Renewable vs. Non-Renewable Energy:
Renewable: Solar, wind, geothermal, hydroelectric, tidal, wave, and biomass energy.
Non-Renewable: Fossil fuels (coal, oil, natural gas) and nuclear energy.
How Each Energy Source Works:
Explains the basic mechanisms of energy production for each source, such as solar panels converting sunlight into electricity or turbines generating energy from wind.
Advantages and Disadvantages:
Includes pros and cons of each source, such as reliability, environmental impacts, and cost. Examples:
Solar: Renewable but weather-dependent.
Fossil Fuels: Reliable but produce carbon dioxide and contribute to global warming.
Greenhouse Gases and Climate Change:
Highlights the greenhouse effect, its role in maintaining Earth’s temperature, and the negative impacts of increased carbon dioxide from burning fossil fuels.
Interactive activities:
Completing tables to compare the pros and cons of energy sources.
Assigning energy sources to suitable locations based on real-world scenarios (e.g., a desert for solar panels, offshore for wind turbines).
Answering reflective questions like:
“What makes geothermal energy renewable?”
“Why is nuclear energy considered non-renewable?”
The plenary consolidates learning with questions to summarize key concepts and encourages students to think critically about energy sustainability.
File details:
This editable ‘.pptx’ file aligns with middle school science curricula. Updated in January 2025, it includes structured content, real-world applications, and interactive tasks, making it an essential resource for teaching energy resources and their environmental implications.
This PowerPoint resource provides an engaging middle school science lesson focusing on the investigation of energy content in different types of food. It offers a hands-on approach to understanding energy transfer, scientific methods, and the interpretation of experimental results.
Key learning objectives:
Designing and conducting an experiment to measure the energy content of various foods by observing temperature changes in water.
Understanding variables in scientific experiments: independent, dependent, and control.
Interpreting data through bar graphs and drawing conclusions from experimental results.
Resource features:
The lesson begins with a thought-provoking starter activity to activate prior knowledge. Students identify scientific apparatus and answer preliminary questions about the experiment setup.
Core topics include:
Energy Measurement in Food:
Introduces the concept of burning food under a boiling tube containing water to measure the energy released, with the rise in water temperature serving as an indicator.
Experiment Setup and Safety:
Details the use of equipment such as a mounted needle, Bunsen burner, thermometer, and boiling tube, with an emphasis on safety procedures like using goggles and handling hot objects carefully.
Variables and Methodology:
Students identify variables:
Independent Variable: Type of food burned.
Dependent Variable: Temperature change in water.
Control Variables: Volume of water, starting water temperature, distance between food and boiling tube.
Step-by-step guidance is provided for writing a method using precise instructions and scientific language.
Interactive activities:
Predicting which food will release the most energy and completing data tables during the experiment.
Plotting temperature changes in bar graphs and answering questions about data trends.
Reflecting on experimental limitations, such as incomplete burning of food or inconsistent starting water temperatures, and suggesting improvements like repeating trials and controlling variables.
The lesson concludes with an evaluation section where students summarize findings, address reliability concerns, and write a concise conclusion about which food had the highest energy content.
File details:
This editable ‘.pptx’ file aligns with middle school science curricula. Updated in January 2025, it features clear visuals, interactive tasks, and guided instructions, making it an essential resource for teaching experimental design and energy transfer concepts.