Teaching Art is a feast into a of colour, line, texture, space and shape. By encouraging a visual exploration in my learning I love developing a creative approach to learning in the classroom. By encouraging different techniques and an understanding of art I hope to help students appreciate visual learning more. I hope you enjoy my uploads and can use them. Please contact me if you require any further information.
Teaching Art is a feast into a of colour, line, texture, space and shape. By encouraging a visual exploration in my learning I love developing a creative approach to learning in the classroom. By encouraging different techniques and an understanding of art I hope to help students appreciate visual learning more. I hope you enjoy my uploads and can use them. Please contact me if you require any further information.
These resources support a study on Hundertwasser.
This helps with making an artist analysis of his work, interpreting a photo you take of houses into your own style and making a coloured drawing
Secondly taking this into a clay tile.
Students to be given a strip of paper and fold this into 8 sections. On the end two folds students make a front cover.
There is a You tube video link to this project.
In the six sections in the middle of the fold out paper there are 6 tasks for each of the elements of art.
Line, Shape, Colour, Texture, Space and Value.
Students on the one side of the fold out write information about the element and on the other side students are to do a drawing of the element as a creative response to each element
This is a fun project and the outcomes are successful.
Students make a fold out booklet of each of the principles.
Video clip on how to make a booklet and then to make each fold on each principle. This powerpoint gives a slide for each principle and students need to make each side of the booklet as creative as they can. One side is the explanation of each principle and the other side one’s own interpretation.
The powerpoint has examples of artwork of each principle to help students to develop their own ideas.
Sheets are copied and students follow making a booklet where one side of the booklet is to give information and definitions on the principles and the other side of the booklet is the student’s own interpretation of the principle.
There are prompts given on each slide explaining what is required for students to write on each principle and examples of what is expected for the student to gather some notes on each principle.
Students learn to draw what is around them and simplify this into a basic painting
Students learn to use watercolour and explore techniques in sketchbook
Students learn about Henri Matisse and the random Fauvist use of colour
Students enjoy making a precious painting
Students learn about the basics in Art looking at the elements of Art
Developing an understanding of pattern
A good starter project on the basics in Art
An art study that shows the development of the Modern era in Art from Neo-Classicism, Romanticism, Realism with examples of different artists
It is a detailed slide study with notes on each artist and key examples of artists work and a brief description of each.
It shows how Impressionism came about with clear examples of what this is about.
It is good to use to give students an introduction to how Modern Art developed and enables them to see the development towards the modern era.
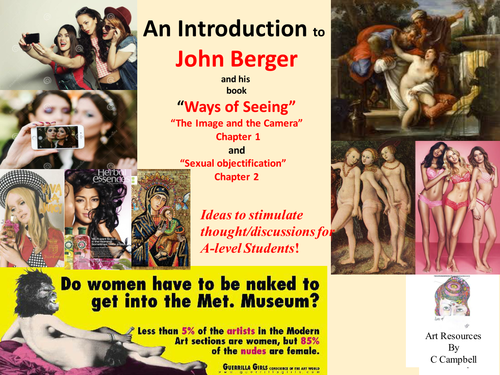
Looking at briefly two chapters of the famous John Berger book ’ Ways of Seeing’ It is difficult to summarise a book of such a wealth of knowledge and such a clever way of phrasing ideas.
The slide presentation gives one a sketch of two chapters. Chapter one which discusses the image versus the photo, seeing versus words and there are a few quotes from John Berger but also the link to the You tube clips.
This is a good A-level presentation and then to get the students to listen to the first two chapters on video clip.
Students need to question how an image has lost its meaning through the advent of the camera and begin to draw a comparison of images before the camera and after the camera.
Students should also look at how the way we have reproduced the female form through the ages from Antiquity to the 21st Century and think about the meaning of what it is to be nude and what it is to be naked. John Berger has a lot of ideas on this and there are lots of phrases from his book discussing this concept and showing some examples of this in some major artworks.
One can never make justice of this incredible book but the slide show does allow for discussion in the class on important concepts and understandings we have of images in our time.
Tasks to develop drawing skills and giving examples and exercises to develop line qualities in drawings.
Looking at various types of lines and ways of drawing with artists examples this is a great project for year 12/13 -AS and A-level class to develop confidence and skills in sketchbooks.
A good way to build skills in art. Gives a variety of tasks and inspiration with a wealth of different lines to use.
Using different types of lines to draw with like, contour lines, pattern lines, expressive lines, structural and modelling lines, diagrammatic lines planning and plotting lines and with examples to support the learning.
There are lots of little exercises to develop confidence in drawing with lines.
Use the Singh Twins to inspire a collage on Self-identity Year 9 project at KS3. Students make a collage of their own photographs and favourite things. Transfer this and trace to a coloured washed background and paint in shapes and add in the fine pen line work to give detail.
This is an examples of photographs of a sketchbook of an A* Art coursework project for an A2 student, who looked at experimental surfaces and textures to develop an exciting unique outcome.
This was based on her nature photographs and showed a number of different layering techniques.
The final piece was a window display made up of glue skins with layers and textures.
There are references to artists she used as well.
This is a project where students are asked to choose an artist to study their style.
Student’s question and develop an understanding of What is a style?
Outcome of this project is that students in year 7 do their own portrait interpretation using the artists and create a mixed media collage based on the selected artist.
There is an exploration on using a variety of media.
Students develop their own skills exploring how to make their own portrait in the style of the artist.
Students use a photocopy of a photograph of themselves to work from.
There is an emphasis on experimentation and students can bring in found textures to collage.
Students use the four artists to make a copy of the four artists styles in a grid on a page: Hundertwasser, Klimt, Ofili and Van Gogh.
TASK 1
The first part of the project is the Artist Research in 4 grids. One for each artist.
Students in the grid discuss the characteristics of each artist’s use of line, colour, shape and texture. There is an individual slide on each artist which highlights with close up pictures showing the markmaking of each artist.
Teacher to go through each slide of each artist and copy the pictures as an example for students to work from.
Students write out the name in each gird, how each artist has a different way of using their marks and then in the grid copies a detail of the artist’s work. This is completed in pencil crayons. Students can also use an object and interpret this in styles - there is an example
Students also brainstorm words to describe the artist. Students also describes the use of elements in each work. Students also discuss the main characteristics of the artist and how they have used their line, colour, shape, texture and how the artist has composed the picture (that is, put it together).
This should take 2 lessons - with students completing the work for homework
TASK 2
Once students have analysed this they can go on to make their own portrait by choosing one of the artists. There are lots of examples of students work in this powerpoint to give examples of how to go about this project. Students to be given a photocopy picture of themselves to work from
This should take 3 lessons in class.
Objectives:
Use of found textures, collage materials and paint to interpret a style looking at the way the student experimented with the use of materials to create the style
Explore media creatively when interpreting artist.
Develop vocabulary and to understand the different ways of using lines, shapes and colours and students begin to analyse the artworks critically describing each work.
To begin to understand that each artist has their own way of interpreting their subject and each person has the own way of making their own style
To analyse and interpret four different artist’s styles and begin to make a personal response to one of these artists.
To complete a self- portrait in the style of an artist.
This is a slide of lots of different images of pictures of portraits and figures.
The next slide is of the vocabulary list and words to match with the pictures.
Print the pictures out on a sheet of A3 and get students to match the visual and words.
This is for any age group and relates to a topic on portraiture.
Students in Cubism No. 2 have made a collage of a celebrity and in this powerpoint students begin to paint this in the style of the analytical cubist artists.
Students use a limited colour scheme like the Cubists and choose two complementary colours.
Students are shown how these colours cancel each other and how to create interesting colours through mixing thse colours and adding white and black.
There are examples of various complementary outcomes and students are given key terms to use in relation to colour. Degraded colours, tint, shade,…
A Still-life project basic one page 5 min scheme with Dirt and Weekly plan.
See the Still-life project on TES.
This is an overview of acstill-life project which entails drawing in different media a still-life composition. Below are a list of all the lessons.
ART THEMES before modern art. What? Modern Art? and Still-life?
Composition? Rule of thirds. Organising still life. Paper prepare: Black/brown paper: newspaper/music, Draw Still-life in line.
3 Exploring pencil mark-making techniques. Pencil tonal study of geometric shapes
4 Pop Art discussions – To make a 2D coloured flat shape area of composition
5 Explore with Oil pastel: Using oil pastel detail
6 and 7 Exploring pen mark-making techniques. To draw over a Cubism Collage using a biro pen
8 Exploring Charcoal techniques Drawing on black paper using white chalk/charcoal.
Research Artist study on Robert Raushenberg library
10 – Evaluation of still-life drawing project
11, 12 and 13 Mod roc Relief
14. Evaluation
This powerpoint is about drawing in charcoal and white chalk on black paper. Students collage a black piece of paper on their paper and then draw a part of their still-life using this technique.
The overall Learning Objectives are:
To develop my understanding of Art and pre-modern art and the meaning of a Still-life drawing.
To develop my observational drawing skills.
To create a Still-life drawing learning to draw carefully from observation with a viewfinder
To learn how to compose a composition using the rule of thirds and developing an understanding of the Golden Mean AND COMPOSITION PRINCIPLES
To develop a further understanding of Pop Art and do a flat colour paper shape detail in your drawing.
To develop my knowledge of the elements of art: lines, shape and form
To develop techniques in different media in my drawing and to explore markmaking of pen, pencil, oil pastel and charcoal.
To practise my observational drawing skills in the following techniques: oil pastel, drawing with a bro pen, using chalk and charcoal
To develop my knowledge of Robert Raushenberg (Pop Art) and practise drawing over a light printed surface with pencil.
To explore developing a relief surface of an area of my still -life drawing and develop this in mod roc technique
This is the final part of a series of Still-life lessons where students do drawings in different techniques and then make a mod-roc outcome.
In this powerpoint the students go to a computer room and do a presentation on the artist LOUISE NEVELSON and then make a mod-roc outcome. Steps are showing how to make the mod-roc relief and criteria for success with this medium.
Students then evaluate their mod-roc outcome by doing a tonal drawing of this and reflect on the outcome
Computer room research: Louise Nevelson - students write and answer the questions and resource information on this artist.
After making the mod-roc students evaluate their mod-roc outcome and do a drawing of your outcome and as a group discuss how they will as a group present their own work like Louise Nevelson.
Learning Objectives:
To explore developing a relief surface of an area of my still -life drawing and develop this in mod roc technique
To build a mod –roc outcome looking at relief techniques
To in a group build your Modroc into a standing tower with the rest of the group.
Do a study of the artist Louise Nevelson and present her work by doing an artist study of her work.
Complete the project by doing an evaluation of their mod-roc relief sculpture and do a pencil drawing of this
In this powerpoint there is cultural information on the symbolism of the peacock in Indian Art and a look at the peacock dance.
Students make a peacock feather drawing looking at a few essential oil pastel techniques: sgrafitto, layering, blending, stippling.
Students then are asked to evaluate this outcome and then as a whole class the second project on the powerpoint is that each student is now asked to make a peacock feather which could then be added to a drawing of the body of the peacock.
Resources given to support this.This could be completed in any medium, pen work or watercolour or oil pastel.
There are examples of different large peacock outcomes in different media and the teacher will need to decide how she would like to do this.
Students are developing an understanding of tonal values and 3D forms and looking at markmaking, and a range of tones and depth of tones.
• Students reflect on what is a shape, and how to turn this into a 3D form and look at ways to do this with some key vocabulary terms.
• Develop an understanding of how to use charcoal and chalk.
• Students on a planning sheet will need to develop their mark making skills to enable them to shade using tones and students will look at various ways to use line techniques to create tone: stippling, hatching, cross hatching, scumbling, contour hatching.
• Students then will look at the lighting of a 3 D form and how the shadow is thrown.
• Students will practice a tonal range on a geometric shape.
Students will then work in a group and each student to draw a geometric shape which can be put together into the fantasy figure composition based on the Surrealism Picasso figures. Examples given of the geometric standing figures of Picasso, De Chirico and Desmond Morris.
Students follow the powerpoint using chalk and charcoal and explore mark making techniques to start.
Then students look at the tonal contrasts and begin to develop a geometric shape.
Each child to do a different geometric shape and in so doing build a figure of the shapes.
Reflection and Evaluation
Activate Prior Knowledge:
Students to complete the questions on slide 2 on a large A2 sheet on what they know about a shape/form/3d. Questions on powerpoint/sheet per child.
Ask students to come to the board to write down the answers.
Ask students about charcoal and get them to explore mark-making on large sheet. Understand how to use charcoal and chalk.
Playfully begin to develop their use of line (mark-making) and tone (contrasts and lighting) by using the chalks and charcoal.
To follow teacher demonstration on the large A1 sugar paper.
Draw out the surrealism fantasy stick figure composition made up of geometric shapes and then each child will begin to start shading their form.
Final Evaluation:
What is creative about the work on Show? How can we improve any of the work on Show?
Who has excelled in their work today? And Why?
If we had to evaluate the outcome – what work shows creativity, imagination and, an attempt to truly achieve success in outcome today?.
Dismiss class
This is a powerpoint on the theme Broken and refers to the Eastern concept of Wabi Sabi - where one sees beauty in imperfections.
There are lots of examples to get students to think of broken and the meaning of this and what is beauty?
Students are asked to do a mind map of broken and try to describe situations where something is broken and what the meaning is of this and question its beauty?
Lots of examples of different examples of artworks to show Broken.
If this was a GCSE theme students to use this as prompts to help develop ideas on the theme.