5 ways to beat behaviour problems in Microsoft Teams

We’ve reached the point of online learning where students are starting to test the boundaries, which means that being on top of behaviour is vital.
But how does that work when you haven’t got access to the tools you normally use? Thankfully, there are plenty of other tools in this brave new online world.
Here’s how to set up your Microsoft Teams classroom to ensure you can deal with behaviour issues without major disruption:
1. The students mute you or remove you from the meeting
You can’t teach if you’re not in the room, so this is a really important setting to get right.
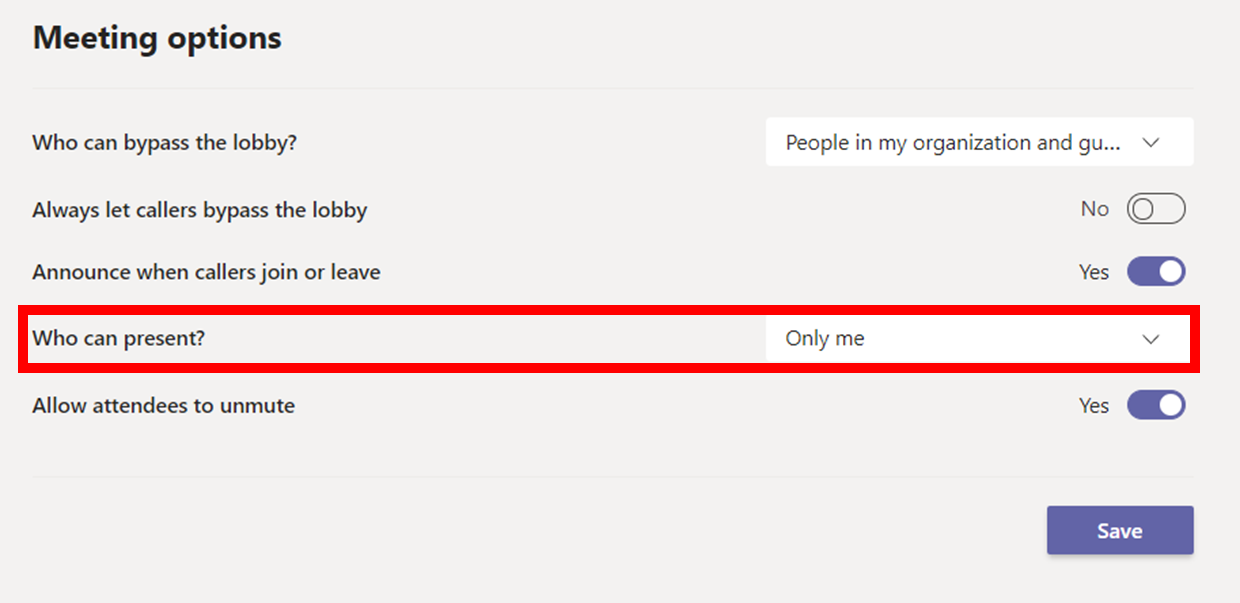
For scheduled meetings, click on the meeting in your calendar and go to meeting options. Change the “who can present” option to “only me”, so everyone joining the meeting will automatically become an attendee.
 For “meet now” meetings, click on the three dots (“more actions” menu) to access the meeting options menu and change “who can present” to “only me”.
 Note: Your Office365 admin can also set this to be the default meeting policy for all meetings, rather than staff having to change it every time.
2. Students calling out and being ‘sent out’
This problem is actually more easily solved in the virtual world.
The default setting for all meetings is for the attendees to be able to unmute themselves. In reality, you will probably need to change this during a lesson.
Click on the three dots “more actions” menu and select “meeting options”. Change the “who can bypass the lobby” to “only me” and the “allow attendees to unmute” to off.
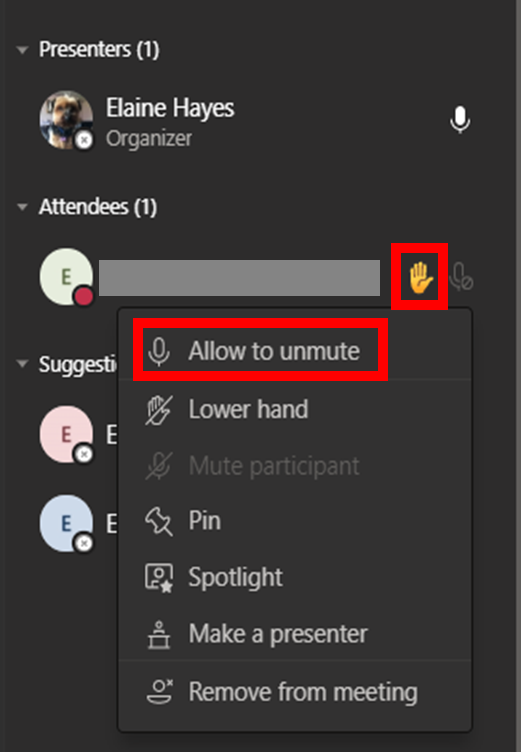
This means you can control who speaks and when. If students need to verbally answer a question, they can raise their hand and you can click alongside their name and give them permission to unmute.


If you need to subsequently remove a student from the lesson, having the lobby set to “only me” will stop a student from popping right back in. This is the virtual equivalent of being sent outside and then peering in through the window or opening the door and calling in.
Setting it up this way means they can still see and contribute in the meeting chat and will have access to any recording that you do after the lesson.
3. Students messing around in the chat
Cat gifs, silly comments, links to their Soundcloud account...the list is endless (unlike your patience).
You can set up extra channels for live lessons and student queries, and these can be moderated through the “manage channel” menu. Turn the moderation on; this means you can turn students’ ability to comment on and off. Private channels do not have this moderation feature.
 If it is just one student causing an issue, click the three dots alongside your team name and click manage team. Scroll down to the “members and guests” list and you can individually mute students so that they cannot post in the team at all. This can be turned on and off - it will come up as chat has been disabled for the muted student.
 4. More chat nonsense
There may be particular behaviour tricks causing you grief: writing sensible replies and then editing them, for example, or students trying to upload apps.
The member permissions menu can help. Click on the three dots alongside the team name and click “manage team”. You can then open settings and the member permissions panel, where you can stop students from being able to delete or edit their messages.

5. Students misusing their cameras
Students’ ability to turn their cameras on and off is controlled through the admin centre by your IT lead. This can be restricted for individual students.
Elaine Hayes is a maths and PE teacher in London. She tweets from @e_hayes12
Register with Tes and you can read two free articles every month plus you'll have access to our range of award-winning newsletters.
Keep reading with our special offer!
You’ve reached your limit of free articles this month.
- Unlimited access to all Tes magazine content
- Save your favourite articles and gift them to your colleagues
- Exclusive subscriber-only stories
- Over 200,000 archived articles
- Unlimited access to all Tes magazine content
- Save your favourite articles and gift them to your colleagues
- Exclusive subscriber-only stories
- Over 200,000 archived articles
