Teaching Art is a feast into a of colour, line, texture, space and shape. By encouraging a visual exploration in my learning I love developing a creative approach to learning in the classroom. By encouraging different techniques and an understanding of art I hope to help students appreciate visual learning more. I hope you enjoy my uploads and can use them. Please contact me if you require any further information.
Teaching Art is a feast into a of colour, line, texture, space and shape. By encouraging a visual exploration in my learning I love developing a creative approach to learning in the classroom. By encouraging different techniques and an understanding of art I hope to help students appreciate visual learning more. I hope you enjoy my uploads and can use them. Please contact me if you require any further information.
A comprehensive drawing powerpoint with different tasks on developing drawing skills, discussions, mark-making exercises, different techniques, methods and examples to support observation skills in the classroom.
To use with GCSE and A-level students to develop their skills in looking at drawings and discussing their techniques but also doing a variety of different tasks to develop their own recording skills.
Learning to work with continuous lines, blind drawing, structural drawings, shading techniques, gestural drawing and free mark-making.
The powerpoint has examples of drawings of a number of artists like, Paul Seurat, Frank Auerbach, Rembrandt and Van Gogh and gives a number of opportunities to learn from these artists and gives different methods to use to strengthen one’s drawing skills.
The powerpoint first of all gives you some techniques to use with paper and students to make a sample board of the techniques.
Homework task: Zentangle …see powerpoint example
Students then go on to draw out an insect and there are symmetry templates for you to use to develop insects.
There are also lots of different resources and pictures of insects to use.
Further task is then to build the paper craft techniques on the pen drawing and to make your relief paper insect. There are examples of different paper techniques and samples to develop.
**Learning Objectives **
Using the topic given insects/birds the aim is to develop their paper art skills and to begin to make an insect. Also, to use skill of symmetry and practise drawing skills and to build a 2D relief insect using paper creatively.
• To learn how to do various paper art techniques and develop ability to manipulate paper.
• To explore a number of different paper craft activities, there are slide examples of techniques.
coiling paper
folding paper
spiraling paper
layering paper
scoring paper
embossing paper
twisting paper
rolling paper
curling paper.
• To EXPLAIN HOW TO carefully draw out insects using the symmetry insects as a guideline.
• To cut out the shapes of insect drawing carefully
• To explore paper techniques.
**Resources **
Large square of re-cycled paper to paste the paper sample techniques on
Glue – pritt stick and pots of glue
Pencils, Scissors
Magazine paper to use to make insects, Pens to draw with
Tracing paper to help with symmetry drawing
**ACTIVITY OBJECTIVES **
To make a sample board of different effects one can achieve when using paper as an art form.
To develop a range of skills to use when working with paper artists and craftsman
To learn to coil, scratch, spiral, fold, bend, cut and lift, twist, emboss, layer, cut, roll and manipulate paper
To learn about different paper artists and craftsmen who work with paper as an art form.
To learn to use paper and to craft various shapes and folds
To learn to build a paper insect using the paper craft techniques, that is, to fold, score, layer, cut, emboss and coil a paper insect
To do homework task: Zentangle insect.
Examples of artists on the Powerpoint to help you to build a 3D paper sculpture with techniques
Also various templates to help you to draw an insect - especially to develop your ability to use symmetry.
Aim to make a small A5 booklet ‘A Beastie Booklet’ and to draw various gargoyles in different techniques and to evaluate their pages.
Aim to make a sculpture in clay of one of the their beastie designs.
The powerpoint also allows students to look at Monster inc and Lisandro Demarchi and to design their own creative beastie or medieval creature.
The powerpoint gives you lots of pictures of gargoyles and examples of student work and refers to different techniques students can do. It also gives a list what should be in the booklet.
There is also an instruction sheet with video links to make a clay pinch pot and how to join this to make animal shapes.
Finally there are examples of students display of their sculptures and booklets.
The project has examples of plant forms to look at and by using Ernst Haeckel and Nikki de St Phalle. The students begin to research their own design plant shape on a presentation sheet. This involves drawing with fine pens over a wash of colour.Examples are given in Powerpoint - lots of pictures of plants and examples of how to do a wash.
Students can also do some Wax and scratch drawings of natural forms using wax crayons and oil pastels. Students then present these on a preparatory sheet- there are examples of this technique.
Secondly students then using their own drawings (wax and scratch) of plants and Niki de St Phalle and Haeckel begin to do a design sheet for their monster plant.
Resources needed: Plastic pot plants to stand the branches and plants in, withies, newspaper, tissue paper, masking tape, PVA glue to make paper mache glue, re-cycled card, re-cycled bottles, acrylic paints to decorate.
The students study they work of Niki De St. Phalle looking at her biomorphic and colourful sculptures and then by using the her work as inspiration plan a design and build a 3D form using withies, found re-cycled plastic bottles and cardboard and construct a plant form in a large plastic plant pot as a basis. There are examples of outcomes and examples of skills to use in the buildong of construction,
The powerpoint has lots of examples to use as inspiration and final examples of outcome.
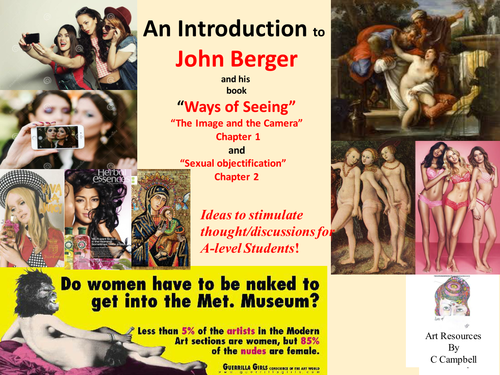
Looking at briefly two chapters of the famous John Berger book ’ Ways of Seeing’ It is difficult to summarise a book of such a wealth of knowledge and such a clever way of phrasing ideas.
The slide presentation gives one a sketch of two chapters. Chapter one which discusses the image versus the photo, seeing versus words and there are a few quotes from John Berger but also the link to the You tube clips.
This is a good A-level presentation and then to get the students to listen to the first two chapters on video clip.
Students need to question how an image has lost its meaning through the advent of the camera and begin to draw a comparison of images before the camera and after the camera.
Students should also look at how the way we have reproduced the female form through the ages from Antiquity to the 21st Century and think about the meaning of what it is to be nude and what it is to be naked. John Berger has a lot of ideas on this and there are lots of phrases from his book discussing this concept and showing some examples of this in some major artworks.
One can never make justice of this incredible book but the slide show does allow for discussion in the class on important concepts and understandings we have of images in our time.
A Key stage 3 project which starts with Figure drawing of class mates - lots of student examples to support and instructions for drawing.
Students then look at modern sculptures and uses them to simplify their figures into abstract shapes. There are once more student examples and clear instructions showing how to simplify. It is important to get students to show the simplification of their figure drawing into an abstract shape.
Students study 4 different sculptural artists - Further task involves doing an artist study on one of the Sculptors: Henri Moore, Anthony Gormley, Barbara Hepworth and Jean Arp and then students make a moodboard of their work. There are sheets for each sculptor showing some info and pictures of each sculptor.
Then there is the making of the sclpture with video clip to explain how to build armature and how to make 3D form using paper mache - there are a lot of good examples of student figures
Students then need to build the figure out of cardboard, papier-mâché, wire, straws and recycled objects and to decorate this with coloured paper, tissue paper and any other embellishments like buttons, beads and string.
Furthermore there is the embellishment of the sculptures…development of design and pattern by looking at Aboriginal Art, Gustav Klimt, African Art, Beatris Milhaze and students have to choose one of these designs to inspire their figure and begin to decorate their figure.
The students then draw out the simplified figure shape with the abstract colourful patterns and present this on a page in their sketchbook.
Finally there is the development of this figure into a hanging mobile looking at the work of Alexander Calder and an evaluation.
A detailed Celtic medieval project looking at examples of how to draw in a simplified stylised way and to represent one’s own family, friends, animals in an illuminated letter.
Students make up two large letters in pencil crayons learning to draw stylising their own pictures and study a number of medieval examples of letters and learn to elongate and to distort their own pictures capturing a simple picture with expression.
Students draw this on white paper their two initials and add in all the medieval patterns. There are loads of examples on this powerpoint of various medieval letters and illuminated manuscripts to copy from to give the students enough resources to work from .
There are also tasks and steps to follow for teachers. An enjoyable project that also should include how to shade carefully using light and dark tones with pencil crayons as part of unit of work and how to draw using warm and cold colours.
The work is finally presented cut out and pasted onto black paper and students can then use oil pastels and further decorate their presentation to create the intricate pattern work of an illuminated manuscript letter.
This is a project to present the work of William Morris in a sketchbook. focusing on lettering in the Arts and Crafts style, it also shows how to do an artist critical study and can be used at KS3 and GCSE.
Success Criteria
Make an elaborate heading for William Morris showing his emphasis on NATURE
Creatively present the pictures on his work
Answer the questions with full sentences describing the characteristics of William Morris.
Copy a detail of his work.
THE POWERPOINT SHOWS how to make a small frame try to draw an enlarge a part of an image of William Morris, that is, crop a section and draw what you see in a box on your page.
(The measurements for the box is 10x12 cm and it can be Portrait or Landscape).
The overall objectives are :
To understand what the elements of art are: line, shape, colour, texture, space, value and tone. This lesson you will be completing an artist study presentation on the work of William Morris and answering the questions and making a critical analysis of his work. We will be presenting examples of William Morris’s work and making a decorative presentation using the word William Morris for a title and presenting this creatively.
A detailed project looking at developing a Still-life project looking at composition, rule of thirds, different techniques for each object with different art styles.
Students firstly, study what is a Still-life and write up a definition for this.
Students then look at what different styles in Art before Modern Art.
Students look in detail at Dutch Still life and the Vanitas still-life.
There is also some information on the Post Impressionist artist Paul Cezanne and his style of brushwork.
A focus on what is still life?, then looking at Pop Art and what is pop Art? Students then answer questions on two Pop Artists: Michael Craig Martin and Patrick Caulfield. Students practise making a background on Pop Art in their sketchbook and answer the questions.
Students develop their own Still-life and are told to bring in objects for their Surreal mixed media Still-life and their are examples of this. Students learn to compose a layout for their still-life final using a Viewfinder and the rules of third, Fibonnacci rule to help them construct a composition. Students develop their own Still-life and are told to bring in objects for their final arrangement.
The emphasis is then to take them through different techniques with each object they brought to class. The techniques included in the project are: Wax and Scratch, Paper collage, Pop Art hard edge colours and outlines, Palette knife painting, Pencil shading and Pen drawing.
There are finally student examples of final outcomes for this project to support the outcome.
This is a project about design and can be used to gain a deeper understamding how positive and negative shapes work. This is about black and white designs using the Notan technique.
This is the balancing of light and dark shapes using a Japanese idea of design.
What is Notan? is the first part of poweerpoint where students develop an understanding of how to use light and dark shapes.
Activity Objective:
To make Notan compositions and learn about balancing light and dark shapes to make a composition.
Looking at Design artists who use Notan: Marimeko, Escher, William Morris
To understand what is the meaning of ‘NOTAN’ and art terms To develop your own Notan design in your book To understand how various designers use the concept of Notan in their work.
Task 1
USING A SQUARE OF COLOURED PAPER or black paper to start
2.DRAW shapes in from the edges of each side of the square.
Draw in from edges
3.CUT OUT SHAPES FROM THE EDGES AND PASTE IN A MIRROR REFLECTION
Task 2
Try add a second layer of shapes in your design into the mirror reflection and reflect this back into design
Watch the video clip from 0.5 - see link in powerpoint
Terms in Art to define
Symmetrical
Asymmetrical
Notan
Balance
Harmony
Positive and Negative shapes
Exercises, activities to develop an understanding of shape and a wide variety of tasks to experiment with the dynamics of shape.
Looking at energy points, different typeface shapes, negative and positive shapes, symmetry patterns, repeat patterns, NOTAN, designing with geometric and organic shapes, drawing shapes to different smells, using music to capture shapes, looking at the meaning of words to capture shapes and the play with tangram shapes.
This can be used with A-level students to inspire, GCSE students for starters and Key Stage 3 to develop a foundation knowledge of the basic element ‘shape’.
There are also a number of different artists like David Bomberg, Joan Miro, Stuart Davis, Escher, Lisa Milroy and Henri Matisse - artists who use a simplified shape in their work and students can interpret there own ideas from these artists.
There are lots of exercises and different tasks to experiment with shapes.
There are two tasks ;
Making your name with zentangle patterns- there are student outcomes and sheets to support this activity.
Students to work in groups making a letter to put together into a word. making a large cardboard letter and use paper craft- ~coiling and quilling to embellish
Learning objective
Students Learn to do lettering and patterns and to make a 3D constuction of letters
Students learn to do block lettering :
Every letter should be 3 blocks across and 5 letters down. The only letters that are different are M which is 4 across and 5 down and W is 5 across and 5 down.
Learning to coil with paper craft students each develop their own letter working in a group. Students to choose one word in a group and to draw the letters of the word out BIG on cardboard
Students Practice drawing out boldly own name using the block lettering sheets provided to support.
Resources
maths block paper
cereal box
felt tips
glossy magazines
pritt stick glue
Describe what type of lines, shapes, space, colour and textures do you see in the work. Try to add one word to the element ……………
For example: Wobbly Lines, Dark Colours, Rough Texture, Mathematical shapes
Wide Space
‘We are learning to develop your written work looking at a work of Michael Craig Martin
We are learning to make a presentation of this in a powerpoint:
We are learning to show slides which should include: Artist name, and pictures of his work,
We are learning to write an analysis using questions on our slides
We are learning to make our own response to the work using pencils, pencil crayons and felt tips
We are learning to reflect on the work of Michael Craig Martin and how he has used still-life.’
Research
On the internet students find examples of the work of
Michael Craig Martin
Choose two images by this artist, one you like and one you do not like.
Students answer the following questions and display visually:
'Why do you like the first image?
Why do you not like the second image?
What bit in each photo do you look at first?"
Students Choose one image to analyze and to use as the basis for their own drawing – the one students are asked to copy. Students evaluate:
“What do you like about this artwork?
Which section do you look at first?
How are you going to copy this artwork (remember its your own version it, not a perfect copy)”
Plan the layout of your page first in pencil, carefully. Presentation is VERY important!
Title: ‘Line, Shape & Colour – Michael Craig-Martin.
Decorate your page.
Next copy one of Craig-Martin’s paintings using colouring pencils.Stufents ask the following questions:
What are your most favourite objects?
What objects do you use all the time?
Are there any objects that you can not do without?
Think carefully about these questions and find 4 images of objects on the internet
You may using the internet or take you own photos.
Try out different viewpoints, fill the photo with the object and photograph on a plain background.
We are going to try to trace off the screen or draw objects with a pencil from the screen
Why do we look at things in certain ways?
How can we make objects look interesting?
Can you guess the objects photographed from different angles?
Divide your page into four sections.
Title: Line, Shape and Form/Overlapping and Composition
Now in each box you are to draw in pencil the outline only of your favourite objects. Try to draw the object four times, once in each block and try to draw a different viewpoint each time
Remember to………….
keep the lines neat and clean.
look carefully at the shape and form of each object.
fill each box with the 4 objects and presentation is important.
4. layout and the way you overlap should be different in each block
Find objects at home to use in your Michael Craig Margin
Interpretation or objects on the internet to copy from
Take at least 4-6 objects and try to combine them together
Plan out a rough sketch first………. See example
This powerpoint supports learning about different drawing techniques in the classroom and using a Feather as a topic.
Feathers are not such difficult objects to draw and students can use this to explore a variety of techniques.
Student draw the feather, in pen, pencil, oil pastel and wax and crayon. Students also do an artist study and present the work of an artist who uses Feathers as their main topic.
Students learn to use a variety of techniques
Overall plan;
Presenting an artist study page: on Chris Maynard
Drawing with Oil pastel and learning various techniques to draw a Peacock feather: Sgrafitto, Tonal work, Blending
Making patterns with felt tips into a feather using zentangle patterns
Making a wax and scratch, that is, using wax crayons and oil pastel and to scratch out the feathers
Furthermore the students after exploring these techniques are asked to make their own very Dream catcher.
Students look at variety of different Dream catchers and go ahead to independently present their own.
There are examples of different dream catchers but also different wishes and needs one would want if one could wish for these things. The powerpoint shows examples of all the objects what one could need. Students soirce and collect poctures of all their needs.
Students can then put their final dream catcher together creatively and be innovative and unique about this.
Attached are three powerpoints for developing a KS3 Collage in Fabric on the 12 Days of Xmas and the artist Aminah Robinson.
Students use the ‘resources’ powerpoint to draw ideas to make up their own design for the 12 days of Xmas.
Class divided and each child gets a different day to design.
I used Black velvet fabric as my backing fabric and each time the student did their drawing I traced this onto different coloured fabric shapes and students then cut this out and pritt sticked this onto the black velvet fabric.
There are three powerpoint lessons attached - first is the resources for designing day of the song.
Second is the Artist interpretation and learning about different fabric artists.
Thirdly, students then cut their designs out in fabric - I used transfer receipt like paper so students could trace onto the fabric and then cut out.
Finally students then embellish their fabric with different stitches and I have a powerpoint with video links on how to do the different stitches: running stitch, blanket stitch, satin stitch, chain stitch and daisy stitch…
In this unit of work studenrs will first of all learn about Hundertwasser and his particular style and then make a clay outcome.
The powerpoints
Drawing exercise - drawing a sphere
4 Tasks to copy symbols and elements: ‘Hunderwasser exercises’
Analysing Hundertwasser and the meaning in his work
Interpretation and makinga a colourful outcome to use as a basis for clay tile: ’ Hunderwasser syymbols/elements’
Making a clay tile
These tasks relate to understanding the key building bricks in Art: Elements of Art and the principles of design and should give you 12 weeks of tasks for students to make two booklets.
Making a booklet on the elements of art and then one on the principles of design.
Understanding these key terms helps in enabling students to write about art and if this is completed at Key Stage 3 can be a real help at GCSE and A-level
Looking at the work of Cindy Sherman in depth with all her major themes and developing one’s own photo-shoot and selfie and a history portrait
Cindy Sherman and her photographs and how she captures gender and stereotypical poses, Alter-ego images, Self-identity figures, Bus riders,
examples of History portraits, Film Stills, grotesque portraits and her Clown images.
There are 11 questions to answer on her work and students should look through the slides and answer the questions analysing her work.
Discussing what makes a gender? What are stereotypes?
The pictures show how Cindy changes her identity showing how we make our own identity and we are not born with it.
There are lots of examples of photographs by Cindy to inspire Year 9/10 and A-level students to question their identity and what makes an identity.
Students should
1 Set up a scene and capture a stereotypical identity they would like to capture or
2 Transform their image completely and to take on a new identity or
3 Capture themselves as they see themselves with all their own interests.
4 Develop a History portrait based on examples of Cindy Sherman.
A detailed set of slides showing the basic elements of art used in Art. Exploring what is a point, line and shape and giving colour theory. This is a supportive project for a Foundation course, Year 12 students to develop a deeper understanding of the principles and elements of Art.