Teaching Art is a feast into a of colour, line, texture, space and shape. By encouraging a visual exploration in my learning I love developing a creative approach to learning in the classroom. By encouraging different techniques and an understanding of art I hope to help students appreciate visual learning more. I hope you enjoy my uploads and can use them. Please contact me if you require any further information.
Teaching Art is a feast into a of colour, line, texture, space and shape. By encouraging a visual exploration in my learning I love developing a creative approach to learning in the classroom. By encouraging different techniques and an understanding of art I hope to help students appreciate visual learning more. I hope you enjoy my uploads and can use them. Please contact me if you require any further information.
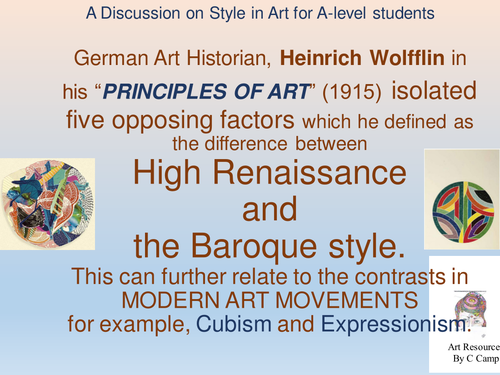
German Art Historian, Heinrich Wolfflin in his “PRINCIPLES OF ART” (1915) isolated five opposing factors which he defined as the difference between
High Renaissance and the Baroque style. This can further relate to the contrasts in MODERN ART MOVEMENTS
There are the 5 main ways of interpreting forms with examples of the work of Heinrich Wolfflin that is:
1. painterly, linear,
2. closed, open,
3. planes and recession,
4. multiplicity, unity,
5. clearness and unclearness.
Wolfflin supports a theory on ways of analysing a painting and examples of style which he formulated between the Renaissance and Baroque style and this gives a good interpretation of the differences in ways of depicting a subject.
In the slide presentation examples are chosen to show the differences in style and hopefully students begin to understand the terminology used and begin to look at the ways different works are composed.
The styles of Wolfflin also link to modern art movements like for example, painterly characterizes the work of Pierre Bonnard, Francis Bacon, Paul Gauguin, Vincent Van Gogh, Rembrandt or Renoir.
Linear characterizes the work of Vermeer or Ingres.
The Impressionists and the Abstract Expressionists tended strongly to be "painterly”, while movements such as Pop Art or photo-realism emphasize flatness and could be referred to more as linear.
This also helps A-level students find their particular strengths and to make them reflect on what particular style they enjoy doing in their own work and gives them an excellent sense of vocabulary to use when analysing artworks and gives them an understanding of using art vocabulary when critically analysing their own and artist’s work.
Students after reviewing the following slides on Wolfflin’s theory and discussing what the differences are in style begin to formulate their own essay on style using 2 artworks of your choice.
TASK: Write an essay on two different artworks and analyse the composition and structure of the artwork in relation to the theories of style of Wolfflin. Begin to not only discuss the visual appearance of the subjects but try to relate this to the influences and background of the particular artists you choose.
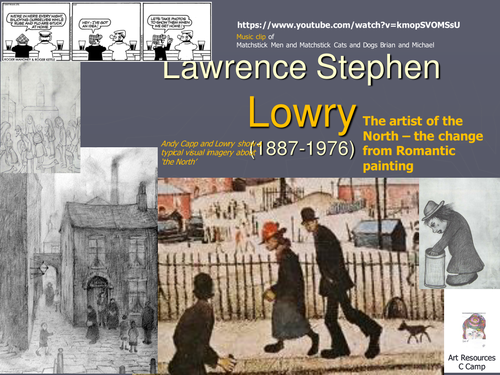
Lots of examples of Lowry's work and his early drawings and the effect of the Industrial revolution on his work.
Students should come to understand his work through the selection of work on the presentation and can do their own version of Lowry working on white painted card or use for GCSE artist for a theme on Architecture.
There is also the famous song 'Matchstick Men and Matchstick Cats and Dogs' by Brian and Michael linked to the presentation.
Students get an insight into this prolific artist of the working class in Manchester and begin to understand the effects of the Industrial Revolution in the North.
This links to Modern movement project and has activities for starters and a list of activities to take place weekly.
It has a Glossary with it for the project.
it has an evaluation for project.
Also resources for students to understand the movements.
There is a separate bundle for the whole project- with all the schemes for each movement with starter activities.
But, the outcomes are successful and students enjoy learning about the art movements and making cup-cakes in the various art styles.
WEEKLY
1 Discuss Art themes
2 Realistic drawing of a cup-cake and shading skills in book
3 Pop Art – To make a 2D relief cup cake using paper cut shapes
4 To draw a cake/biscuit e using the Cubism Collage and capturing geometric shapes light to dark
5 Continuation of drawing of biscuit/cake but doing this in Paint now and capture bright colours- Fauvism
6 Expressionism Doing a polyprint of cup-cake drawing in print and rolling ink
7Doing a Neo-impressionist cake drawing
8 and 9 Surrealism outcome –adding magical creature to cake
Presentation of cupcake stands
Evaluation of project
This is a project where Students interpret one object into different Modern movement styles. This is the style of Cubism when they do a cupcake in the style of Cubism and so learn about the art movement.
Learning Objective:
To develop a cup cake in the Cubism style
using a collage technique
To develop a drawing that shows geometric shapes and shading from light to dark in the shapes
This powerpoint gives you steps to follow for this lesson in class.
Students shade in geometric shapes over a newspaper collage - drawing their cup-cake in a geometric way.
Overall in the project.
Copying a detail from each Modern movement
Collecting a picture of each Modern movement
To understand some key words to describe each modern movements
To understand the key elements in Art: Line, Shape, Colour, Texture, Space
To develop an understanding of the work of Joan Miro by looking at the example ‘The Harlequin Carnival’ and describing what you see.
To draw out a cupcake consolidating what you learnt in class in pencil.
To make a magical creature out of a splash of coffee.
To trace this and to colour this in as best you can.
To then paste your magical creature on the cupcake drawing and to creatively colour this in.
To evaluate your outcome.
To take a photograph of your sheet of A4 paper and to upload this to the Shared drive X.
Task 1
Write for a Heading ‘Surrealism’ on A4 paper Look at the picture by Joan Miro on the right called: ‘ The Harlequin’s Carnival’. This is a typical Surrealist picture.
Describe this work on the paper, describe what you see in one sentence. Write 2 or 3 lines on your paper about this painting using descriptive words.
Task 2
On the piece of A4 paper carefully draw a cup cake. Size about the normal size of a cake place this at the bottom of the A4 paper
Follow the steps on this slide to help you to draw one cupcake.
Draw this lightly with pencil like the examples given on the right.
Task 3
Make a very little coffee, some black coffee in a cup. Wait for this to cool before using this. (You can make the coffee by putting half a cup of water and mix a spoon of coffee with this.)
Splash strong cold coffee on another piece of paper – ( not the drawing paper of cupcake)
When the coffee splash is dry draw in and around this splash in pencil and make a fantasy random magical creature like the examples on this slide and the next three slides
Task 4
Once you have your coffee splash and have drawn around this.
Try to copy this out again, that is, put a piece of white paper over the splash you can use your window light to help you trace it
Colour the tracing in.
Task 5
Cut this out. You have now made a magical creature!
You could outline this darkly with your pencil.
This is the style of Joan Miro –who uses flat shapes. You now need to colour in with flat colour shapes (that is, no shading!) . See examples. You can use pencil crayons and felt tips if you have. If you do not have this just use your pencil to colour this in.
Paste this on your cupcake
Decorate your cupcake creatively with magical creatures.
Task 6
Creatively finish colouring in your cupcake as best you can. You can collage – stick coloured papers and decorate.
Paste this on your A4 sheet with task 1.
Complete a short evaluation. Write next to your cupcake artwork. Telling me what went well and about any issues you had.
Take a photo of your A4 page work.
Save this giving the jpg. your name
Upload this to the Remote Learning Work load.
You will find your class with your name.
Upload this to your name please
In this powerpoint there is cultural information on the symbolism of the peacock in Indian Art and a look at the peacock dance.
Students make a peacock feather drawing looking at a few essential oil pastel techniques: sgrafitto, layering, blending, stippling.
Students then are asked to evaluate this outcome and then as a whole class the second project on the powerpoint is that each student is now asked to make a peacock feather which could then be added to a drawing of the body of the peacock.
Resources given to support this.This could be completed in any medium, pen work or watercolour or oil pastel.
There are examples of different large peacock outcomes in different media and the teacher will need to decide how she would like to do this.
There is one powerpoints - this focuses on the St. George images and on Marc Chagall. In the project students use their imagination and to draw dragons and St. George’s battle. Students look at the Stained Glass artist Marc Chagall and then make up their St. George story on paper to transfer to black paper. There are instructions and worksheets.
Students will need to use a stanley knife and safety working with blades is imperative for this project.
Students need to have very simple designs and stylise their drawings into basic shapes.
Therebis also a section om using a computer to make a symmetry pattern.
WEEKLY Plan
Two lessons weekly 7 weeks to
1/2To look at examples of St George and the Dragon and to draw out one’s own St. George and Dragon picture.
1/2. To look at examples of Stained Glass windows and look at the artist Marc Chagall.
3/4 To simplify the designs of St. George and the Dragon into thick lines and shapes to transfer onto black paper with chalk.
5 /6 To trace designs onto black paper shapes and begin to cut the negative shapes around the lines. To simplify these lines one can take the students to a computer room and do a basic symmetry pattern and lay this over their drawing and students begin to simplify the shapes into geometric forms.
7 / 8.- To make up a sheet of tissue paper on plastic paper to put behind the black paper cut out. Tear or cut the tissue paper into shapes at random and just lay this down on plastic with PVA glue. When this is dry the tissue paper will peel off the plastic.
11 / 12 – To continue to draw into black paper and put together.
13 – Evaluation of project
To design a picture of St. George and the dragon’ on paper using resources in the first powerpoint.
To refine the details of the designs into simple outlines-Teachers could photocopy and enlarge details to help students.
To look at the Stained Glass artist Marc Chagall (second powerpoint) and to think how they could use his style in their work
To transfer designs to black paper and to cut the negative shapes around the lines using the stanley knife.
To make a sheet of coloured paper on a plastic sheet using PVA glue and tissue paper.
This is a Modern Movements Art project.
There are a set of powerpoints for each movement.
Students make cupcakes in different Modern Movement Styles.
This Powerpoint is on the FAuvism Style where students use bright colours of paint at random to capture their cupcake. The students first of all try to understand what is the Fauvism style and look at some examples and then try capture this style in a cup cake to make a cake stand in the end.
Your Learning Objective was:
To draw a detail of a Fauvist artwork
To describe the style of Fauvism using key words.
To write down when Fauvism occurred and who were the famous Fauvist artists
To draw your own Fauvist style cup-cake using bright spontaneous colours of paint and bold outlines
This is a project on Modern Art Movements.
There are a set of powerpoints online relating to this project. The aim is to ,make different objects in separate modern movement styles
The task is to make a cup-cake in differnt modern movements and then to make a cake stand with all the different cup-cakes. This powerpoint is on making a pop art style cup cake using the flat colours, bright and outlined style of Pop Art. The students first try to understand the style in their books and then make the cup cake.
See the other powerpoints for this cup-cake project: on the different Modern Art movements : - Cubism, Surrealism, Expressionism, Neo-impressionism
These are the learning objectives for the project:
To draw a detail of a Pop Art work
To describe the style of Pop Art using key words.
To write down when Pop art occurred and who were the famous pop artists
To draw your own Pop Art style cup-cake
To trace this into coloured paper and make a paper art collage of a cup cake.
This is a Modern Art Movements project where the students make different cup-cakes in the different Art modern movement Styles and then make a cupcake stand with all the different cakes in the different styles displayed.
This is a powerpoint on the relief printing of Expressionist movement. The students use a polyprint block and make their own cupcake in this expressionist style and roll ink.
The students first need to understand the style of the project and learn what the specific characteristics of Expressionism is:
-the harsh agitated lines
-angular marks and the
-dark bright intense colour or just black and white woodcut prints of the Expressionist artists.
This is part of a project of Modern movements where students do all the different styles: Neo-impressionism, Surrealism, Cubism -etc. See the other powerpoints.
Learning Objectives:
To draw a detail of an Expressionist work or use the worksheets to colour in on Expressinism and in so doing develop an understanding of this ‘ism’
Worksheet to print off to describe the work ‘The Scream’ by Edvard Munch
To describe the style of Expressionism using key words.
To use the poloyprint and to make your own Expressionist black and white print of your cupcake in the style of the Expressionists.
This is part of a unit of work called Modern Movements - using cup cakes. This is the first lesson where students explore looking at what are the themes in historical art and how this relates to Modern Art
This first powerpoint explores what is Art and looks at the various subjects of the past master paintings: Still-life, Landscape and Portraits.
Students make a circular collage of examples of themes in Art.
This is the final part of a series of Still-life lessons where students do drawings in different techniques and then make a mod-roc outcome.
In this powerpoint the students go to a computer room and do a presentation on the artist LOUISE NEVELSON and then make a mod-roc outcome. Steps are showing how to make the mod-roc relief and criteria for success with this medium.
Students then evaluate their mod-roc outcome by doing a tonal drawing of this and reflect on the outcome
Computer room research: Louise Nevelson - students write and answer the questions and resource information on this artist.
After making the mod-roc students evaluate their mod-roc outcome and do a drawing of your outcome and as a group discuss how they will as a group present their own work like Louise Nevelson.
Learning Objectives:
To explore developing a relief surface of an area of my still -life drawing and develop this in mod roc technique
To build a mod –roc outcome looking at relief techniques
To in a group build your Modroc into a standing tower with the rest of the group.
Do a study of the artist Louise Nevelson and present her work by doing an artist study of her work.
Complete the project by doing an evaluation of their mod-roc relief sculpture and do a pencil drawing of this
Students given examplesof nature pictures and to create a repeat pattern from a pencil drawing of these pictures Pictures of nature for students to draw from and then how to make a repeat unit from this drawing
Showing how to make a mirror repeat, half-drop repeat, straight repeat and diagonal repeat.
Resources needed: Tracing paper, pencils, calico fabric cut in squares, ink rollers, waterproof inks,
Step by step breakdown of design and printing processes
Guidelines on how to use polyprint. Students make a repeat pattern on fabric and then sew this into a cushion
There are lots of student examples to support
Examples of student work
Success Criteria
Simplifying drawing into a line pattern and making a repeat unit,
Choosing a colour combination for repeat unit and drawing out the unit on fabric
Carefully rolling out the colours and layering the print from light to dark.
Strong contrasts of colour
Careful accurate layering of colours.
This is a very successful drawing lesson to build confidence with drawing. It can be used at any level as skills are on invaluable. It can be stretched over two lessons.
I have a shoe box of little ornaments wrapped in fabric and tied up with tape that I use for this lesson and over the years this is one of my favourite lessons.
I finally tried to make a powerpoint and hope you enjoy !
There is a drawing starter exercise
Then the fun begins
Objectives
To explore observational drawing techniques: blind drawing and contour drawing
To investigate how to capture techniques (markmaking) when drawing
To build confidence in capturing a form with line by using different styles when drawing: gestural drawing and pattern drawing
To develop a design from observational details
There are 17 drawings to make … and each slide gives you the instruction and an example of drawing
Resources
A3 cartridge
sharp 2B pencil
small objects to draw wrapped to start
oil pastel each
Fine-liner each
ruler
pencil rayons
small bit of tracing paper cut in squares ( size of unit for repeat)
starting with the following
. TOUCH DRAWING
Draw through TOUCH ONLY
Feel the object under a cloth draw the object – and try to imagine the shape, texture, and form
Try to draw and outline only.
2 minutes
BLIND DRAWING
Draw with CONTINUOUS LINE and BLINDLY 3 min
Draw the object and draw blindly. DO NOT LOOK AT YOUR PAPER as you draw.
Instead imagine your pencil as a contour ( an ant crawling on the object) exploring all the edges, outlines, shapes, textures and details of the object.
2 minutes…
Follow the slides
There are pictures of student examples.
Success criteria
The line and markmaking quality is MORE important than accuracy
This gives students a realisation that drawing is about lines and marks.
In the first part of the powerpoint students are asked to listen to pieces of music and to formulate slogans from them.
Students then are asked to do a critical analysis of the work of Banksy by selecting one of his works and answering questions.
After this students are asked to copy a picture of Banksy and then make their own collage of his work using magazines and newspapers.
The theme of their poster is on the pandemic.
We will be learning:
To create a poster collage in the style of Banksy that describes the pandemic occurring and linking this to the UK
To use magazines, newspapers and pictures and to make a collage of these to create a poster.
To make a slogan, drawing the lettering or finding letters in magazies or newspaper.
Success Criteria
Your poster must include the following:
A key phrase or work linked to the pandemic
Two image that links to what is happening in the UK
or something that is key in the NEWS.
It should have graffitti style lettering and pencil work
Accurate shape outline
Good use of negative space
Link between font style and theme
Clear placements/readable
• Learning Objectives
To reflect on examples of copies of drawings of different artists and illustrators and analyse the formal elements: shapes, tone, form, lines, texture, and marks.
• To investigate and interpret a variety of selected artists and discuss their sense of style and markmaking
• To study drawings with reference to their visual literacy and the formal elements (tone, texture, colour, line, form).
• To discover the different mark making skills of a number of different artists.
• To research, investigate and develop ideas in a personal way on an A2 sheet.
To develop a visual work of practical responses with annotations.
In this task students are to analyse the drawing styles of particular artists and begin to interpret these different artist’s styles in drawings of their own.
Students use the formal elements to analyse the artists and develop drawings using their own subject as a response with annotations.
• Students draw the hand/feet or a subject of their choice in particular signatures of a selection of artists.
• To reflect on examples of copies of drawings of different artists and illustrators and analyse the formal elements: shapes, tone, form, lines, texture, and marks.
• Try to use different drawing techniques as highlighted by the masters.
This is a good start to critical contextual analysis and gets students to look at a number of artists and develops their visual analysis skills .
Students to end with an A2 or A1 drawing sheet showing their subject in various styles.
The powerpoint first of all gives you some techniques to use with paper and students to make a sample board of the techniques.
Homework task: Zentangle …see powerpoint example
Students then go on to draw out an insect and there are symmetry templates for you to use to develop insects.
There are also lots of different resources and pictures of insects to use.
Further task is then to build the paper craft techniques on the pen drawing and to make your relief paper insect. There are examples of different paper techniques and samples to develop.
**Learning Objectives **
Using the topic given insects/birds the aim is to develop their paper art skills and to begin to make an insect. Also, to use skill of symmetry and practise drawing skills and to build a 2D relief insect using paper creatively.
• To learn how to do various paper art techniques and develop ability to manipulate paper.
• To explore a number of different paper craft activities, there are slide examples of techniques.
coiling paper
folding paper
spiraling paper
layering paper
scoring paper
embossing paper
twisting paper
rolling paper
curling paper.
• To EXPLAIN HOW TO carefully draw out insects using the symmetry insects as a guideline.
• To cut out the shapes of insect drawing carefully
• To explore paper techniques.
**Resources **
Large square of re-cycled paper to paste the paper sample techniques on
Glue – pritt stick and pots of glue
Pencils, Scissors
Magazine paper to use to make insects, Pens to draw with
Tracing paper to help with symmetry drawing
**ACTIVITY OBJECTIVES **
To make a sample board of different effects one can achieve when using paper as an art form.
To develop a range of skills to use when working with paper artists and craftsman
To learn to coil, scratch, spiral, fold, bend, cut and lift, twist, emboss, layer, cut, roll and manipulate paper
To learn about different paper artists and craftsmen who work with paper as an art form.
To learn to use paper and to craft various shapes and folds
To learn to build a paper insect using the paper craft techniques, that is, to fold, score, layer, cut, emboss and coil a paper insect
To do homework task: Zentangle insect.
Examples of artists on the Powerpoint to help you to build a 3D paper sculpture with techniques
Also various templates to help you to draw an insect - especially to develop your ability to use symmetry.
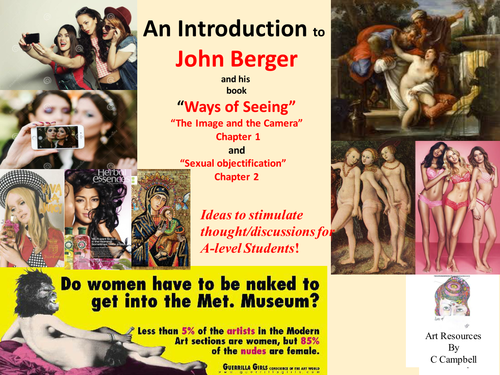
Looking at briefly two chapters of the famous John Berger book ’ Ways of Seeing’ It is difficult to summarise a book of such a wealth of knowledge and such a clever way of phrasing ideas.
The slide presentation gives one a sketch of two chapters. Chapter one which discusses the image versus the photo, seeing versus words and there are a few quotes from John Berger but also the link to the You tube clips.
This is a good A-level presentation and then to get the students to listen to the first two chapters on video clip.
Students need to question how an image has lost its meaning through the advent of the camera and begin to draw a comparison of images before the camera and after the camera.
Students should also look at how the way we have reproduced the female form through the ages from Antiquity to the 21st Century and think about the meaning of what it is to be nude and what it is to be naked. John Berger has a lot of ideas on this and there are lots of phrases from his book discussing this concept and showing some examples of this in some major artworks.
One can never make justice of this incredible book but the slide show does allow for discussion in the class on important concepts and understandings we have of images in our time.
A detailed project looking at developing a Still-life project looking at composition, rule of thirds, different techniques for each object with different art styles.
Students firstly, study what is a Still-life and write up a definition for this.
Students then look at what different styles in Art before Modern Art.
Students look in detail at Dutch Still life and the Vanitas still-life.
There is also some information on the Post Impressionist artist Paul Cezanne and his style of brushwork.
A focus on what is still life?, then looking at Pop Art and what is pop Art? Students then answer questions on two Pop Artists: Michael Craig Martin and Patrick Caulfield. Students practise making a background on Pop Art in their sketchbook and answer the questions.
Students develop their own Still-life and are told to bring in objects for their Surreal mixed media Still-life and their are examples of this. Students learn to compose a layout for their still-life final using a Viewfinder and the rules of third, Fibonnacci rule to help them construct a composition. Students develop their own Still-life and are told to bring in objects for their final arrangement.
The emphasis is then to take them through different techniques with each object they brought to class. The techniques included in the project are: Wax and Scratch, Paper collage, Pop Art hard edge colours and outlines, Palette knife painting, Pencil shading and Pen drawing.
There are finally student examples of final outcomes for this project to support the outcome.