- Home
- Teaching & Learning
- General
- Five shortcuts for creating video lessons
Five shortcuts for creating video lessons

The pandemic brought about many temporary changes for teaching and learning - but unlike school closures, the use of video lessons is here to stay. Schools may be running as normal for now, but many teachers are creating banks of video resources to ensure education can continue, even if a child has to isolate at home. Video lessons are also great at supporting teaching within school, providing homework resources, allowing learners to recap lessons and supporting revision.
I’ve been producing video lessons since 2011, and it does take time and energy. But over the years, I’ve found a few shortcuts which make the production much easier to manage.
Be selective about topics
Not all topics translate well to video. Instead of trying to convert the whole curriculum, use your professional judgement and experience as a teacher to select the topics you think will work well.
More:
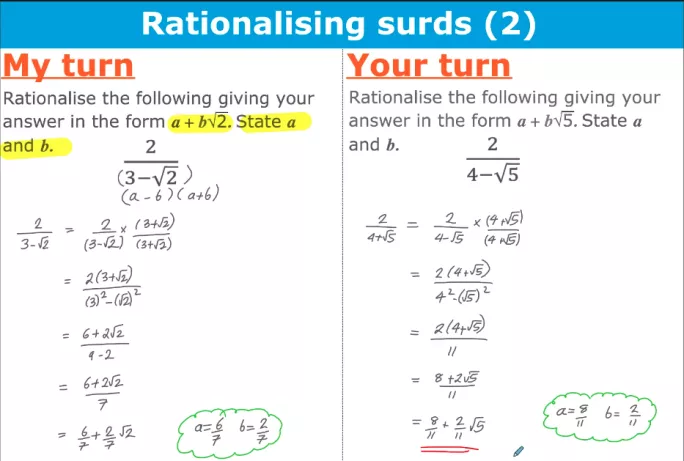
Certainly, any topic which needs to be modelled can work well as a video lesson. A good layout for this is the my turn / your turn split screen - see below. It’s also worth considering making videos of topics fundamental to a subject, for example, point, evidence, explanation in English or fractions of an amount in maths, to ensure students can always revisit these easily.

Format for videos
I’d advise against fast-moving videos with pictures and graphics - while they can be more entertaining and engaging, they distract from the learning. The more you can replicate what you do in class, the better the video is. “Writing along” in your video is a great way to adopt a pace similar to classroom teaching which helps a student to keep up.
It’s worth thinking about what you want students to have written in their books by the end of the lesson. For instance, if you want them to take notes, can you share an example of your notes at the start so they understand what they need to do?
Invest time in getting your video right at the start
A video lesson will be used by lots of students so it’s important to make it your best lesson. It will take a few takes but saves time in the long run. Having to go back into a completed video to change something and re-edit is much more time-consuming.
If you make a mistake when recording a video just stop talking but don’t cut the video. Simply note the time and then start talking from the last sensible voice break. This means you don’t need to re-shoot the whole video but allows you to edit out the error.
Split videos into chunks
Short videos are always best. If your lesson is 20 minutes, break it up into 10 two-minute chunk lessons. This is more flexible, it makes editing easier if you’ve made a mistake and if the curriculum changes, you need only remove the video that is no longer relevant.
Avoid age or key stage
Don’t include anything in the onscreen graphics or title which suggests a video is relevant to only one age group. There’s a real risk that students will disregard a video which they believe isn’t for their age. Instead, describe the topic that the lesson covers. Video lessons still need to be labelled for age, etc. but add this to tags rather than in anything a student will see.
Creating video lessons is not only helpful for your students but is also a valuable way to reflect on your practice. Although you may dread seeing or hearing yourself on film, watching your lesson provides valuable insight into your teaching and how you can continue to hone it. Good luck.
Colin Hegarty is director of education at Sparx Learning and founder of HegartyMaths
Register with Tes and you can read two free articles every month plus you'll have access to our range of award-winning newsletters.
Keep reading with our special offer!
You’ve reached your limit of free articles this month.
- Unlimited access to all Tes magazine content
- Save your favourite articles and gift them to your colleagues
- Exclusive subscriber-only stories
- Over 200,000 archived articles
- Unlimited access to all Tes magazine content
- Save your favourite articles and gift them to your colleagues
- Exclusive subscriber-only stories
- Over 200,000 archived articles
topics in this article


